24 Easy Halloween Treats School Kids Love
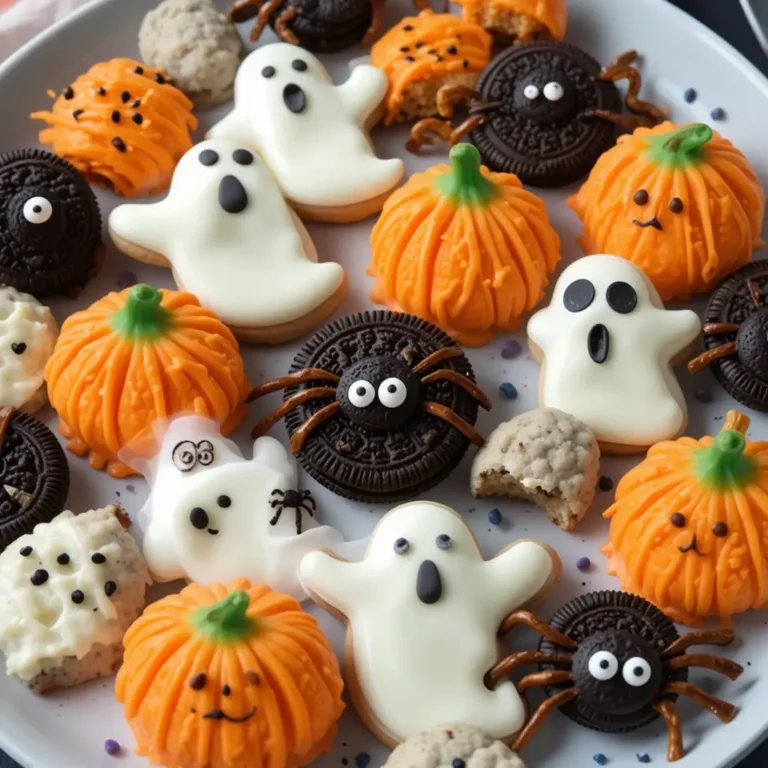
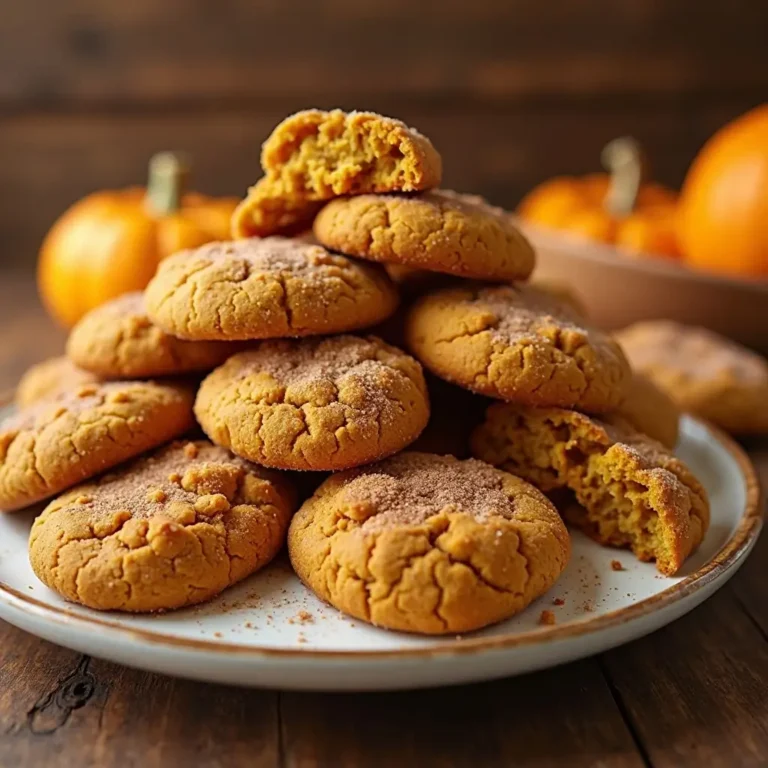
Looking for spooky yet simple halloween treats school parties will adore? These adorable monster cookies are bursting with colorful chocolate candies, creamy peanut butter, and soft oats that create the perfect chewy texture.
Here’s a fun fact: Halloween candy sales exceed $3 billion annually, but homemade treats create memories that last forever! These monster cookies are special because they’re nut-free friendly, take just 25 minutes from start to finish, and let kids get creative with decorating.
Much like our popular Pumpkin Spice Cupcakes that readers rave about, these treats bring festive joy without complicated steps. Get ready to become the hero of the class party with these irresistibly fun halloween treats school kids will devour!
What Are Halloween Monster Cookies?
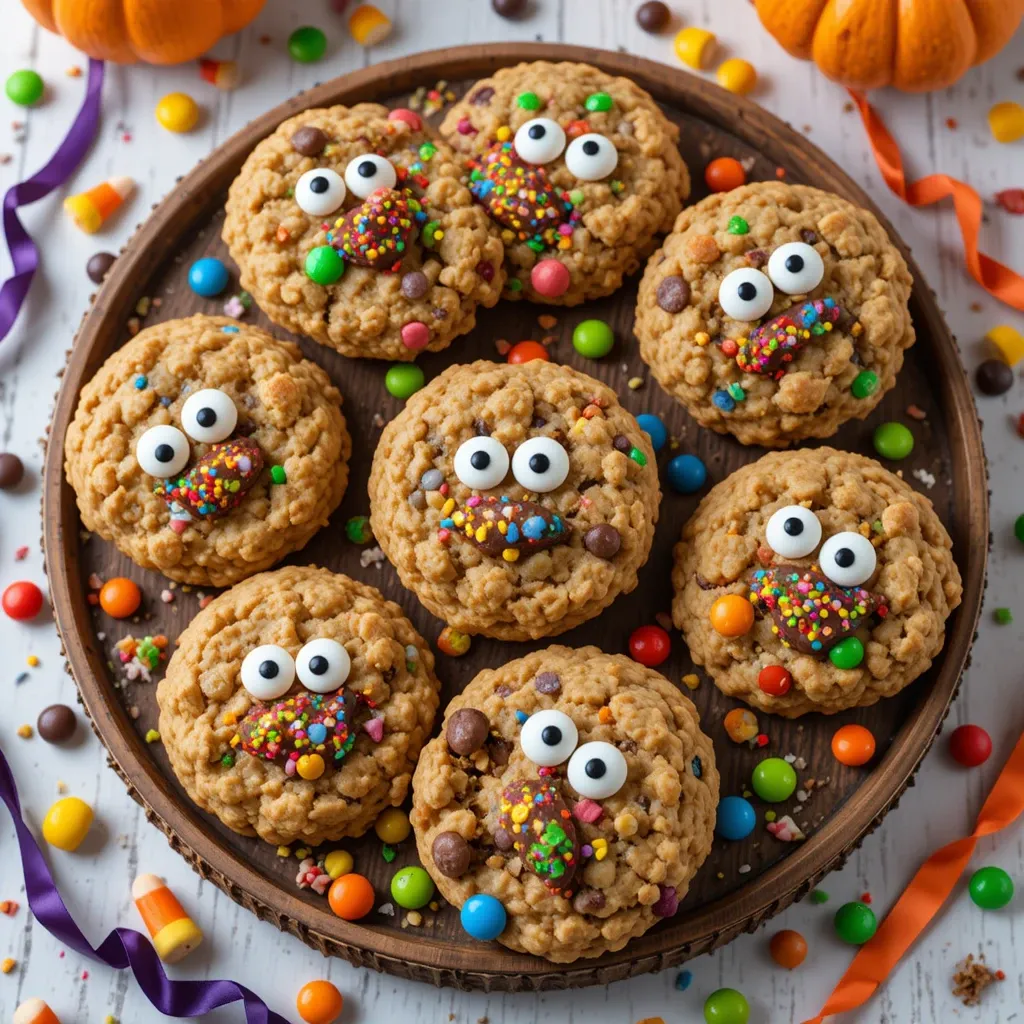
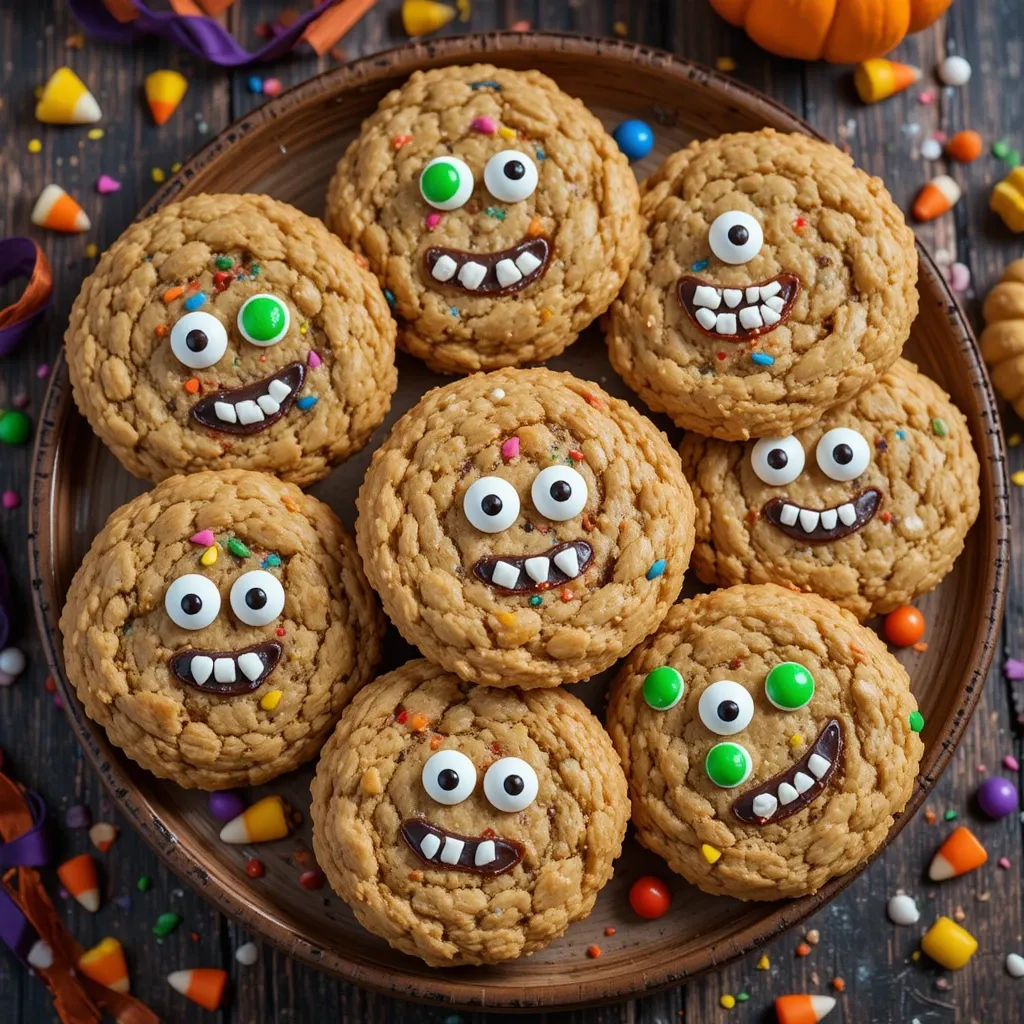
What makes a cookie transform into a monster? Is it the googly candy eyes staring back at you, or the vibrant M&Ms creating a rainbow of “warts”? These halloween treats school celebrations need are essentially loaded oatmeal cookies disguised as friendly creatures.
The playful name comes from their wild appearance—each cookie looks delightfully different, like little monsters at a Halloween party!
After all, they say the way to a man’s heart is through his stomach, and the way to a child’s smile is through colorful, fun treats. Don’t wait until October 31st—start baking these monster cookies today and watch them disappear faster than ghosts at dawn!
Why You’ll Love These Halloween Treats School Parties Need
Perfect for Classroom Celebrations
These monster cookies are the ultimate halloween treats school guidelines approve of because they’re individually wrapped, easy to transport, and don’t require refrigeration. The main highlight? Kids absolutely love decorating their own monsters, making this recipe both a treat and an activity. Each cookie features a perfect balance of chewy oats, sweet chocolate chips, and that nostalgic peanut butter flavor that brings smiles to faces young and old.
Budget-Friendly Baking
Making halloween treats school parties love at home saves you serious money compared to store-bought options. A batch of 24 cookies costs under $8, while bakery Halloween cookies run $2-3 each. You’re looking at $48 in savings while creating something far more special and personalized! Plus, you probably have most ingredients in your pantry already.
Customizable and Allergy-Conscious
The beauty of these cookies lies in their flexibility. Swap peanut butter for sunflower seed butter to make them completely nut-free. Use dairy-free chocolate chips for lactose-intolerant children. Add orange food coloring to the dough for extra Halloween flair, or press candy corn into the tops for festive decoration. Similar to our Monster Munch Snack Mix that offers variety, these cookies let you customize every batch to suit different dietary needs and taste preferences.
Ready to create the most talked-about halloween treats school has ever seen? Let’s get baking and make this October unforgettable!
How to Make Halloween Monster Cookies
Quick Overview
These halloween treats school kids adore are surprisingly simple to whip up. The cookie dough comes together in one bowl, requires no chilling time, and bakes to perfection in just 10 minutes. You’ll love the soft, chewy texture combined with pockets of melted chocolate and the satisfying crunch of M&Ms. The “monster” decorating happens after baking, making this a fun activity for kids to help with.
Time Breakdown:
- Prep Time: 15 minutes
- Baking Time: 10 minutes per batch
- Decorating Time: 10 minutes
- Total Time: 35 minutes
- Yield: 24 cookies
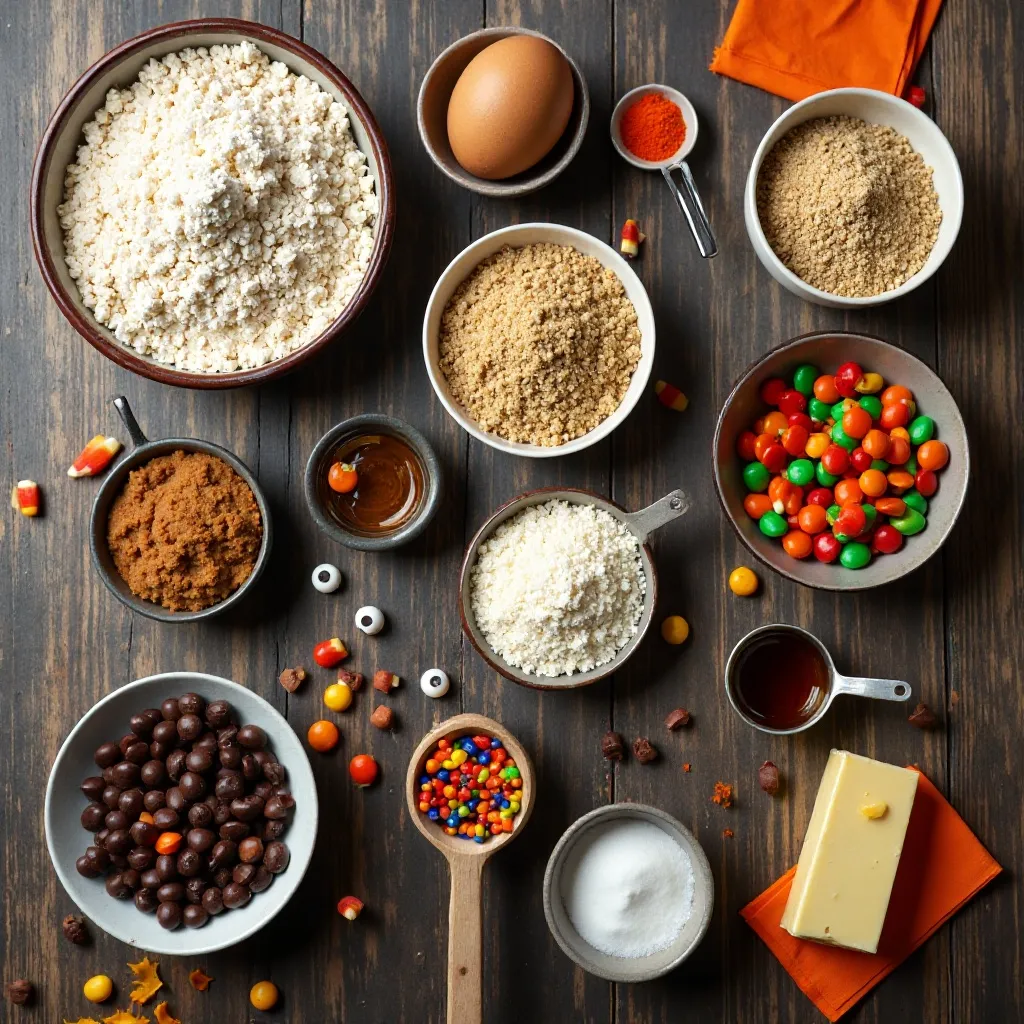
Key Ingredients for Halloween Monster Cookies
Dry Ingredients:
- 1 cup all-purpose flour
- 1 cup quick-cooking oats
- ½ teaspoon baking soda
- ½ teaspoon baking powder
- ¼ teaspoon salt
Wet Ingredients:
- ½ cup unsalted butter, softened
- ½ cup creamy peanut butter (or sunflower seed butter)
- ½ cup granulated sugar
- ½ cup packed brown sugar
- 1 large egg
- 1 teaspoon vanilla extract
Mix-Ins and Decorations:
- 1 cup mini chocolate chips
- ½ cup M&Ms (orange, purple, and green for Halloween)
- 48 candy eyeballs (2 per cookie)
- Additional M&Ms for decorating after baking
Step-by-Step Instructions
Step 1: Preheat and Prepare
Start by preheating your oven to 350°F (175°C). Line two large baking sheets with parchment paper or silicone baking mats. This prevents the cookies from sticking and ensures easy cleanup. Set these aside while you prepare the dough.
Step 2: Mix the Dry Ingredients
In a medium bowl, whisk together the flour, oats, baking soda, baking powder, and salt. Make sure everything is evenly distributed. The oats give these halloween treats school texture and heartiness, while the leavening agents help them puff up beautifully in the oven. Set this bowl aside.
Step 3: Cream the Butter and Sugars
In a large mixing bowl, use an electric mixer on medium speed to beat the softened butter, peanut butter, granulated sugar, and brown sugar together. Beat for 2-3 minutes until the mixture becomes light and fluffy. This step incorporates air into the dough, creating a softer cookie texture. The mixture should look pale and creamy.
Step 4: Add Egg and Vanilla
Add the egg and vanilla extract to the butter mixture. Beat on medium speed for another minute until everything is fully combined. The egg binds the ingredients together while the vanilla adds depth of flavor. Make sure to scrape down the sides of the bowl with a spatula to ensure even mixing.
Step 5: Combine Wet and Dry Ingredients
Add the dry ingredient mixture to the wet ingredients. Using a wooden spoon or sturdy spatula, stir until just combined. Don’t overmix—stop as soon as you no longer see streaks of flour. Overmixing can make your cookies tough instead of tender. The dough will be thick and slightly sticky.
Step 6: Fold in the Goodies
Fold in the mini chocolate chips and ½ cup of M&Ms. Distribute them evenly throughout the dough. These colorful additions make your halloween treats school parties stand out and add bursts of chocolate in every bite.
Step 7: Shape the Cookies
Using a medium cookie scoop (about 2 tablespoons), drop balls of dough onto your prepared baking sheets. Space them about 2 inches apart as they’ll spread during baking. You should get approximately 12 cookies per sheet. For uniform cookies, roll each scoop between your palms to create smooth balls before placing them on the sheet.
Step 8: Bake to Perfection
Bake one sheet at a time on the center rack for 10-12 minutes. The cookies are done when the edges are lightly golden but the centers still look slightly underdone. They’ll continue cooking on the hot pan after you remove them from the oven. This ensures a soft, chewy center—the hallmark of perfect monster cookies!
Step 9: Cool Slightly
Let the cookies cool on the baking sheet for 5 minutes. This cooling time allows them to set up enough to transfer without breaking. After 5 minutes, carefully move them to a wire cooling rack.
Step 10: Decorate Your Monsters
Here’s where the magic happens! While the cookies are still slightly warm (but cool enough to handle), gently press two candy eyeballs onto each cookie. Add extra M&Ms to create colorful “spots” or “warts.” You can also use orange or black icing to draw mouths, add candy corn as “fangs,” or get creative with any Halloween sprinkles you have on hand. This is the perfect step to let kids help with—each monster will have its own unique personality!
Step 11: Let Them Set
Allow the decorated cookies to cool completely on the wire rack. The chocolate will set, and the decorations will stick firmly to the cookies. This takes about 20-30 minutes. Once cooled, your halloween treats school will love are ready to pack up and share!
What to Serve Halloween Monster Cookies With
These versatile halloween treats school celebrations need pair wonderfully with various beverages and snacks:
For Kids’ Parties:
- Cold milk (regular, chocolate, or strawberry)
- Apple cider (warm or cold)
- Orange-colored punch or lemonade
- Hot chocolate with marshmallow ghosts
Complementary Treats:
- Fresh apple slices with caramel dip
- Cheese and crackers for a savory balance
- Popcorn balls or caramel corn
- Veggie cups with ranch dip (for the health-conscious parents)
For Adult Gatherings:
- Hot coffee or espresso
- Pumpkin spice lattes
- Spiced chai tea
- Even a glass of dessert wine for evening celebrations
These cookies also make excellent additions to Halloween treat bags, school lunch boxes, or party favor boxes. Wrap them individually in clear cellophane bags tied with orange and black ribbon for an extra festive touch!
Top Tips for Perfecting Halloween Monster Cookies
Don’t Skip the Softened Butter
Make sure your butter is truly softened to room temperature—not melted. Softened butter should give slightly when pressed but still hold its shape. This ensures proper creaming with the sugars, which creates the perfect cookie texture. If you forgot to take it out early, cut the butter into small cubes and let it sit for 15-20 minutes.
Use Fresh Baking Soda
Check the expiration date on your baking soda. Old leavening agents won’t give you the rise and texture you need. If your baking soda is more than 6 months old, replace it for the best results in your halloween treats school parties deserve.
Don’t Overbake
The biggest mistake people make is overbaking these cookies. They should look slightly underdone in the center when you remove them from the oven. The residual heat continues cooking them on the pan. Overbaked cookies become hard and crunchy instead of soft and chewy.
Chill Your Dough for Thicker Cookies
If you prefer thicker, puffier cookies, refrigerate the dough for 30 minutes before baking. Cold dough spreads less in the oven, resulting in taller cookies with a chewier center. This extra step isn’t necessary but makes a noticeable difference if thickness is important to you.
Make Them Nut-Free
For nut-free halloween treats school requires, substitute the peanut butter with an equal amount of sunflower seed butter or soy nut butter. The texture and taste remain nearly identical. WowButter and SunButter are excellent brands specifically designed to mimic peanut butter’s consistency.
Customize Your Monster Look
Get creative with decorations! Use different colored candy eyes (find them in the baking aisle), various sizes of M&Ms, candy corn pieces, chocolate chips, or even small pretzels as “antlers.” Let each family member create their own monster design. Take photos of the creations before they get devoured—kids love seeing their edible art!
Measure Flour Correctly
Too much flour makes cookies dry and cakey. Use the spoon-and-level method: spoon flour into your measuring cup and level it off with a knife. Never pack the flour down or scoop directly from the bag, as this compacts it and adds excess flour to your dough.
Room Temperature Egg
Use a room-temperature egg for better incorporation into the dough. If you forgot to take it out, place the egg in a bowl of warm water for 5 minutes before cracking it.
Storing and Reheating Tips
Room Temperature Storage
Store your halloween treats school in an airtight container at room temperature for up to 5 days. Place a piece of bread in the container—it releases moisture that keeps the cookies soft. Replace the bread slice every couple of days. Layer cookies with parchment paper if stacking to prevent the decorations from sticking together.
Refrigerator Storage
While not necessary, you can refrigerate these cookies for up to 2 weeks in an airtight container. This is especially useful if your kitchen is very warm or humid. Let them come to room temperature for 15 minutes before serving for the best flavor and texture.
Freezing the Cookies
These cookies freeze beautifully for up to 3 months! Place completely cooled, decorated cookies in a single layer on a baking sheet and freeze for 1 hour. Then transfer them to a freezer-safe container or zip-top bag, separating layers with parchment paper. This prevents the decorations from getting smashed. Thaw at room temperature for 30 minutes before serving.
Freezing the Dough
You can also freeze the unbaked cookie dough! Shape the dough into balls, freeze them on a baking sheet for 1 hour, then transfer to a freezer bag for up to 3 months. Bake from frozen, adding 2-3 extra minutes to the baking time. Decorate after baking as usual. This is perfect for making halloween treats school needs fresh on demand!
Reheating Tips
For a fresh-from-the-oven experience, warm cookies in a 300°F oven for 3-5 minutes. This softens them and makes the chocolate slightly melty again. Alternatively, microwave individual cookies for 8-10 seconds. Be careful not to overheat, or the candy decorations will melt.
Frequently Asked Questions
Can I make these cookies without peanut butter?
Absolutely! Many schools have strict nut-free policies for halloween treats school parties. Substitute peanut butter with an equal amount of sunflower seed butter (SunButter), soy nut butter (WowButter), or even cookie butter. The texture remains wonderfully soft and chewy. You might notice a slightly different flavor, but these alternatives work perfectly for nut-allergic children.
How do I keep the candy eyes from falling off?
The trick is timing! Press the candy eyes onto the cookies while they’re still slightly warm but not hot. The residual heat softens the chocolate on the back of the candy eyes just enough to create a seal. If your cookies have cooled completely, use a tiny dab of frosting or melted chocolate as “glue” to attach the eyes.
Can I use old-fashioned oats instead of quick oats?
Yes, but your cookies will have a chewier, heartier texture with more noticeable oat pieces. Quick oats are finer and create a smoother texture that’s more traditional for monster cookies. If you only have old-fashioned oats, pulse them a few times in a food processor to break them down slightly before using.
My cookies spread too much. What went wrong?
Several factors cause excessive spreading: butter that’s too warm or melted, dough that’s too warm, or not enough flour. Make sure your butter is softened but not melted. If your kitchen is warm, chill the dough for 30 minutes before baking. Also, verify you measured the flour correctly using the spoon-and-level method rather than scooping directly from the bag.
Are these cookies safe to send to school?
These halloween treats school parties love are generally safe, but always check your school’s specific policies. Many schools prohibit homemade treats due to allergy concerns, while others have nut-free requirements. If peanut butter is an issue, use the sunflower seed butter substitution mentioned above. For schools requiring store-bought items, consider making these for home celebrations instead.
Can I make these cookies smaller or larger?
Definitely! For mini monster cookies perfect for younger children, use a small cookie scoop (1 tablespoon) and reduce baking time to 8-9 minutes. For jumbo cookies, use a large scoop (3 tablespoons) and increase baking time to 13-15 minutes. Adjust the number of decorations accordingly—mini cookies need just one eye each!
What other candies can I use for decorating?
The decoration possibilities are endless! Try candy corn, Halloween sprinkles, mini marshmallows, Reese’s Pieces, Skittles, gummy worms cut into small pieces, chocolate chips of various colors, or even small pretzel pieces. Black icing can create spider webs or spooky faces. Let your creativity run wild—that’s what makes these halloween treats school kids remember!
Do I have to use both chocolate chips and M&Ms?
You can customize the mix-ins however you prefer! Use all chocolate chips, all M&Ms, or try other additions like butterscotch chips, white chocolate chips, or peanut butter chips. The total amount of mix-ins should stay around 1.5 cups for the best texture. Different combinations create unique flavor profiles while maintaining that classic monster cookie appearance.
Nutrition Information
| Nutrient | Per Cookie |
|---|---|
| Calories | 165 |
| Total Fat | 8g |
| Saturated Fat | 4g |
| Cholesterol | 18mg |
| Sodium | 95mg |
| Total Carbohydrates | 22g |
| Dietary Fiber | 1g |
| Sugars | 14g |
| Protein | 3g |
Nutritional values are approximate and based on standard ingredient measurements. Values may vary based on specific brands used and decoration choices.
Additional Tips for Making These Halloween Treats School-Ready
Packaging Ideas for School Distribution
Presentation matters when sending halloween treats school! Individual packaging ensures hygiene and makes distribution easier. Slip each cookie into a small cellophane bag and tie with orange and black curling ribbon. Add a small tag that says “From [Your Child’s Name]” for a personal touch. Stack them in a decorated shoebox or Halloween basket for easy transport.
Making Ahead for Busy Parents
Life gets hectic during Halloween season! Prepare the cookie dough up to 2 days ahead and store it covered in the refrigerator. Let it sit at room temperature for 15 minutes before scooping and baking. Alternatively, bake the cookies 1-2 days early and store them in an airtight container—they’ll actually taste even better as the flavors meld together.
Involving Kids in the Process
Turn these halloween treats school parties need into a family activity! Kids ages 4 and up can help measure dry ingredients, press cookie dough onto sheets (with supervision), and especially love the decorating portion. Younger children can sort M&Ms by color, count candy eyes, or help press decorations onto cooled cookies. This builds their confidence in the kitchen while creating lasting memories.
Dietary Modifications
Gluten-Free: Replace all-purpose flour with a 1:1 gluten-free baking flour blend. Bob’s Red Mill and King Arthur Measure for Measure work excellently. Ensure your oats are certified gluten-free as well.
Dairy-Free: Use dairy-free butter (Earth Balance or Miyoko’s) and check that your chocolate chips and candies are dairy-free. Enjoy Life brand makes excellent allergy-friendly chocolate chips.
Reduced Sugar: Cut the sugars by ¼ cup each for a less sweet version. The cookies will be slightly less soft but still delicious. You can’t eliminate the sugar entirely as it affects texture.
Vegan: Use a flax egg (1 tablespoon ground flaxseed + 3 tablespoons water, let sit 5 minutes), dairy-free butter, and ensure all chocolate and candies are vegan. The texture will be slightly denser but still tasty.
Why Homemade Beats Store-Bought
Making halloween treats school celebrates at home offers benefits beyond just cost savings. You control exactly what goes into your cookies—no artificial preservatives, mysterious ingredients, or excessive amounts of corn syrup. You can adjust sweetness levels, accommodate specific allergies, and create treats that align with your family’s dietary values.
There’s also something deeply satisfying about sending your child to school with homemade goodies. Other kids remember “the delicious cookies [Your Child’s Name]’s parent made,” which builds positive social connections. Your child feels proud sharing something you made together, and you’ll love seeing their excited face when they help pack up the treats.
Plus, homemade halloween treats school parties appreciate tend to taste significantly better than mass-produced alternatives. Fresh-baked cookies with real butter and quality chocolate simply can’t be beaten!
Final Thoughts
These monster cookies prove that halloween treats school parties love don’t have to be complicated or time-consuming. With simple ingredients, minimal prep work, and maximum fun factor, you’ve got a winning recipe that satisfies kids, parents, and teachers alike. The best part? These cookies work for far more than just school—think fall festivals, Halloween parties, trick-or-treater rewards, or just because it’s October and you want something festive!
Remember that baking should be enjoyable, not stressful. If your monsters don’t look perfect, that’s absolutely okay—each wonky eye and crooked smile adds to their charm. The goal is creating delicious treats and happy memories, not competing for a spot on a professional baking show.
So gather your ingredients, preheat that oven, and get ready to create the halloween treats school has been waiting for. Your kitchen will smell amazing, your kids will have a blast decorating, and come party day, you’ll be the hero who brought the good stuff. Happy baking, and have a spook-tacular Halloween!