Thanksgiving Pilgrim Hat Cookies Recipe Everyone Will Love
These adorable Thanksgiving pilgrim hat cookies are the perfect festive treat to sweeten your holiday celebration! With their charming pilgrim hat design, buttery cookie base, and chocolate-covered centers, they’re guaranteed crowd-pleasers.
What makes them truly special is how simple they are to create – no baking experience required! Just three ingredients and 15 minutes stand between you and these Instagram-worthy desserts. Kids absolutely love helping assemble these cute treats, making them perfect for family bonding time.
What Are Thanksgiving Pilgrim Hat Cookies?
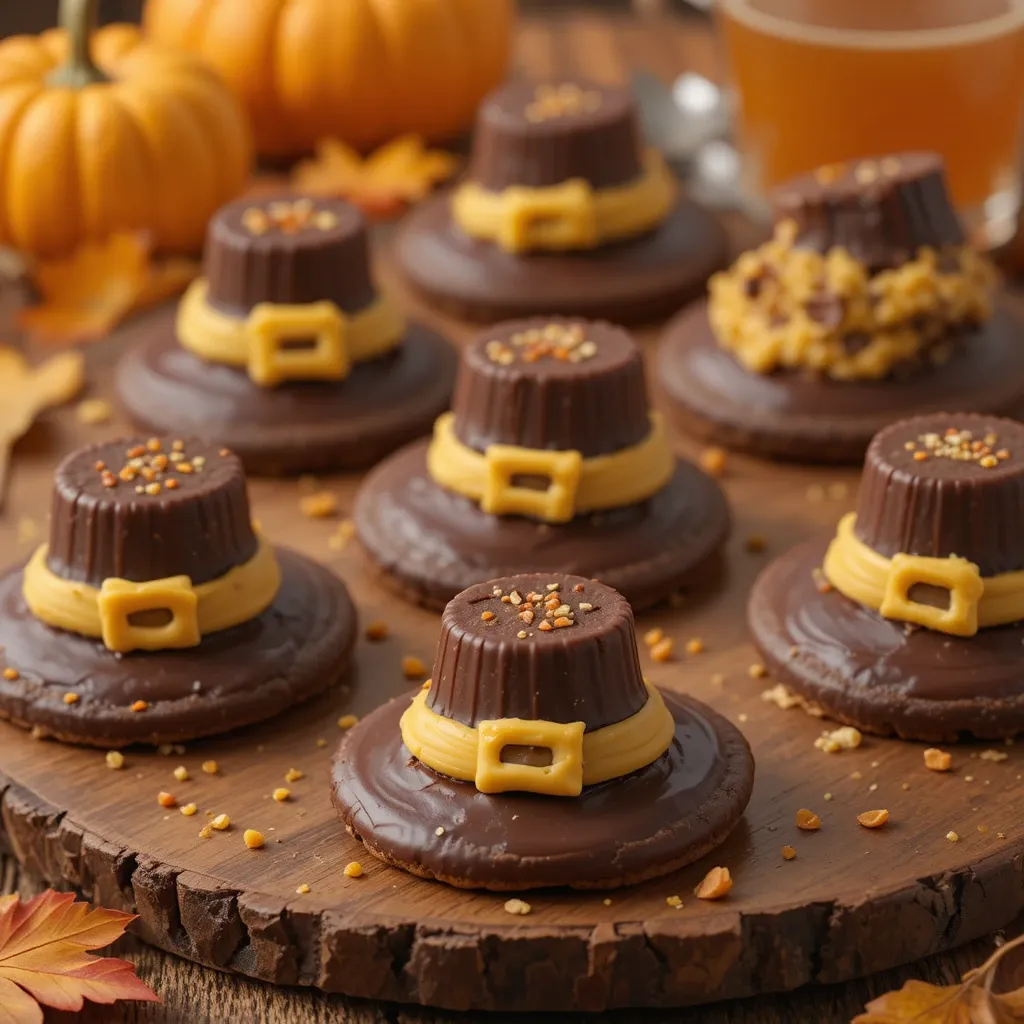
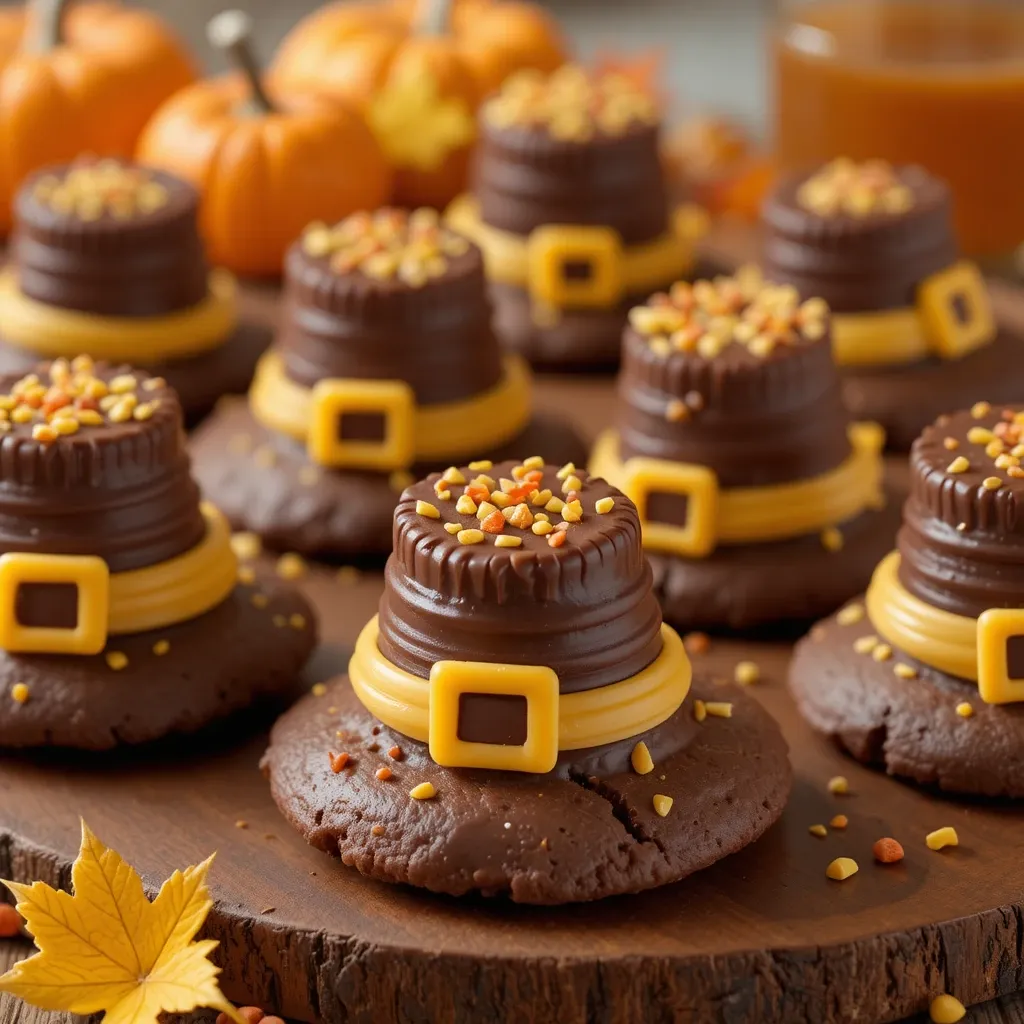
Ever wonder how a simple cookie transforms into a miniature pilgrim hat? These whimsical treats combine fudge-striped cookies, peanut butter cups, and chocolate squares to create an adorable edible pilgrim hat!
The genius is in the assembly – stack, stick, and you’re done. It’s true what they say: the way to everyone’s heart is through creative holiday desserts! These no-bake wonders prove that impressive doesn’t mean complicated. Ready to make some Thanksgiving magic?
Why You’ll Love This Thanksgiving Pilgrim Hat Cookies Recipe
Effortlessly Festive and Fun
These thanksgiving pilgrim hat cookies deliver maximum wow factor with minimal effort. The combination of crispy fudge-striped cookies, creamy peanut butter cups, and rich chocolate creates a perfect textural contrast that melts in your mouth. Each bite offers the satisfying crunch of the cookie base paired with smooth, velvety chocolate – a flavor symphony your taste buds will thank you for.
Budget-Friendly Holiday Baking
Making thanksgiving pilgrim hat cookies at home saves you serious money compared to buying fancy bakery treats. With just three affordable ingredients from your local grocery store, you can create 24 adorable cookies for under $10. That’s less than 50 cents per cookie! Compare that to boutique bakery prices, and you’ll see why homemade is always the smarter choice.
Customizable and Allergy-Friendly
The beauty of these cookies lies in their versatility. Swap peanut butter cups for sunflower butter cups to make them allergy-friendly. Use different chocolate varieties – dark, milk, or white – to suit your family’s preferences. Add festive sprinkles, edible gold dust, or colored icing for extra pizzazz. If you loved making our [Thanksgiving Turkey Cookies], you’ll adore these pilgrim hats just as much!
Make It a Tradition
These cookies aren’t just dessert – they’re memory-makers. Let your kids take charge of assembly while you supervise. Use them as Thanksgiving table place cards by adding name tags. Package them in cellophane bags for thoughtful hostess gifts. The possibilities are endless, and the smiles are guaranteed!
How to Make Thanksgiving Pilgrim Hat Cookies
Quick Overview
Thanksgiving pilgrim hat cookies are a no-bake dessert dream come true! These charming treats require zero oven time and come together in just minutes.
The secret is simple stacking with a touch of melted chocolate as “glue.” You’ll love how the buttery cookie base, creamy peanut butter cup center, and chocolate square top create the perfect pilgrim hat silhouette.
Time Breakdown:
- Prep Time: 10 minutes
- Assembly Time: 15 minutes
- Cooling Time: 30 minutes
- Total Time: 55 minutes
- Yield: 24 cookies
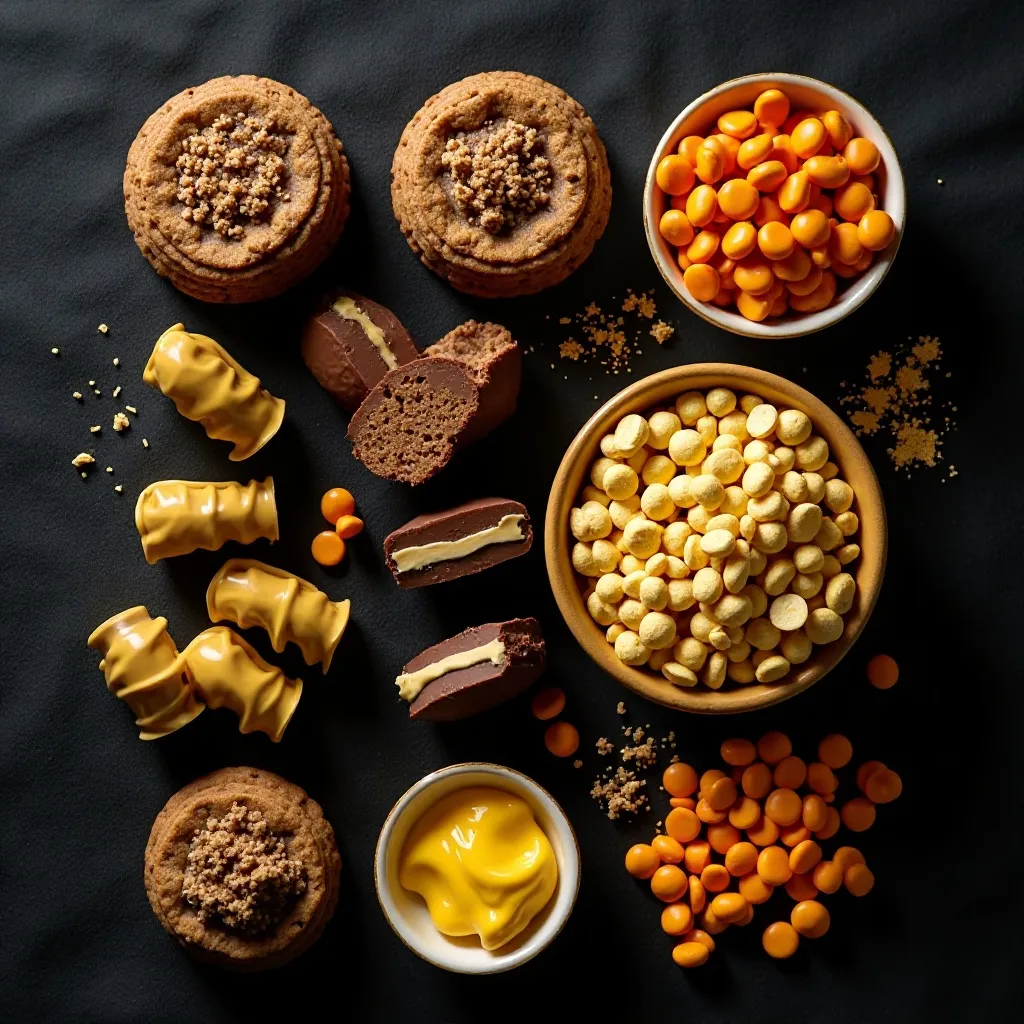
Key Ingredients for Thanksgiving Pilgrim Hat Cookies
Here’s everything you need to create these festive treats:
Main Components:
- 24 Fudge-Striped Cookies (such as Keebler Fudge Stripes) – These form the hat brim with their perfect round shape and delicious fudge coating
- 24 Miniature Peanut Butter Cups (unwrapped) – The body of the pilgrim hat; use regular size Reese’s Miniatures
- 24 Yellow Chocolate Melts or Yellow Candy Coating – Creates the iconic hat buckle decoration
- 12 ounces Semi-Sweet Chocolate Chips – Acts as the edible “glue” to hold everything together
Optional Decorations:
- Orange icing or writing gel
- Yellow nonpareils or sprinkles
- Small yellow rectangular candies for buckles
- Edible gold luster dust
Step-by-Step Instructions
Step 1: Prepare Your Workspace
Clear a large, clean surface and line two baking sheets with parchment paper or wax paper. This prevents the cookies from sticking and makes cleanup a breeze. Arrange all your ingredients within easy reach so you can work efficiently once the chocolate melts.
Step 2: Melt the Chocolate
Place the semi-sweet chocolate chips in a microwave-safe bowl. Microwave on 50% power for 30-second intervals, stirring between each interval. This prevents burning and ensures smooth, glossy chocolate. The chocolate is ready when completely melted and silky – usually after 2-3 intervals (about 90 seconds total).
Step 3: Attach the Peanut Butter Cups
Arrange all 24 fudge-striped cookies flat side up on your prepared baking sheets. Using a small spoon, place about 1/2 teaspoon of melted chocolate on the flat side of each cookie – right in the center. Immediately press a miniature peanut butter cup upside down onto the chocolate. The peanut butter cup should sit with its flat bottom facing up, creating the body of the pilgrim hat. Hold for 2-3 seconds to ensure it adheres properly.
Step 4: Create the Hat Top
Spoon another small dollop of melted chocolate (about 1/4 teaspoon) onto the flat bottom of each peanut butter cup. Take a yellow chocolate melt or a small square piece of chocolate and gently press it onto the top. This creates the crown of the pilgrim hat. If using larger chocolate squares, you may want to trim them with a sharp knife to achieve the right proportion.
Step 5: Add the Buckle Detail
This is where your cookies transform into pilgrim hats! Melt 4-5 yellow chocolate melts according to package directions. Using a toothpick or small decorating bag, draw a small rectangle or square on the front of each peanut butter cup to represent the buckle. You can also use pre-made yellow icing or attach small rectangular yellow candies using a tiny dot of chocolate.
For a more detailed buckle, create a rectangular outline and fill it in slightly. Add a small orange dot in the center if desired for extra dimension.
Step 6: Let Them Set
Allow the cookies to sit at room temperature for 30-45 minutes until the chocolate hardens completely. For faster results, refrigerate for 15-20 minutes. Don’t rush this step – properly set chocolate ensures your pilgrim hats stay intact when served.
Step 7: Final Touches
Once set, inspect each cookie and add any additional decorations. Use orange or yellow writing gel to enhance buckle details. Dust with edible gold powder for an elegant finish. Arrange on a festive serving platter and watch them disappear!
What to Serve Thanksgiving Pilgrim Hat Cookies With
These delightful cookies pair beautifully with various Thanksgiving beverages and desserts:
Beverage Pairings:
- Hot apple cider with cinnamon sticks
- Pumpkin spice lattes or regular coffee
- Cold milk (kids’ favorite!)
- Spiced chai tea
- Warm caramel hot chocolate
Complementary Desserts:
- Pumpkin pie with whipped cream
- Pecan pie squares
- Apple crisp
- Pumpkin cheesecake bites
- Cranberry orange cookies
Serving Suggestions: Create a stunning dessert board featuring these pilgrim hat cookies alongside autumn-themed treats. Include fresh grapes, apple slices, caramel dip, and mixed nuts. Add mini pumpkins and fall leaves for decoration. Your guests will be impressed by the presentation!
Top Tips for Perfecting Thanksgiving Pilgrim Hat Cookies
Choose Quality Ingredients
Not all cookies are created equal! Fudge-striped cookies work best because of their sturdy base and flat bottom. Name-brand cookies tend to hold up better than generic versions. Fresh peanut butter cups are essential – check expiration dates to avoid chalky, old chocolate.
Temperature Matters
Work in a cool kitchen when assembling these cookies. If your kitchen is warm, the chocolate sets too slowly, causing the components to slide. In hot weather, refrigerate the peanut butter cups for 10 minutes before assembly – they’ll hold their shape better.
Perfect Your Chocolate “Glue”
Don’t overheat the chocolate! Burnt chocolate becomes grainy and won’t set properly. If your chocolate seems too thick, add 1/2 teaspoon of coconut oil or vegetable shortening to thin it slightly. Never add water or milk – this causes chocolate to seize.
Assembly Line Method
Set up an assembly line for efficiency. Place all cookies first, then add chocolate to all cookies before placing peanut butter cups. This prevents the chocolate from hardening before you attach the components.
Make Them Allergy-Friendly
Swap peanut butter cups for sunflower butter cups, Enjoy Life chocolate cups, or mini dark chocolate peanut-free alternatives. Use dairy-free chocolate chips if needed. Always check labels for allergen warnings.
Size Variations
Create mini pilgrim hats using mini vanilla wafers, mini peanut butter cups, and chocolate chips. Or make giant versions with full-size cookies, regular peanut butter cups, and larger chocolate squares. Adjust accordingly!
Storage Prevents Sliding
If stacking cookies for storage, place parchment paper between layers. Otherwise, the chocolate may soften and cause the hats to slide off their brims.
Buckle Alternatives
No yellow chocolate? Use small pieces of yellow Starburst candies, yellow M&Ms, or even small pieces of yellow fondant. Orange or white buckles look festive too! Get creative with what you have.
Storing and Reheating Tips
Room Temperature Storage
Store thanksgiving pilgrim hat cookies in an airtight container at room temperature for up to 5 days. Place parchment paper between layers to prevent sticking. Keep away from direct sunlight and heat sources, which can melt the chocolate.
Refrigerator Storage
For longer freshness, refrigerate cookies in an airtight container for up to 2 weeks. Bring to room temperature before serving for the best flavor and texture. Cold cookies are fine to eat but lack the optimal creamy texture of room-temperature treats.
Freezing Instructions
These cookies freeze beautifully! Arrange in a single layer on a baking sheet and freeze until solid (about 2 hours). Transfer to a freezer-safe container or zip-top bag, separating layers with parchment paper. Freeze for up to 3 months.
Thaw frozen cookies in the refrigerator overnight or at room temperature for 1-2 hours. Never microwave to thaw – this melts the chocolate and ruins the texture.
Make-Ahead Tips
Assemble pilgrim hat cookies up to 3 days before your event. Store as directed above. The flavors actually improve slightly as they sit, allowing everything to meld together beautifully.
Gift Packaging Storage
If packaging as gifts, wait until cookies are completely set before wrapping. Use cellophane bags, tie with festive ribbon, and attach cute tags. Tell recipients to store in a cool, dry place and consume within 5 days for best quality.
Frequently Asked Questions
Can I use regular-size peanut butter cups instead of miniatures?
Yes, but you’ll need larger cookies to maintain the proper hat proportions. Use full-size cookies (about 3 inches in diameter) and adjust the chocolate square size accordingly. This makes fewer but larger pilgrim hats – about 12-16 instead of 24.
What if I don’t have fudge-striped cookies?
Vanilla wafers, chocolate chip cookies, or Milano cookies work well as alternatives. Choose cookies with flat bottoms for stability. The fudge stripes add visual interest, but any round, sturdy cookie creates a great base.
How do I prevent the chocolate from hardening too quickly?
Keep your melted chocolate in a warm spot while working. If it starts to harden, reheat briefly in the microwave for 10-15 seconds at 50% power. Working quickly and efficiently also helps – use the assembly line method mentioned above.
Can I make these nut-free for school events?
Absolutely! Replace peanut butter cups with SunButter cups, Enjoy Life mini chocolate cups, or allergy-friendly chocolate alternatives. Use certified nut-free chocolate chips for the “glue.” Always check all ingredient labels for potential cross-contamination warnings.
What’s the best way to transport these cookies to a party?
Use a sturdy container with a tight-fitting lid. Place cookies in a single layer if possible, or use parchment paper between layers. Keep the container level during transport and avoid leaving them in a hot car. They’re surprisingly durable once the chocolate sets completely!
Can I use white or dark chocolate instead of semi-sweet?
Yes! White chocolate creates an elegant look, while dark chocolate adds rich, sophisticated flavor. Candy melts in various colors work too – try orange, brown, or even festive red and green for a fun twist.
How can I make the buckles look more professional?
Use a small piping bag or squeeze bottle for precise buckle details. Practice on parchment paper first to get comfortable with the technique. Alternatively, use small square yellow candies or fondant pieces attached with chocolate for perfectly shaped buckles.
Why did my cookies slide apart?
This usually happens when the chocolate wasn’t thick enough or didn’t set properly. Use enough chocolate to create a good bond – about 1/2 teaspoon per layer. Ensure cookies are completely cooled and set before moving them. Warm kitchens can also cause sliding.
Can toddlers help make these cookies?
Yes! This is a perfect toddler activity with supervision. Let them place the peanut butter cups while you handle the melted chocolate. Older kids can help with all steps. It’s a wonderful way to introduce young children to cooking.
What other holidays can I adapt this cookie for?
These are incredibly versatile! Make witch hats for Halloween using chocolate cookies and green candy buckles. Create Santa hats for Christmas with red melts and white candy trim. The basic technique works for countless themes!
Nutrition Information
| Nutrient | Per Cookie (1 serving) |
|---|---|
| Calories | 145 |
| Total Fat | 8g |
| Saturated Fat | 4g |
| Cholesterol | 3mg |
| Sodium | 65mg |
| Total Carbohydrates | 18g |
| Dietary Fiber | 1g |
| Sugars | 13g |
| Protein | 2g |
Nutrition information is approximate and based on standard ingredients. Values may vary based on specific brands used.
Final Thoughts
Thanksgiving pilgrim hat cookies are more than just a dessert – they’re a celebration of creativity, family time, and holiday spirit. With their charming appearance and delicious taste, they’ve earned their place as a Thanksgiving tradition in countless homes.
The beauty of this recipe lies in its simplicity and versatility. Whether you’re an experienced baker or someone who avoids the kitchen, you’ll succeed with these adorable treats. They’re perfect for school parties, office gatherings, or your family’s Thanksgiving table.
So gather your ingredients, invite your kids to help, and create some sweet memories this Thanksgiving. These pilgrim hat cookies prove that the best recipes don’t need to be complicated to be absolutely delightful. Happy baking, and happy Thanksgiving!
Pro Tip: Take photos of your finished cookies and share them on social media with #PilgrimHatCookies to inspire others. We’d love to see your creative variations!