Easy Thanksgiving Cupcakes Turkey Tutorial Step-by-Step
Picture this: golden-brown “turkeys” sitting proudly on your dessert table, but they’re actually adorable cupcakes! These Thanksgiving cupcakes turkey treats combine moist chocolate or vanilla cake with creative candy decorations to create the most charming edible turkeys you’ve ever seen.
Did you know that turkey-themed desserts became popular in the 1950s when homemakers started getting creative with holiday presentations? These cupcakes are special because they’re surprisingly easy to make, require no baking skills beyond basic cupcakes, and kids absolutely love decorating them.
Unlike our elaborate Pumpkin Cheesecake, these take just 45 minutes from start to finish and are perfect for getting the whole family involved in holiday prep.
What Are Thanksgiving Cupcakes Turkey?
Ever wondered why we turn perfectly good cupcakes into adorable turkeys? It’s because Thanksgiving deserves desserts as fun as the celebration itself! These whimsical treats feature cupcakes transformed into turkeys using candy corn “feathers,” cookie “wings,” and candy eyes that seem to follow you around the room.
As the old saying goes, “the way to a man’s heart is through his stomach,” and these cupcakes prove the way to everyone’s heart is through adorable, edible art. Ready to create your own flock of sweet turkeys?
Why You’ll Love This Thanksgiving Cupcakes Turkey Recipe
Irresistibly Cute and Delicious
These cupcakes deliver on both looks and taste. The moist, fluffy cake base provides the perfect canvas for your turkey creation, while the rich chocolate frosting acts as “glue” for all those colorful candy decorations. Each bite combines cake, frosting, and crunchy candy in a delightful texture symphony.
Budget-Friendly Holiday Fun
Forget spending $4 per cupcake at fancy bakeries! Making thanksgiving cupcakes turkey at home costs less than $1 per cupcake. You’ll use simple ingredients like boxed cake mix, store-bought frosting, and affordable candy that’s everywhere during fall. Plus, you can make dozens at once, perfect for classroom parties or large family gatherings.
Customizable and Kid-Approved
The best part? These cupcakes are endlessly customizable. Use different frosting colors for various turkey “feathers,” swap candy corn for M&Ms, or try different cookie types for wings. Kids can decorate their own turkeys, making each one unique. Unlike our more sophisticated Cranberry Orange Bread, these invite creativity and mess-free fun that keeps little hands busy while you prep the main feast.
Perfect for Multiple Occasions
While designed for Thanksgiving, these cupcakes work for fall festivals, harvest parties, November birthdays, or any autumn celebration. They’re conversation starters that photograph beautifully for social media and create lasting holiday memories.
Ready to create your adorable turkey flock? Let’s dive into this simple, crowd-pleasing recipe!
How to Make Thanksgiving Cupcakes Turkey
Quick Overview
This recipe transforms ordinary cupcakes into extraordinary Thanksgiving centerpieces with minimal effort and maximum impact.
The magic happens in the decorating stage where simple candies become turkey features. You’ll love how forgiving this recipe is—there’s no “wrong” way to decorate!
Total Time Breakdown:
- Prep Time: 15 minutes
- Baking Time: 18-20 minutes
- Cooling Time: 30 minutes
- Decorating Time: 20-30 minutes
- Total Time: About 1.5 hours
- Yield: 24 cupcakes
Key Ingredients for Thanksgiving Cupcakes Turkey
For the Cupcakes:
- 1 box chocolate or vanilla cake mix (plus required ingredients: eggs, oil, water)
- 24 cupcake liners (brown or autumn colors preferred)
For the Turkey Decorations:
- 2 containers chocolate frosting (16 oz each)
- 24 Double Stuf Oreo cookies
- 24 Nutter Butter cookies (or Milano cookies)
- 48 candy eyes (or white chocolate chips with mini chocolate chips)
- 24 pieces candy corn
- 24 pieces red fruit leather or Red Hots candies (for wattles)
- 1 cup candy corn (about 6-8 pieces per turkey for feathers)
- Optional: orange M&Ms or Reese’s Pieces for feet
Special Tools:
- Standard muffin tin
- Piping bag or zip-top bag for frosting
- Small kitchen scissors (for cutting fruit leather)
- Toothpicks (for precision decorating)
Step-by-Step Instructions
Step 1: Bake Your Cupcake Base
Preheat your oven to 350°F (175°C) and line your muffin tin with cupcake liners. Prepare the cake mix according to package directions. For extra moist cupcakes, add an extra egg and replace the water with milk.
Fill each liner about 2/3 full to prevent overflow. Bake for 18-20 minutes or until a toothpick inserted in the center comes out clean. Watch carefully—overbaked cupcakes become dry and difficult to frost.
Remove from the oven and let cool in the pan for 5 minutes, then transfer to a wire rack. The cupcakes must be completely cool before decorating, otherwise frosting will melt. This takes about 30 minutes.
Step 2: Create the Turkey Body
Once cupcakes are cool, frost the top generously with chocolate frosting. Create a smooth, rounded dome shape—this becomes the turkey’s body. Use an offset spatula or butter knife for easy spreading.
The frosting should be thick enough to hold decorations but not so thick it overwhelms the cupcake. Room temperature frosting spreads easiest.
Step 3: Attach the Turkey Head
Take one Nutter Butter cookie (or Milano) for the turkey’s head and neck. Position it vertically at the front edge of the cupcake, pressing gently into the frosting so it stands upright.
If the cookie won’t stay upright, apply a small dab of frosting to the back as “glue” and hold for 10 seconds. The cookie should be stable before moving to the next step.
Step 4: Add the Tail Feathers
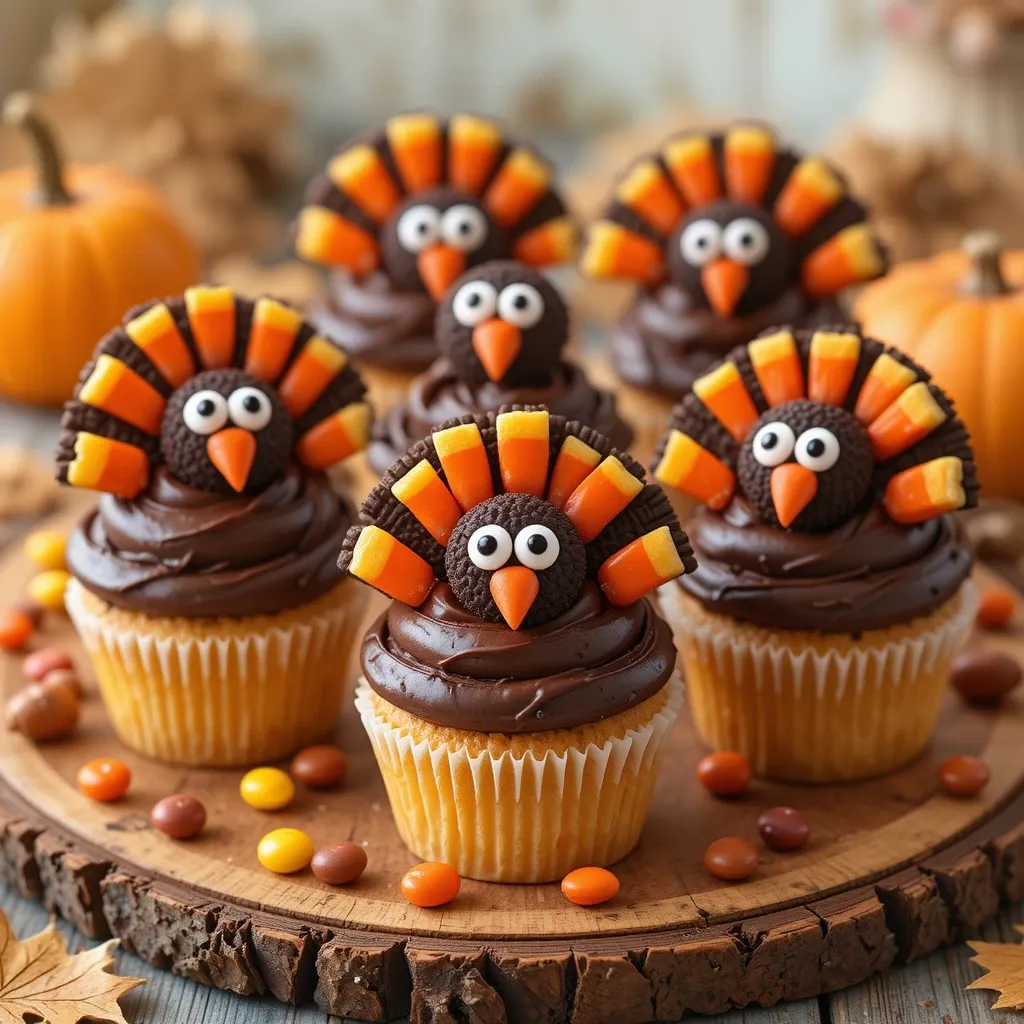
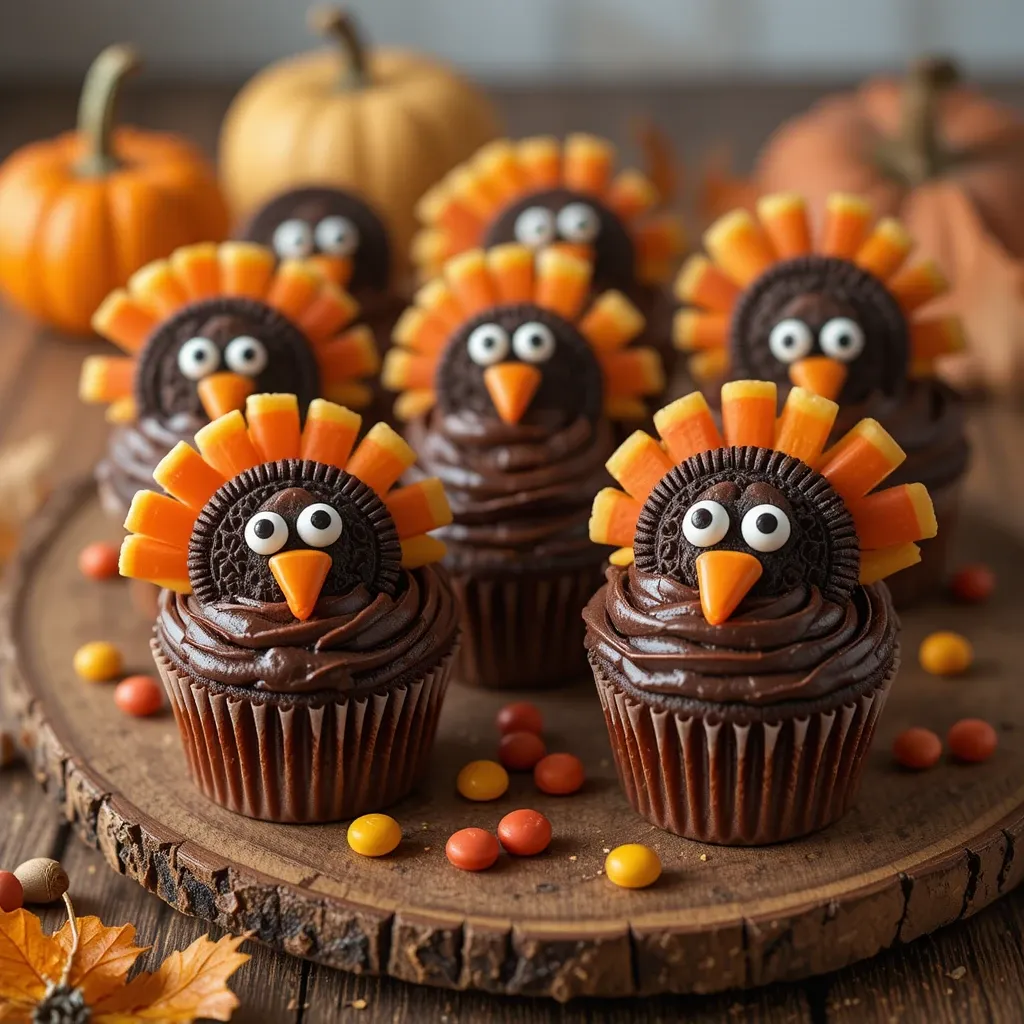
This is where your turkey comes to life! Take one Oreo cookie and carefully insert it into the frosting at the back of the cupcake, positioning it vertically like a fan of feathers.
Press firmly but gently—you want it secure but not cracked. The Oreo should stand at about a 70-degree angle, slightly tilted back.
Step 5: Create the Candy Corn Feather Display
Now for the colorful feathers! Take 6-8 pieces of candy corn and insert them into the frosting around the Oreo, creating a semi-circle fan pattern.
Alternate the candy corn colors (if using different varieties) for visual interest. Press them in at angles so they splay outward like real tail feathers. Some can point up, others slightly out to the sides.
Step 6: Add the Turkey Face
Using a small dab of frosting as glue, attach two candy eyes to the Nutter Butter “head.” Place them near the top, about 1/3 down from the tip.
For the beak, attach one piece of candy corn (pointed end out) to the center of the face, just below the eyes. Press gently so it sticks but doesn’t crack the cookie.
Step 7: Create the Wattle
Cut a small, teardrop-shaped piece of red fruit leather (about 1 inch long). Alternatively, use a Red Hots candy for a simpler option.
Attach the wattle just below the beak using a tiny dab of frosting. The wattle should hang slightly downward for authenticity. If using fruit leather, you can create texture by pinching it before attaching.
Step 8: Optional Wing and Feet Details
For wings, take two candy corn pieces and insert them into the sides of the cupcake, pointing outward and slightly downward.
For feet, place two orange M&Ms or Reese’s Pieces at the base front of the cupcake, using frosting to secure them. You can even use mini pretzel sticks for a more detailed leg appearance.
Step 9: Final Touches and Setting
Once decorated, let the cupcakes sit for 15-20 minutes so the frosting sets and decorations become secure.
Avoid touching the decorations during this time. If transporting, the cupcakes should be completely set and transported in a single layer in a sturdy container.
Step 10: Display and Serve
Arrange your thanksgiving cupcakes turkey on a platter or cake stand. They look especially festive on autumn-themed serving ware or surrounded by fall leaves and mini pumpkins.
These are best enjoyed within 24 hours of decorating for optimal freshness and candy crunch.
What to Serve Thanksgiving Cupcakes Turkey With
These adorable cupcakes shine brightest as part of your complete Thanksgiving dessert spread.
Complementary Desserts:
- Classic pumpkin pie offers a traditional contrast to these playful treats
- Apple crisp with vanilla ice cream provides warm, comforting flavors
- Pecan pie bars add sophisticated sweetness
- Mini cheesecakes give guests variety
Beverage Pairings:
- Hot apple cider (spiked or regular) complements the autumn theme
- Pumpkin spice lattes for an afternoon treat
- Hot chocolate for the kids’ table
- Dessert wine like Moscato for adults
Serving Suggestions:
- Create a “kids’ dessert table” featuring just these cupcakes with milk
- Offer as a take-home treat in clear cellophane bags tied with ribbon
- Display alongside a “decorate your own” station with extra candy
- Pair with coffee for a post-dinner dessert course
Top Tips for Perfecting Thanksgiving Cupcakes Turkey
Choose the Right Frosting Consistency
Room temperature frosting is crucial. Too cold, and it won’t stick decorations properly. Too warm, and everything slides off. Let frosting sit out for 30 minutes before using.
If frosting seems too stiff, microwave for 5-10 seconds and stir. If too loose, refrigerate for 15 minutes.
Make Ahead Like a Pro
Bake cupcakes up to 2 days ahead and store in an airtight container at room temperature. Freeze unfrosted cupcakes for up to 3 months.
However, decorate the same day you’re serving for the freshest look and taste. Candy can become soft or colors can bleed if assembled too far in advance.
Decoration Assembly Line Strategy
Set up an assembly line if making multiple cupcakes. Complete one step on all cupcakes before moving to the next. This speeds up the process and ensures consistency.
Have all decorating supplies organized in small bowls within reach. This is especially helpful when decorating with kids.
Ingredient Substitutions
Can’t find Nutter Butters? Use Vienna Fingers, Milano cookies, or even pretzel rods for the head/neck. Oreos can be replaced with Fudge Stripes or chocolate graham crackers for different feather looks.
For allergy-friendly versions, use sunflower seed butter cookies and check all candy labels for allergens. Vegan versions work with dairy-free cake mix and frosting.
Securing Decorations That Won’t Stay
If cookies keep falling over, insert a toothpick through the cookie base into the cupcake for extra support. Just warn guests about the toothpick!
For heavy Oreos, try partially separating the cookie (keeping cream on both sides) to reduce weight while maintaining the look.
Color Coordination Tips
Use different colored frosting to create variety. Orange frosting makes turkeys look more authentic, while chocolate creates dramatic contrast with colorful candies.
Natural food coloring can tint white frosting to autumn shades without artificial dyes.
Avoid Common Mistakes
Don’t frost warm cupcakes—this causes melting and sliding decorations. Don’t overfill cupcake liners—this creates domed tops that are harder to decorate flat.
Don’t press decorations too hard or cookies will crack. Use gentle, firm pressure instead.
Storing and Reheating Tips
Room Temperature Storage
Decorated thanksgiving cupcakes turkey stay fresh for 1-2 days at room temperature in an airtight container. Place in a single layer to prevent decoration damage.
Don’t stack decorated cupcakes—the decorations will smash and stick together. Use a cupcake carrier or large flat container.
Refrigeration Guidelines
While you can refrigerate these cupcakes for up to 4 days, the cookies may become slightly soft from condensation. If refrigerating, let them come to room temperature for 30 minutes before serving for best texture.
Store in a container with paper towels underneath to absorb moisture. Don’t cover with plastic wrap directly touching decorations.
Freezing Instructions
Freeze unfrosted cupcakes for up to 3 months. Wrap individually in plastic wrap, then place in freezer bags with air removed.
We don’t recommend freezing decorated cupcakes as candy and cookies don’t thaw well and can become soggy or discolored.
Reheating Notes
These cupcakes are meant to be served at room temperature, so reheating isn’t necessary. If cupcakes seem dry, a 5-second microwave zap (undecorated) can refresh them, but let cool before frosting.
Never microwave decorated cupcakes—the candy will melt and create a mess.
Make-Ahead Strategy
For best results: Bake cupcakes 1-2 days ahead and store covered. Purchase all decorating supplies a week ahead. Decorate 4-6 hours before serving for optimal freshness and appearance.
This strategy gives you the convenience of advance prep with the fresh appeal of just-made treats.
Frequently Asked Questions
Can I use homemade cupcakes instead of boxed mix?
Absolutely! Any homemade chocolate or vanilla cupcake recipe works beautifully. Just ensure they’re sturdy enough to hold decorations—dense cakes work better than ultra-light ones. Homemade cupcakes often taste even better than boxed, though boxed mixes offer convenience and consistency.
What if I can’t find candy eyes?
No problem! Create eyes using mini white chocolate chips with a dot of chocolate frosting in the center. Or use mini marshmallows with edible marker dots. White icing dots with black edible marker also work perfectly.
How do I transport these cupcakes without ruining the decorations?
Use a sturdy cupcake carrier with individual slots to prevent shifting. Place cupcakes in the carrier right before leaving and drive carefully over bumps. For extra security, refrigerate for 30 minutes before transport so frosting firms up. Some decorations may need minor touch-ups on arrival.
Can I make these cupcakes gluten-free?
Yes! Use your favorite gluten-free cake mix and ensure all cookies and candies are certified gluten-free. Many brands make gluten-free sandwich cookies similar to Oreos. Check all candy labels as some contain wheat-based ingredients.
Are these cupcakes suitable for kids to help decorate?
These are perfect for kids ages 4 and up! The decorating is forgiving, and each turkey can look unique without being “wrong.” Set up a decorating station with all supplies organized, cover the table with newspaper, and let creativity flow. Younger kids may need help with the Oreo placement, but can easily add candy corn and eyes.
How far in advance can I decorate these cupcakes?
Decorate 4-6 hours before serving for best results, or the morning of your event for an evening gathering. While they can be decorated the night before, candy can soften and lose crunch over time. The fresher the decoration, the better they look and taste.
What’s the best way to display these at a party?
Create a tiered display using cake stands or turn a wooden cutting board into a rustic platter. Surround cupcakes with autumn leaves, mini pumpkins, or wheat stalks. For kids’ parties, display at their eye level so they can admire the details. A “turkey family” display with different-sized cupcakes (regular and mini) is adorable!
Can I make mini versions of these cupcakes?
Definitely! Use mini cupcakes with mini Oreos (if available), broken candy corn pieces, and mini Nilla Wafers for heads. They’re perfect for portion control and you can make more from one batch. Decorating requires more precision but the tiny turkeys are incredibly cute.
What should I do if my frosting is too soft to hold decorations?
Refrigerate the frosting for 15-20 minutes to firm up. Or add 1/4 cup of powdered sugar to thicken it. Temperature matters—if your kitchen is very warm, decorations will slide regardless of frosting consistency. Try working in a cooler room or refrigerating each batch of decorated cupcakes briefly before continuing.
Are there any nut-free alternatives for decorations?
Skip Nutter Butters and use Vienna Fingers, Biscoff cookies, or even pretzel rods instead. Most candy corn, Oreos, and candy eyes are nut-free, but always check labels. Many schools require nut-free treats, and this recipe adapts easily to meet those requirements.
Nutrition Information
| Nutrient | Per Cupcake |
|---|---|
| Calories | 285 |
| Total Fat | 12g |
| Saturated Fat | 4g |
| Cholesterol | 25mg |
| Sodium | 220mg |
| Total Carbohydrates | 42g |
| Dietary Fiber | 1g |
| Sugars | 28g |
| Protein | 3g |
Nutrition information is approximate and based on standard recipes. Values may vary depending on specific brands and ingredients used.
Final Thoughts
These thanksgiving cupcakes turkey are more than just dessert—they’re memories in the making. Whether you’re baking with grandchildren who’ll remember decorating turkeys with you for years to come, bringing a show-stopping treat to the office party, or simply adding whimsy to your holiday table, these cupcakes deliver joy with every bite.
The beauty of this recipe lies in its flexibility and forgiving nature. No two turkeys need to look alike, and that’s what makes them special. Each one has personality, character, and a story from whoever decorated it.
So gather your supplies, preheat that oven, and get ready to create your own flock of adorable, edible turkeys. Your Thanksgiving celebration just got a whole lot cuter and more delicious. Happy baking, and may your holidays be filled with sweetness, laughter, and plenty of turkey cupcakes!
Don’t forget to share your creations! Tag us in your turkey cupcake photos—we love seeing your creative variations and hearing about your family’s decorating adventures.