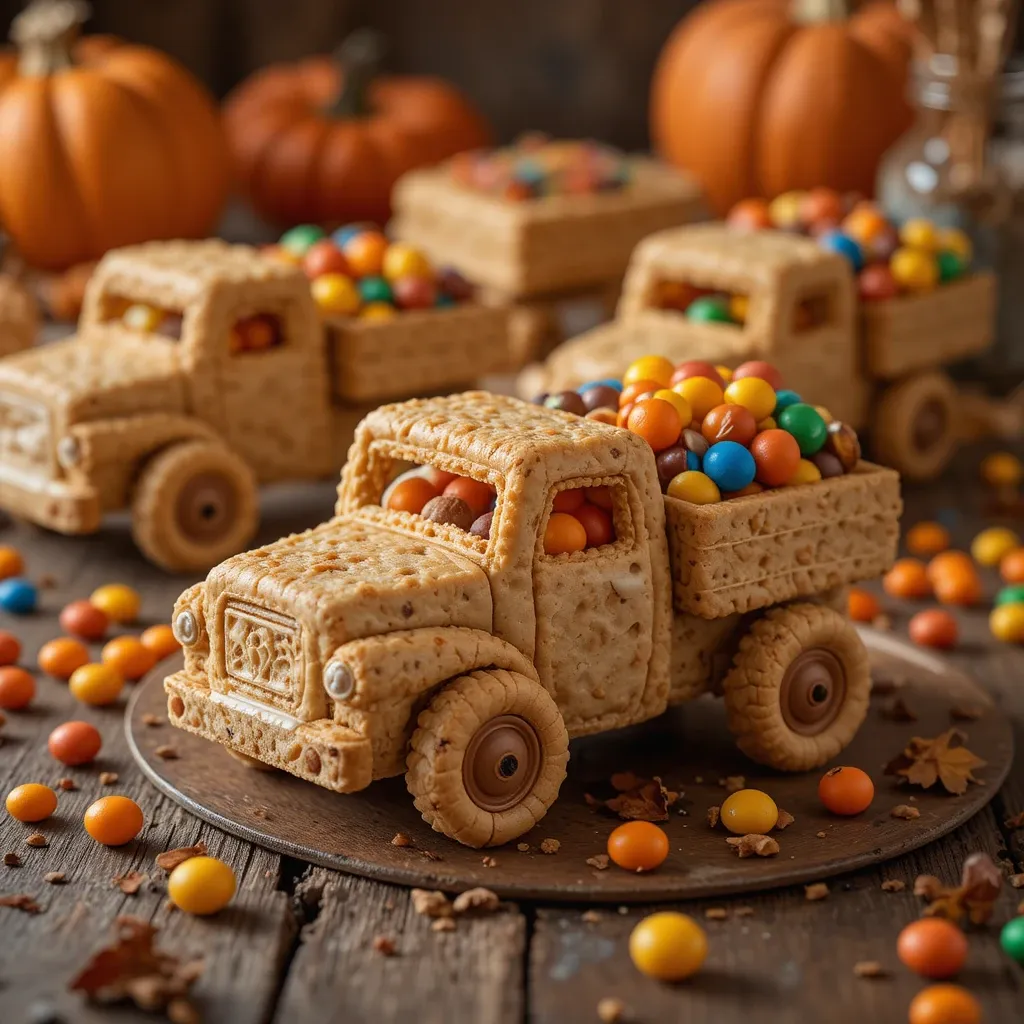
Thanksgiving Cookies Truck – The Cutest Dessert
Picture this: a miniature truck carrying a delicious cargo of autumn flavors, made entirely from cookies and candy. These thanksgiving cookies truck treats are the perfect combination of creative fun and mouthwatering taste. They’re incredibly simple to assemble, requiring no baking skills beyond making basic cookies.
Whether you’re planning a festive dessert table or looking for a fun activity with kids, these edible trucks deliver joy in every bite—much like our popular Pumpkin Spice Sugar Cookies that readers can’t stop making!
What is a Thanksgiving Cookies Truck?
Ever wondered why we call these treats “cookie trucks”? Well, isn’t it obvious when you see a golden graham cracker flatbed loaded with colorful candy “harvest”? These whimsical creations transform simple cookies into miniature delivery vehicles carrying edible autumn treasures.
They say the way to a man’s heart is through his stomach, and these cookie trucks drive straight there! The name perfectly captures the playful spirit of Thanksgiving—celebrating abundance and gratitude in the most delightful, kid-friendly way possible. Ready to build your own fleet of dessert vehicles?
Why You’ll Love This Thanksgiving Cookies Truck:
The Ultimate Showstopper Dessert
These cookie trucks aren’t just desserts—they’re conversation starters that transform your Thanksgiving table into an interactive experience. The combination of crunchy cookies, creamy frosting, and colorful candies creates a textural symphony that appeals to both kids and adults.
Budget-Friendly Holiday Magic
Forget expensive bakery orders! Making thanksgiving cookies truck treats at home costs a fraction of store-bought themed desserts. You’ll spend around $15-20 to create a whole fleet of 12-15 trucks, compared to $5-7 per decorated cookie at specialty shops. The ingredients are readily available at any grocery store, and you probably have half of them in your pantry already.
Customizable Flavor Adventure
The beauty of this recipe lies in its flexibility. Use chocolate graham crackers for the truck base, vanilla wafers for wheels, and load the bed with candy corn, M&Ms, pretzels, or even mini pumpkins made from orange frosting. The royal icing acts as both glue and decoration, allowing you to personalize each truck. If you loved our Thanksgiving Sugar Cookie Cutouts, you’ll appreciate how these trucks take creativity to the next level. They’re perfect for making with children, who can choose their own candy cargo and design unique vehicles.
Make It a Family Tradition
Transform cookie decorating into a memorable Thanksgiving Eve tradition. Set up an assembly line with different stations for frosting, candy selection, and final touches. It’s a screen-free activity that creates lasting memories and delicious results!
How to Make Thanksgiving Cookies Truck:
Quick Overview
These thanksgiving cookies truck treats are surprisingly easy to create, even for beginners. The “no-bake” assembly takes about 45 minutes from start to finish, with most of that time spent on creative decorating.
The combination of sturdy graham crackers, sweet royal icing cement, and colorful candy creates an impressive dessert that looks like it came from a professional bakery.
Time Breakdown:
- Prep Time: 15 minutes
- Assembly Time: 30 minutes
- Setting Time: 20 minutes (for icing to harden)
- Total Time: 1 hour 5 minutes
- Yield: 12-15 cookie trucks
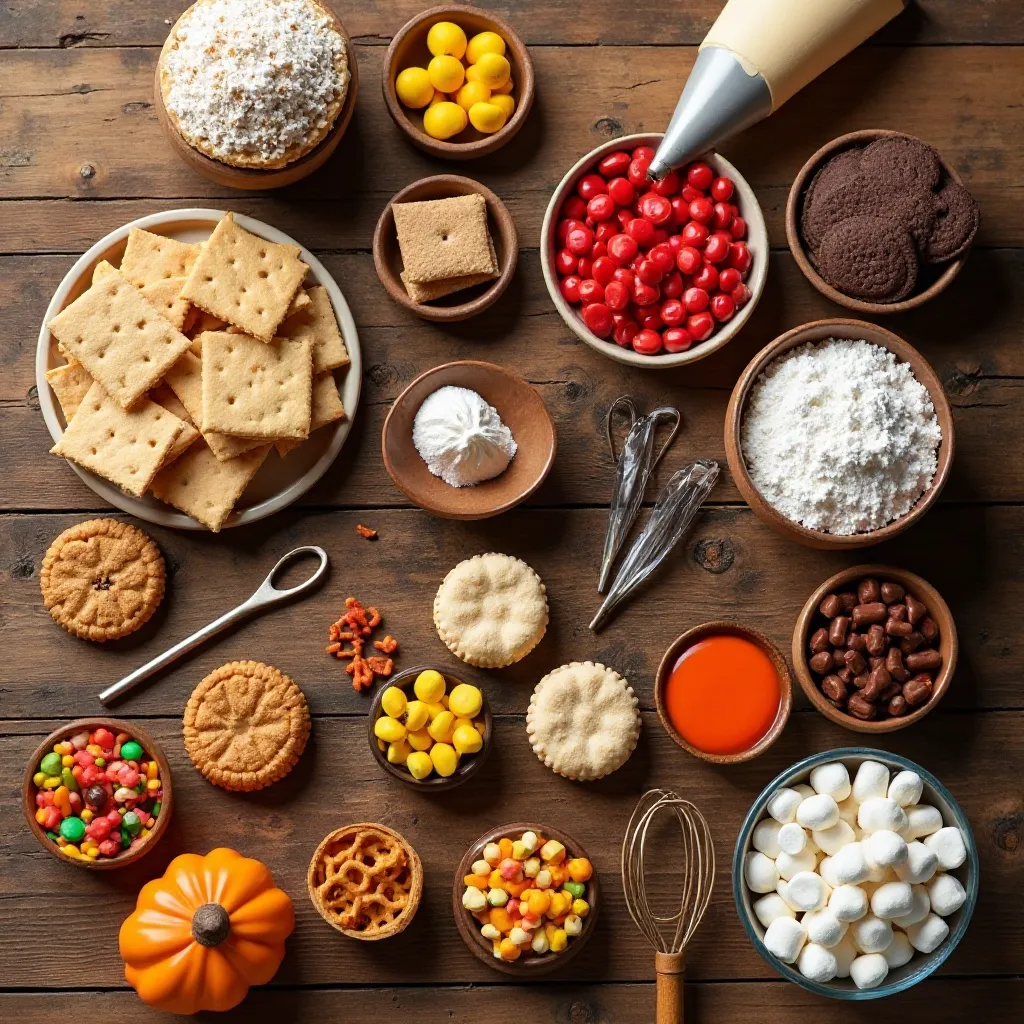
Key Ingredients for Thanksgiving Cookies Truck:
For the Truck Base:
- 24-30 graham cracker sheets (honey or cinnamon flavor)
- 48-60 vanilla wafer cookies (for wheels)
- 1 package (16 oz) chocolate sandwich cookies (optional, for variety)
For the Royal Icing “Glue”:
- 3 cups powdered sugar
- 2 tablespoons meringue powder
- 5-6 tablespoons warm water
- ½ teaspoon vanilla extract
- Food coloring (orange, brown, yellow, red)
For the Candy Cargo:
- 2 cups candy corn
- 1 cup chocolate chips or M&Ms
- 1 cup mini pretzels
- ½ cup orange and red gummy candies
- 1 cup Reese’s Pieces or fall-colored sprinkles
- Mini marshmallows (optional)
Additional Supplies:
- Piping bags or zip-lock bags
- Small offset spatula
- Toothpicks
- Parchment paper or wax paper
Step-by-Step Instructions:
Step 1: Prepare Your Royal Icing
In a large mixing bowl, combine the powdered sugar and meringue powder. Add 5 tablespoons of warm water and vanilla extract. Using an electric mixer on low speed, beat for 7-10 minutes until the icing forms stiff peaks. The consistency should be thick enough to hold its shape but pipeable. If it’s too thick, add water one teaspoon at a time. If too thin, add more powdered sugar. Divide the icing into separate bowls and tint with food coloring for variety.
Step 2: Create the Truck Base
Break each graham cracker sheet into individual rectangles. You’ll need two rectangles per truck—one for the flatbed and one for the cab. Using a serrated knife, carefully cut one rectangle to create a smaller square for the truck cab (about 2 inches x 2 inches). This creates the classic truck silhouette.
Step 3: Attach the Wheels
Transfer royal icing to a piping bag or zip-lock bag with a corner snipped off. Pipe four small dots of icing on the bottom of your graham cracker flatbed, positioning them where wheels would go. Press vanilla wafer cookies firmly onto each icing dot, holding for 10-15 seconds until secure. Let this dry for 5 minutes before flipping over.
Step 4: Assemble the Truck Cab
Pipe a thick line of royal icing along one short edge of your flatbed. Press the smaller graham cracker piece perpendicular to the flatbed, creating the truck cab. Hold steady for 30 seconds. Use additional icing to reinforce the joint from the inside. Let this structure dry for 10 minutes.
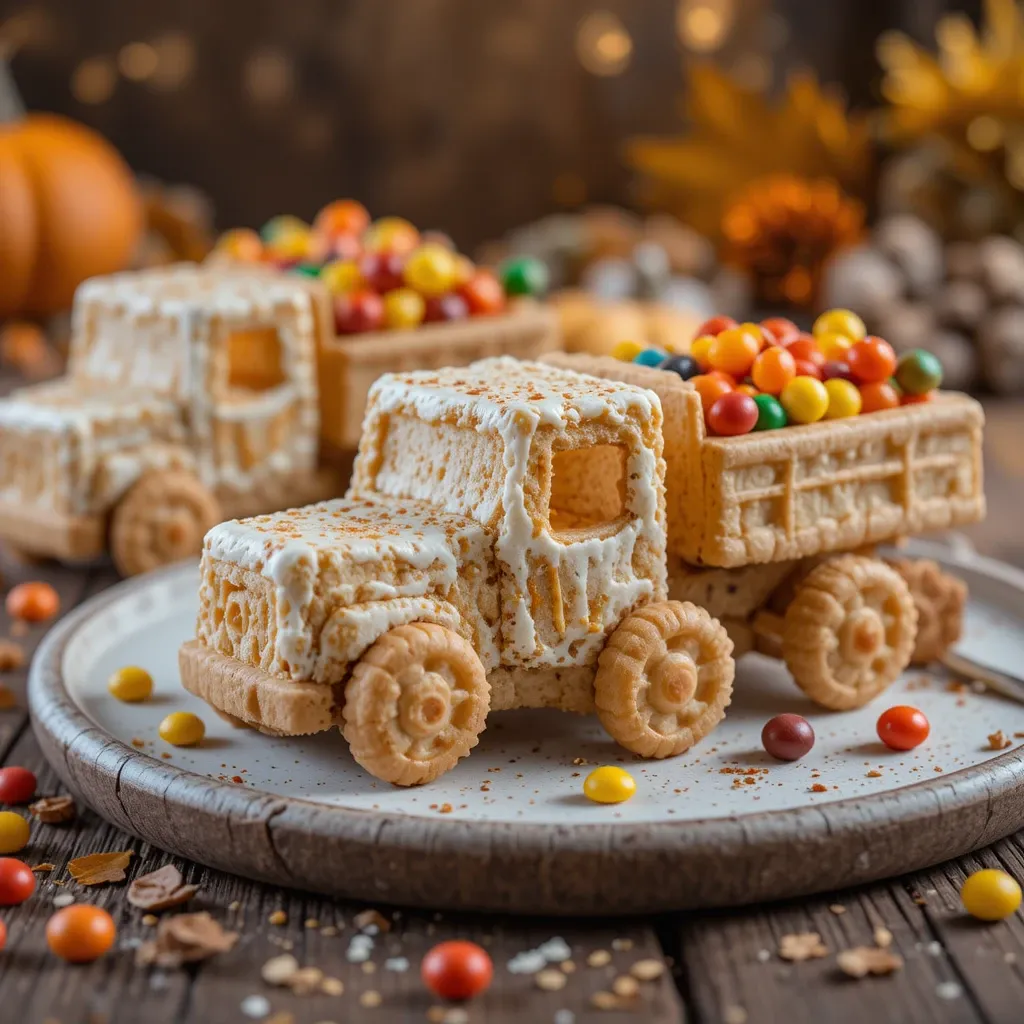
Step 5: Decorate the Cab
Using different colored icing, pipe windows on the truck cab. Add small dots for headlights and a thin rectangle for the front grille. You can use chocolate chips as headlights for added dimension. Get creative with license plates using white icing and writing with edible markers.
Step 6: Build the Cargo Rails
To create raised sides for your truck bed, pipe thick lines of icing along both long edges of the flatbed. Press mini pretzel sticks into these lines to form “rails” that will contain your candy cargo. Alternatively, use small rectangular cookies or broken graham cracker pieces.
Step 7: Load the Truck Bed
Pipe a generous amount of icing inside the truck bed between the rails. This acts as adhesive for your candy cargo. Artfully arrange candy corn, M&Ms, chocolate chips, and gummy candies to look like a bountiful harvest load. Press gently to secure. Think about color combinations—orange, yellow, brown, and red create that perfect autumn palette.
Step 8: Add Final Details
Use additional royal icing to add finishing touches. Pipe an outline around the truck edges for definition. Add small dots or swirls for decoration. You can even create tiny pumpkins by piping orange dots with green stem details on the truck’s side panels.
Step 9: Let Everything Set
Place your completed thanksgiving cookies truck on parchment paper and let the icing harden completely for 15-20 minutes. Don’t be tempted to move them too soon, or the structure might collapse. The royal icing will dry rock-hard, creating a stable edible sculpture.
Step 10: Display and Enjoy
Once fully set, carefully transfer your cookie trucks to a serving platter. Arrange them on a bed of crushed graham crackers to look like a dirt road, or place them on individual dessert plates. These treats are as fun to display as they are to eat!
What to Serve Thanksgiving Cookies Truck With:
These whimsical cookie trucks pair beautifully with several Thanksgiving beverages and desserts:
Hot Apple Cider: The warm, spiced flavors complement the sweet cookie trucks perfectly. Serve in mugs with cinnamon sticks for stirring.
Pumpkin Spice Lattes: The fall favorite beverage creates a cohesive autumn theme when served alongside these treats.
Vanilla Ice Cream: Crumble a cookie truck over vanilla ice cream for an incredible textured sundae experience.
Fruit Salad: Balance the sweetness with a fresh fruit salad featuring apples, pears, grapes, and pomegranate seeds.
Hot Chocolate Bar: Set up a hot chocolate station with marshmallows, whipped cream, and crushed candy canes. The cookie trucks make perfect stirring sticks or side treats.
Cheese Platter: Before dessert, serve a simple cheese and cracker platter to cleanse the palate before the sweet finale.
Top Tips for Perfecting Thanksgiving Cookies Truck:
Master the Royal Icing Consistency
The secret to sturdy cookie trucks lies in your icing consistency. It should be thick enough to hold pieces together but not so stiff that it won’t spread. Test by piping a small amount—it should hold its shape for 10 seconds before slightly settling. If decorating intricate details, thin the icing slightly with a few drops of water for easier piping.
Work in Stages for Stability
Don’t try to assemble everything at once. Attach wheels first and let them set for 5 minutes. Then add the cab and wait another 10 minutes before loading cargo. This staged approach prevents structural collapse and frustration. Patience creates professional results!
Choose Fresh Graham Crackers
Stale graham crackers break easily and won’t provide adequate structure. Check the expiration date and feel the package—fresh crackers should feel firm, not soft or bendable. Store opened packages in an airtight container to maintain crispness.
Size Your Candy Appropriately
Small candies work best for realistic proportions. Avoid large candy pieces that overwhelm the truck or make it top-heavy. Mini M&Ms work better than regular size. Cut larger gummy candies into smaller pieces if needed.
Use Gel Food Coloring
Liquid food coloring can thin your royal icing too much. Gel or paste food coloring provides vibrant colors without compromising consistency. Add gradually—you can always add more, but you can’t take it away.
Create an Assembly Line
If making multiple trucks (great for classroom parties or large gatherings), set up stations: one for base assembly, one for decoration, one for cargo loading. This production line approach saves time and keeps things organized.
Prevent Sliding Disasters
Royal icing can be slippery before it sets. Work on a flat, stable surface and avoid moving trucks until completely dry. If transporting, place them in a box with individual compartments or secure with additional icing dots to a cardboard base.
Temperature Matters
Royal icing sets faster in cool, dry conditions. Avoid making these on humid days if possible, as moisture prevents proper hardening. If your kitchen is warm, place finished trucks near an open window or in a cool room to speed setting.
Substitute Smart
No meringue powder? Use 2 egg whites instead, beating them with powdered sugar and a teaspoon of lemon juice until stiff peaks form. No vanilla wafers? Use Oreo cookies with the cream scraped off, or round shortbread cookies. Get creative with what you have!
Plan Your Color Scheme
Before starting, decide on a color theme. Traditional Thanksgiving uses orange, brown, yellow, and red. But you could do all chocolate and gold for elegance, or pastel colors for a whimsical twist. Having a plan prevents candy chaos.
Storing and Reheating Tips:
Short-Term Storage:
Completed thanksgiving cookies truck treats stay fresh for 5-7 days when stored properly. Place them in a single layer in an airtight container with parchment paper between layers if stacking. Keep at room temperature in a cool, dry place away from direct sunlight. Refrigeration isn’t necessary and can actually make graham crackers soft and lose their crunch.
Long-Term Storage:
These cookie trucks can be frozen for up to 2 months, though some candies may experience texture changes. Place completely set trucks on a parchment-lined baking sheet and freeze for 1 hour until solid. Then transfer to a freezer-safe container with parchment between layers. Thaw at room temperature for 30 minutes before serving.
Humidity Considerations:
Royal icing is highly susceptible to humidity. If your area is humid, store trucks with a small packet of food-safe silica gel in the container to absorb excess moisture. This keeps both the icing and crackers crisp.
Pre-Assembly Storage:
If you want to prep ahead, make royal icing up to 3 days in advance. Store in an airtight container with plastic wrap pressed directly on the surface to prevent crusting. Stir well before using. Graham crackers and candies can obviously be stored in their original packages until assembly day.
Gift Packaging:
Planning to give these as gifts? Wrap each truck individually in clear cellophane bags tied with ribbon. This not only looks festive but also protects the delicate structure during transport. Add a cute tag with a Thanksgiving message.
Reheating Note:
These treats are meant to be enjoyed at room temperature and should never be reheated, as this would melt the icing and candy components.
Frequently Asked Questions
Can I make thanksgiving cookies truck treats ahead of time?
Absolutely! These cookie trucks are perfect for advance preparation. Make them 2-3 days before your Thanksgiving celebration and store in an airtight container at room temperature. The royal icing actually gets stronger as it ages, making your trucks more stable. Just add any last-minute fresh decorations right before serving.
What can I use instead of royal icing?
While royal icing provides the strongest hold, you can use store-bought white decorating icing in a tube for a quicker option. Melted chocolate also works but takes longer to set and may not hold as firmly. Thick cream cheese frosting can work in a pinch, but refrigeration will be necessary, which may soften the graham crackers.
Are these cookies suitable for kids with food allergies?
Yes, with modifications! Use gluten-free graham crackers and cookies for celiac or gluten-sensitive children. For egg allergies, substitute the meringue powder royal icing with a simple powdered sugar and water glaze. Choose allergy-friendly candies carefully, checking labels for common allergens like peanuts, tree nuts, and dairy.
How do I transport cookie trucks to a party?
Transport is tricky but manageable. Place each truck in a cupcake liner inside a cupcake carrier for individual protection. Alternatively, use a sturdy cardboard box lined with parchment paper. Pipe small dots of royal icing on the cardboard to “glue” each truck in place during transport. Drive carefully and avoid sudden stops!
Can I use homemade cookies instead of graham crackers?
Yes! Sugar cookies or gingerbread cookies work wonderfully and can be cut into specific truck shapes before baking. Just ensure they’re sturdy (not too delicate or crumbly) and completely cooled before assembly. The cookies should be at least ¼ inch thick for adequate strength.
What if my royal icing is too runny?
Add more powdered sugar, one tablespoon at a time, beating well after each addition until you reach the desired consistency. The icing should form stiff peaks and hold its shape. If it’s too thick and difficult to pipe, add water one teaspoon at a time.
How many cookie trucks should I make per person?
These are rich and sweet, so one truck per person is usually sufficient, especially if you’re serving other desserts. For a kids’ party where these are the main treat, consider 1-2 per child. They’re also great as take-home favors!
Can adults enjoy these, or are they just for kids?
Cookie trucks appeal to all ages! Adults love the nostalgic, playful nature and appreciate the creative presentation. They’re especially popular at friendsgiving celebrations and adult Thanksgiving gatherings. Plus, they make great conversation pieces and Instagram-worthy desserts.
What’s the best way to eat a cookie truck?
There’s no wrong way! Some people disassemble and eat piece by piece, savoring different components. Others bite right in for a flavor explosion of cookie, icing, and candy. Kids especially enjoy “unloading” the candy cargo first. However you choose, it’s delicious!
Do I need special baking skills to make these?
Not at all! This is a no-bake assembly project requiring only basic decorating skills. If you can spread frosting and stack cookies, you can make these trucks. The beauty is in the imperfection—each truck will have its own personality, which adds to their charm.
Nutrition Information
| Nutrient | Per Cookie Truck |
|---|---|
| Calories | 285 |
| Total Fat | 8g |
| Saturated Fat | 3g |
| Cholesterol | 0mg |
| Sodium | 195mg |
| Total Carbohydrates | 52g |
| Dietary Fiber | 1g |
| Sugars | 38g |
| Protein | 2g |
Nutritional values are approximate and will vary based on specific ingredients and candy choices used.
Bonus Creative Ideas to Elevate Your Cookie Trucks
Theme Variations:
Create a whole fleet with different themes! Make pickup trucks with candy corn, dump trucks filled with chocolate rocks (cocoa pebbles), or delivery vans carrying mini marshmallow packages. Color-coordinate candies for specific trucks—all brown candies for a “chocolate delivery,” all orange for “pumpkin transport.”
Edible Landscape:
Transform your serving platter into a complete scene. Use crushed graham crackers as “dirt roads,” green coconut as grass, and pretzel sticks as fence posts. Add small paper trees or create mini hay bales from shredded wheat cereal. This creates an Instagram-worthy Thanksgiving tablescape.
Personalization Station:
At your Thanksgiving gathering, set up a cookie truck decorating station where guests create their own. Provide pre-assembled truck bases (you’ve attached the wheels and cab) along with bowls of assorted candies, icing in piping bags, and decorating tools. It’s entertainment and dessert combined!
Name Tag Additions:
Use edible marker pens or piped icing to write family members’ names on the truck cabs. These become personalized place cards that double as take-home favors. Kids especially love finding their named truck at the dinner table.
Size Variations:
Make a parade of different-sized trucks using various cookie bases. Mini trucks using Ritz crackers and Necco wafer wheels make adorable bite-sized treats. Monster trucks using double-stacked graham crackers with large Oreo wheels create dramatic statement pieces.
Historical Education:
Share the history of Thanksgiving harvest traditions while making these trucks. Discuss how early settlers transported their harvests and how modern agriculture works. This transforms cookie decorating into an educational opportunity for curious children.
Photography Tips:
These cookie trucks are incredibly photogenic. Photograph them on rustic wood boards with autumn leaves scattered around. Use natural lighting from a window. Shoot from a low angle to make trucks look life-sized and impressive. These photos will be your most-saved Pinterest pins!
Leftover Creativity:
Got broken pieces or extra supplies? Create “cookie truck crashes” with crumbled pieces artfully arranged, or make a “truck graveyard” dessert cup with layers of crushed cookies, pudding, and candy. Waste nothing!
The Joy of Thanksgiving Cookies Truck Tradition
There’s something magical about watching children’s faces light up when they see a table full of colorful cookie trucks. These treats represent more than just sugar and spice—they embody the spirit of creativity, family togetherness, and gratitude that defines Thanksgiving.
In our fast-paced world of store-bought convenience, taking time to craft something with your hands creates meaningful memories. The slight imperfections, the sticky fingers covered in icing, the debates over which candy belongs where—these moments become the stories shared for years to come.
Thanksgiving cookies truck treats invite us to play with our food in the best possible way. They remind us that holidays should be fun, that desserts can be interactive, and that the simplest ingredients can create spectacular results when combined with imagination and love.
So this Thanksgiving, start a new tradition. Gather your loved ones, spread out the graham crackers and candy, and build a fleet of cookie trucks that will transport your celebration straight to deliciousness. Your family will thank you, your Instagram followers will envy you, and your heart will be full watching everyone enjoy these whimsical creations.
Happy baking—or rather, happy assembling—and may your Thanksgiving be filled with joy, gratitude, and plenty of adorable edible trucks!
Pro tip: Don’t forget to take photos before anyone takes a bite. These cookie trucks disappear faster than real trucks on a highway!
For more creative Thanksgiving recipes and holiday baking inspiration, subscribe to our newsletter and follow us on Pinterest, Instagram, and Facebook. Share your cookie truck creations with #ThanksgivingCookiesTruck—we love seeing your delicious results!