The BEST Thanksgiving Cookies Decorated Pie You’ll Ever Make
Picture this: golden, flaky-looking cookies that fool everyone into thinking you spent hours making mini pies. Last Thanksgiving, I brought these to my sister’s house, and my brother-in-law literally argued with me for five minutes that they were “definitely tiny pies, not cookies.” The look on his face when he bit into one? Priceless.
These thanksgiving cookies decorated pie style have become my secret weapon for holiday gatherings. They’ve got that gorgeous lattice-top look, the warm spice flavors of actual pie, and the convenience of grab-and-go cookies. Plus, decorating them is actually fun instead of stressful (which, let’s be honest, is rare during the holiday season).
I’ve been making these for three years now, and each time I perfect them a little more. The first year, my lattice strips were too thick and kinda looked like prison bars. By year two, I figured out the dough consistency that makes them actually look like pie crust. This year? I’m basically a thanksgiving cookies decorated pie artist, and I’m sharing all my hard-won secrets with you.
Why These Cookies Steal the Show Every Time
Here’s the thing about bringing dessert to Thanksgiving – you’re competing with grandma’s famous pecan pie and aunt Linda’s pumpkin cheesecake. But these cookies? They get photographed before anyone even takes a bite.
They Look Impossibly Impressive (But They’re Not)
I’m going to be real with you: these look like they require pastry school training. They don’t. If you can roll dough and use a pizza cutter, you can make these. The decorating process took me about 35 minutes the first time, but now I can knock out a batch in 20 minutes flat. The secret is having everything ready before you start – trust me on this.
The Flavor Is Actually Pie-Like
Most decorated cookies taste like… decorated cookies. These thanksgiving cookies decorated pie treats actually deliver on their promise. I use real pumpkin pie spice, a touch of molasses for depth, and browned butter in the dough. That browned butter? Game changer. It adds this nutty, caramelized flavor that makes people ask “what IS that?” in the best way possible.
Perfect for Cookie Exchanges
If you do cookie swaps (and honestly, they’re the best part of the season), these win. Every. Single. Time. They’re sturdy enough to transport without falling apart, they look stunning on a platter, and nobody else brings anything remotely like them. I’ve literally had people message me in February asking for the recipe.
Kid-Friendly Decorating Activity
My 8-year-old nephew helped me make these last year, and he actually stayed focused for the entire decorating process. That’s saying something. Kids love laying down the lattice strips and brushing on the egg wash. Just maybe supervise the cinnamon sugar application – learned that one the hard way when half the container ended up on two cookies.
Recipe Card
| Recipe Details | |
|---|---|
| Prep Time | 30 minutes |
| Chill Time | 2 hours |
| Baking Time | 12 minutes |
| Total Time | 2 hours 42 minutes |
| Yield | 24 cookies |
| Difficulty | Medium |
| Calories | 165 per cookie |
| Protein | 2g |
| Carbs | 22g |
| Fat | 8g |
Ingredients for Thanksgiving Cookies Decorated Pie
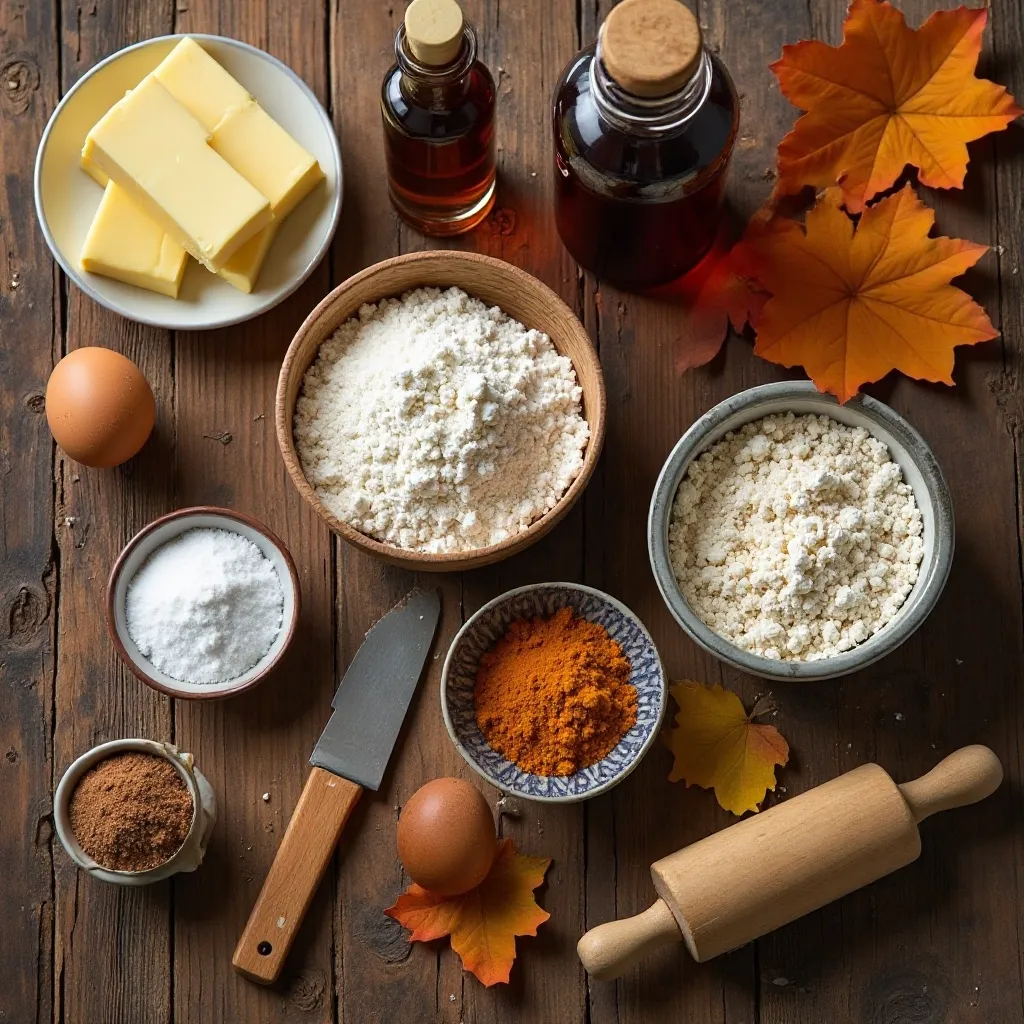
Before we dive in, let me tell you about the ingredients that really matter here. The browned butter is non-negotiable – it’s what separates these from basic sugar cookies. And please, use real pumpkin pie spice, not just cinnamon. The complexity of flavors makes all the difference.
I always make these in my stand mixer because the dough needs to be perfectly smooth, but a hand mixer works fine if you’ve got some arm strength. You’ll also need a small round cookie cutter (I use a 3-inch) and either a small knife or a fluted pastry wheel for the lattice strips. A pastry wheel makes those pretty crimped edges, but honestly? A regular knife works just fine.
For the Cookie Dough:
- 1 cup (2 sticks) unsalted butter
- 1 cup granulated sugar
- 1 large egg
- 2 teaspoons vanilla extract
- 1 teaspoon molasses
- 3 cups all-purpose flour
- 2 teaspoons pumpkin pie spice
- 1 teaspoon baking powder
- ½ teaspoon salt
For the “Pie Filling” Decoration:
- ½ cup pumpkin butter or apple butter (I prefer pumpkin)
- 1 egg + 1 tablespoon water (for egg wash)
- 2 tablespoons coarse sugar mixed with ½ teaspoon cinnamon
Optional but Recommended:
- Mini pie crust cutters for vents (so cute!)
- Gold luster dust for extra fancy vibes
The Simple Process for Perfect Pie Cookies
Quick Overview:
This recipe breaks down into four easy phases: brown the butter, make the dough, chill it, then decorate and bake. The hardest part is honestly waiting for the dough to chill – I usually make it the night before I plan to decorate. Takes the pressure off, and the dough handles even better after a full night in the fridge.
Step-by-Step Instructions:
Step 1: Brown That Butter
Cut your butter into tablespoon-sized pieces and melt it in a light-colored saucepan over medium heat. This is important – you need to SEE when the butter browns, and a dark pan makes that impossible. Stir constantly once it starts foaming. After about 5-7 minutes, you’ll see little brown specks at the bottom and smell a nutty, almost toasty aroma. That’s your cue. Pour it immediately into a heat-safe bowl and let it cool to room temperature (this takes about 20 minutes).
Step 2: Mix the Dough
Once your browned butter has cooled, beat it with the sugar in your mixer for about 2 minutes until it’s light and fluffy. Add the egg, vanilla, and molasses, beating until combined. In a separate bowl, whisk together the flour, pumpkin pie spice, baking powder, and salt. Gradually add the dry ingredients to the wet, mixing on low speed. The dough should come together and pull away from the sides of the bowl. If it’s sticky, add a tablespoon more flour.
Step 3: Chill Time
Divide the dough in half, shape each half into a disk, wrap in plastic wrap, and refrigerate for at least 2 hours. I cannot stress this enough – don’t skip the chilling. I tried once when I was running late, and the cookies spread like crazy and lost all their cute details. Not worth it.
Step 4: Roll and Cut
Preheat your oven to 350°F and line baking sheets with parchment paper. Working with one disk at a time (keep the other chilled), roll the dough on a lightly floured surface to about ¼-inch thickness. Cut out circles with your cookie cutter. You’ll get about 24 circles total. Place half of them on your prepared baking sheets – these are your bases.
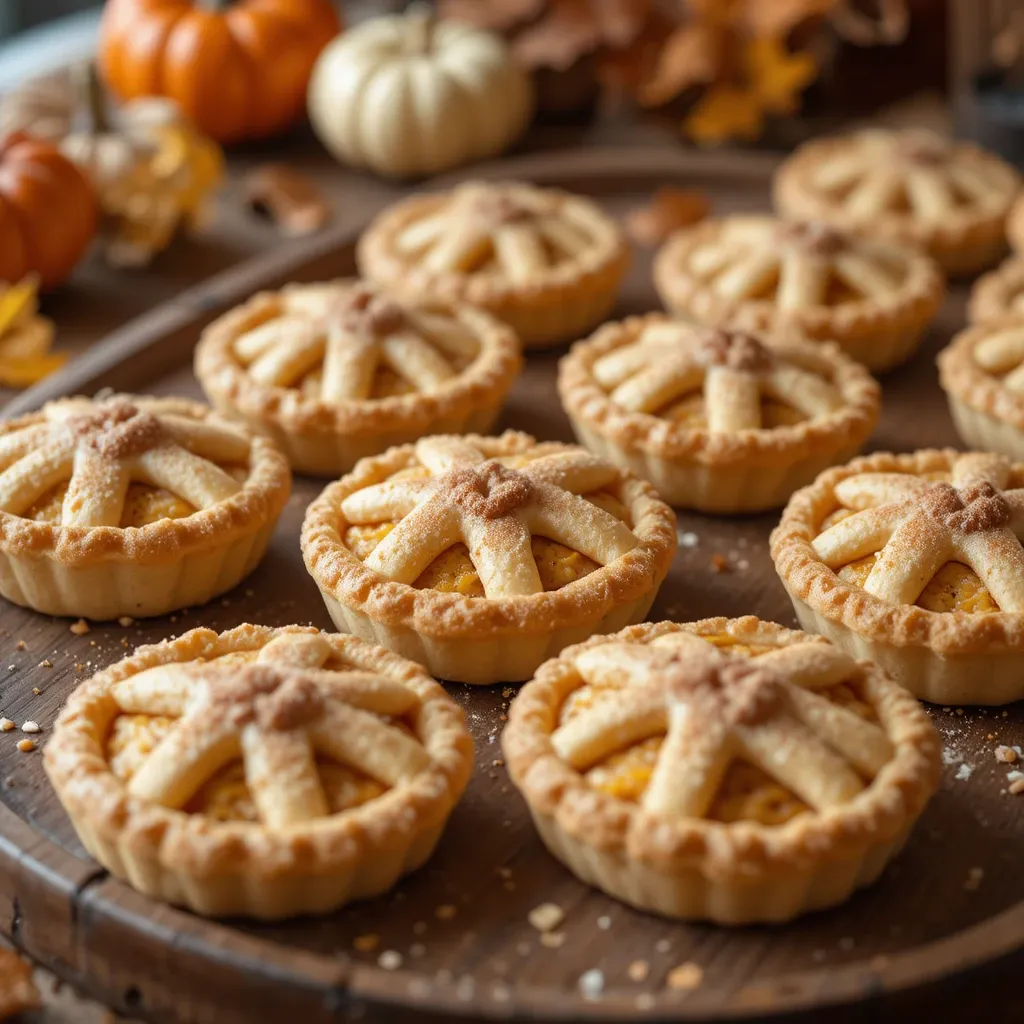
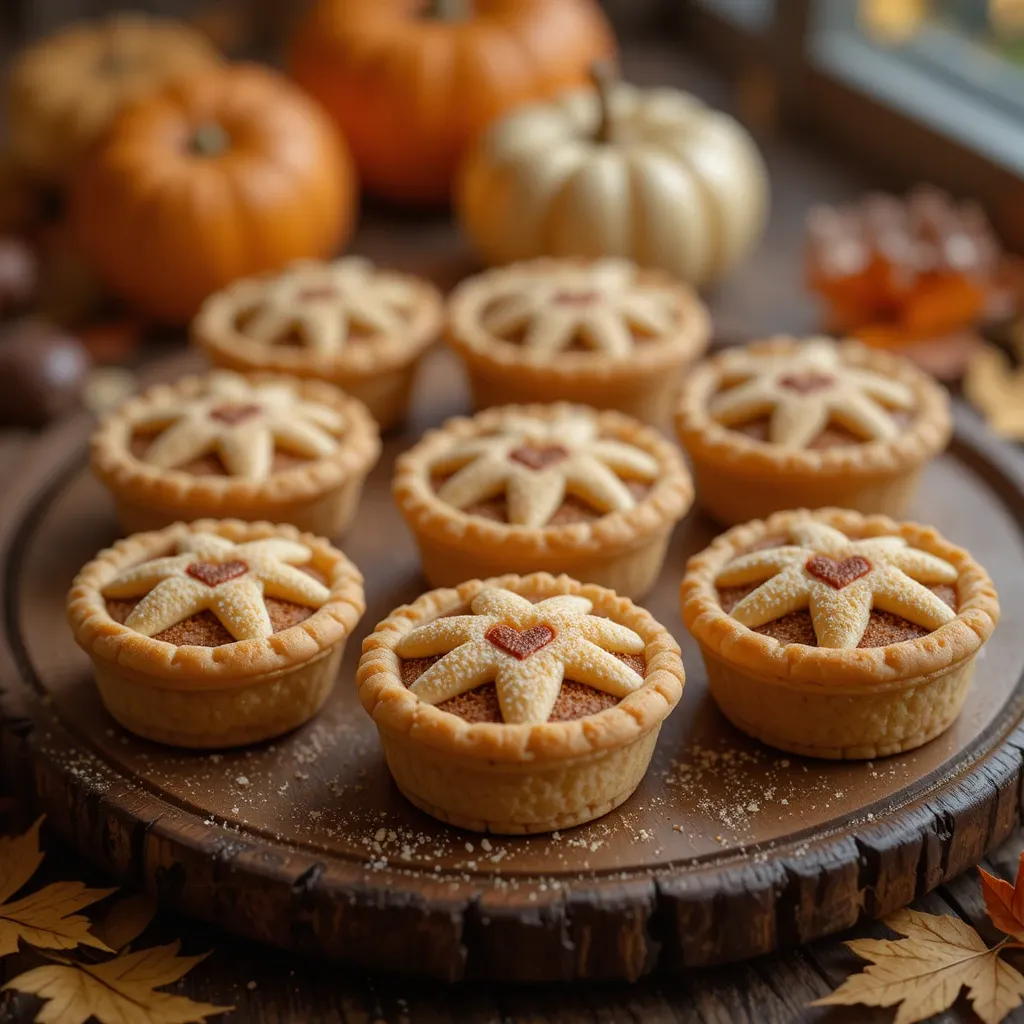
Step 5: Create the Pie Effect
Here’s where it gets fun. Spread about a teaspoon of pumpkin butter in the center of each base cookie, leaving a ¼-inch border. Now take your remaining dough circles and cut small lattice strips – I cut mine about ¼-inch wide. Lay them across the pumpkin butter in a crisscross pattern. You can do a fancy over-under weave if you’re feeling ambitious (I usually do for about half the batch), or just lay strips on top of each other. Both look great.
Step 6: Finishing Touches
Whisk together the egg and water, then brush this mixture over the entire surface of each cookie. This creates that gorgeous golden shine. Immediately sprinkle with your cinnamon sugar mixture. If you have mini pie crust cutters, now’s the time to add little hearts or leaves to some of them. I usually do about 6 decorated with cutouts and leave the rest with just lattice.
Step 7: Bake to Golden Perfection
Bake for 11-13 minutes. You’re looking for lightly golden edges and a slight puff to the cookies. They might look slightly underdone in the center, but they’ll firm up as they cool. Let them sit on the baking sheet for 5 minutes (this is crucial – I once tried to move them immediately and broke three), then transfer to a wire rack.
My Favorite Ways to Serve These Beauties
These thanksgiving cookies decorated pie style are honestly perfect on their own, but if you want to make them part of a full dessert spread, I’ve got thoughts.
The Classic Thanksgiving Dessert Table
I arrange these on a wooden cutting board with some fresh fall leaves tucked around the edges (not touching the cookies, just decorative). Put them next to a bowl of whipped cream for dipping – sounds weird, but it’s like getting a bite of pie à la mode. Some people in my family even crumble them over vanilla ice cream, which I thought was sacrilege until I tried it.
Coffee Break Companion
These pair beautifully with a spiced chai latte or a strong coffee. The spices in the cookie echo the chai spices, and the sweetness balances a dark roast perfectly. I’ve been bringing these to my book club meetings, and they disappear faster than anything else I’ve ever made.
Gifting Game-Changer
Stack them in a clear cellophane bag tied with raffia, and you’ve got instant hostess gifts. I made 60 of these last Thanksgiving and gave them to neighbors, my kids’ teachers, and our mail carrier. Everyone was thrilled. Just layer them with parchment paper squares in between so the decorations don’t stick together.
Pro Tips from My Kitchen
Should I use salted or unsalted butter?
Always unsalted for these. The pumpkin butter and the dough itself already have salt, and if you use salted butter, the cookies end up tasting a bit too savory. I learned this the hard way when I ran out of unsalted butter and thought “eh, it’ll be fine.” It wasn’t fine.
My foolproof timing trick
Set a timer for 11 minutes, then check them. If the edges are golden and the centers look set but soft, they’re done. If they still look raw in the middle, give them 1 more minute at a time. My oven runs hot, so mine are always done at 11 minutes flat, but I know some people need the full 13 minutes.
The secret to crisp lattice strips
Roll the dough for your lattice strips slightly thinner than your base cookies – like closer to ⅛-inch. This ensures they get crispy while the base stays tender. Also, make sure your strips are completely chilled before laying them down. If they’re too warm, they’ll stick to everything and tear.
Can I make these ahead of time?
Yes! The dough keeps in the fridge for up to 3 days or in the freezer for 2 months. Already-baked cookies stay fresh in an airtight container for 5 days, or you can freeze them for up to a month. Just let them come to room temperature before serving – they taste best that way.
Don’t skip the egg wash
I know it seems like an extra step, but the egg wash is what gives these that authentic pie crust look. Without it, they just look like… decorated cookies. With it? Everyone asks if you went to pastry school. The shine and golden color are worth the 30 seconds of brushing.
Room temperature matters
Make sure your browned butter has completely cooled before mixing. If it’s even slightly warm, it’ll make the dough too soft to handle. I usually brown my butter first thing when I start baking, then prep all my other ingredients while it cools.
Storage and Make-Ahead Magic
Keeping Them Fresh
Store these thanksgiving cookies decorated pie treats in an airtight container at room temperature. They’ll stay perfectly fresh for 5 days, though honestly, they never last that long in my house. The key is making sure they’re completely cool before storing them – any residual warmth creates condensation, which makes them soft and sticky.
Freezing Instructions
These freeze beautifully. Layer them in a freezer-safe container with parchment paper between each layer. They’ll keep for up to 2 months. To serve, let them thaw at room temperature for about 30 minutes. I actually prefer making a double batch and freezing half so I can pull them out for unexpected guests throughout the season.
Make-Ahead Strategy
Here’s my favorite timeline: Make the dough on Monday, chill it overnight, decorate and bake on Tuesday, store or freeze on Wednesday. This spreads out the work so you’re never stressed. I’ve also successfully made these completely two weeks in advance, frozen them, and served them at Thanksgiving – nobody could tell they weren’t fresh-baked that morning.
Variations Worth Trying
Apple Pie Version
Swap the pumpkin butter for apple butter and add an extra ½ teaspoon of cinnamon to the dough. Before adding the lattice, sprinkle tiny diced apples (like, really tiny) on the apple butter. These taste exactly like apple pie cookies and are perfect for anyone who’s team apple over team pumpkin.
Pecan Pie Twist
Mix 2 tablespoons of finely chopped pecans into your pumpkin butter before spreading. After the egg wash, press a tiny pecan piece into the center of each cookie. The crunch factor is incredible, and these win over the pecan pie purists in the family.
Make Them Gluten-Free
I’ve tested this with a 1:1 gluten-free flour blend, and it works surprisingly well. The texture is slightly more crumbly, but the taste is spot-on. Just make sure to chill the dough for at least 3 hours instead of 2 – it needs the extra time to hydrate.
Recipe FAQs
Can I use store-bought cookie dough?
Technically yes, but you’ll miss out on that browned butter flavor that makes these special. If you’re in a serious time crunch, use a high-quality sugar cookie dough and add the pumpkin pie spice yourself. Won’t be quite the same, but still pretty tasty.
What if I don’t have pumpkin butter?
Mix ¼ cup of pumpkin puree with ¼ cup of brown sugar and ½ teaspoon pumpkin pie spice. Simmer it in a small saucepan for about 5 minutes until it thickens. Let it cool completely before using. I’ve done this in a pinch, and it works great.
Why did my lattice strips break?
The dough was probably too cold. Let it sit at room temperature for about 5 minutes after rolling if the strips keep cracking. You want it cold enough to handle but pliable enough to lay down without breaking.
Can kids really help make these?
Absolutely. My niece and nephew (ages 6 and 8) helped last year. They rolled the dough, cut the circles, and did the lattice strips. I handled the oven and the egg wash. It took us about twice as long, but they were so proud of themselves, and the cookies still looked great.
How do I prevent the cookies from spreading?
Make sure your dough is thoroughly chilled, and don’t skip chilling it between rolling and baking if your kitchen is warm. Also, don’t overbake – pulling them right when the edges turn golden keeps them from spreading too much.
Okay, real talk – these thanksgiving cookies decorated pie style are going to become your new holiday tradition. They’re impressive enough for your fanciest dinner party but easy enough for a random Tuesday when you need something festive.
Try making a batch this weekend, and I guarantee you’ll be the person everyone asks to bring cookies to every event for the rest of the season. And honestly? That’s a pretty great problem to have.
Drop a comment below if you make these – I love seeing everyone’s creative lattice designs! And if you’re feeling adventurous, try the pecan version. It’s my personal favorite on days when I want something a little extra special.