Easy Thanksgiving Sugar Cookies for Kids Simple & Delicious
Last Tuesday afternoon, my kitchen counter looked like a flour bomb had exploded. My seven-year-old daughter and her best friend were elbow-deep in cookie dough, giggling as they pressed turkey-shaped cutters into rolled-out dough. That’s when I realized—this wasn’t just about making Thanksgiving sugar cookies for kids. It was about creating those sticky-fingered memories that make holidays special.
I’ve been making these Thanksgiving sugar cookies for kids for the past five years, and honestly? They’ve become our official kickoff to the holiday season. The recipe itself is incredibly forgiving (trust me, I once accidentally added salt instead of sugar to the first batch and we still salvaged it), and the decorating part keeps little hands busy for at least an hour. That’s a win in my book.
Here’s the thing about these cookies—they’re soft enough that kids can actually bite through them without breaking a tooth, but they hold their shape beautifully when you’re decorating. I’ve tested this recipe probably twelve times over the years, tweaking the butter ratio and playing with different flour amounts until I got it just right.

Why These Thanksgiving Sugar Cookies for Kids Are Actually Special
Look, I know what you’re thinking. Sugar cookies? What’s so special about that? But after making countless batches with my kids, I’ve learned exactly what makes a cookie “kid-friendly” versus one that ends up half-eaten on the counter.
They’re Actually Easy Enough for Real Kids
Most “kid-friendly” recipes still require way too much adult supervision. These? My daughter can measure most ingredients herself now. The dough comes together in one bowl, there’s no chilling time that tests a six-year-old’s patience, and you can’t really mess them up. I’ve seen kids add double the vanilla extract and they still turned out delicious.
The Texture Is Perfection
In my opinion, texture makes or breaks a sugar cookie for kids. These come out soft but not crumbly, sturdy but not tough. They’re substantial enough to hold up under enthusiastic frosting application (and we’re talking about kids who think more frosting equals better cookie), but they practically melt in your mouth. The secret that took me years to figure out is using room temperature butter—not melted, not cold, but genuinely room temp.
Budget-Friendly for Multiple Batches
With three kids in my house and their friends always wanting to join in, I need a recipe that doesn’t require fancy ingredients. Everything here is pantry-basic: flour, sugar, butter, eggs, vanilla. I can make a triple batch for under fifteen dollars, and that yields about 75 cookies depending on your cutter size.
Decorating Is Where the Magic Happens
The cookies themselves are lightly sweet, which is intentional. Kids can go wild with frosting, sprinkles, and edible glitter without the final product being tooth-achingly sweet. Plus, the flat surface works perfectly for those little bottles of decorating gel.
They Actually Keep Well
I’ve noticed that most homemade sugar cookies get rock-hard by day two. These stay soft in an airtight container for almost a week. I usually make the dough on Monday, we bake and decorate Tuesday after school, and we’re still eating them (well, what’s left of them) by the weekend.
Thanksgiving Sugar Cookies for Kids Recipe
Here’s everything you need to know before we get our hands messy:
| Recipe Details | |
|---|---|
| Prep Time | 15 minutes |
| Cook Time | 10 minutes per batch |
| Total Time | 45 minutes (including decorating) |
| Servings | 24-30 cookies (depending on cutter size) |
| Difficulty | Easy (kid-friendly!) |
| Calories | 145 per cookie |
| Protein | 2g |
| Carbs | 19g |
| Fat | 7g |
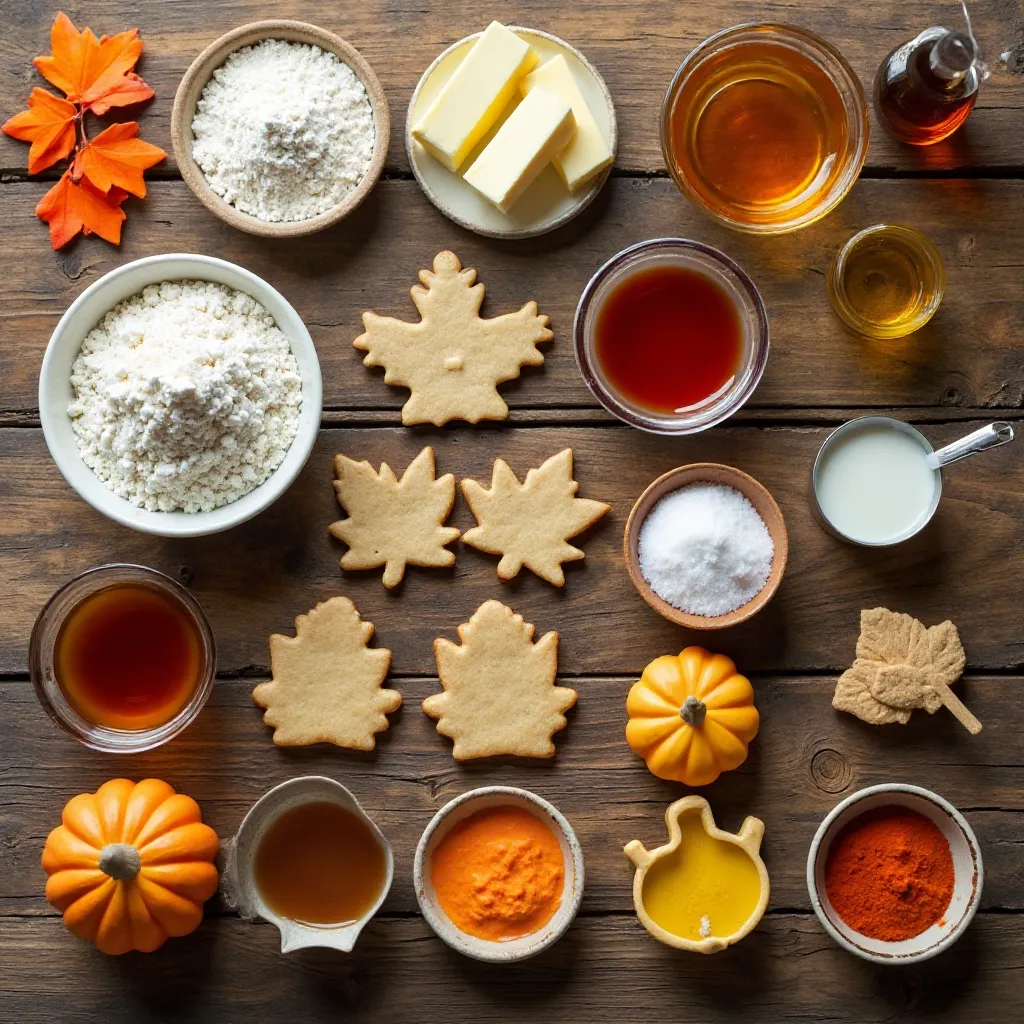
What You Need for Thanksgiving Sugar Cookies for Kids
Before you start, let me tell you—having everything measured and ready makes this so much smoother when you’ve got excited kids bouncing around your kitchen. I learned this the hard way when my son knocked over the flour container while I was fishing for the baking powder.
For the Cookies:
- 3 cups all-purpose flour (I use whatever’s cheapest, honestly)
- 1½ teaspoons baking powder
- ½ teaspoon salt
- 1 cup unsalted butter, softened to room temperature (this is crucial!)
- 1 cup granulated sugar
- 2 large eggs
- 2 teaspoons vanilla extract (or more if you’re like me)
- ½ teaspoon almond extract (optional, but it adds something special)
For Decorating:
- 2 cups powdered sugar
- 2-3 tablespoons milk
- Food coloring (orange, brown, red, yellow for that Thanksgiving vibe)
- Sprinkles, edible glitter, candy eyes—whatever makes your kids happy
Don’t skip the almond extract if you have it. The first time I made this recipe, I used only vanilla and it was good. But adding that tiny bit of almond extract? Game changer. It gives the cookies a subtle bakery-quality flavor that makes people ask what your secret is.
How to Make Perfect Thanksgiving Sugar Cookies
Let’s get cooking! I promise this is easier than it looks written out.
The Mixing Process
Step 1: Preheat your oven to 350°F. I know, I know—everyone says to preheat first, but I actually mean it here. These cookies bake fast, and you want your oven ready. Line two baking sheets with parchment paper or silicone mats.
Step 2: In a medium bowl, whisk together your flour, baking powder, and salt. Set this aside. This step seems unnecessary, but it actually prevents clumps and helps the cookies bake evenly. I once skipped it when I was in a hurry and ended up with some cookies that were weirdly dense in spots.
Step 3: In your large mixing bowl (or stand mixer if you’re fancy), beat the softened butter and sugar together for about 2-3 minutes. You want it light and fluffy—it should look almost white and airy. This is where the magic happens, so don’t rush it. I usually let my daughter operate the mixer for this part because it’s hard to mess up.
Step 4: Add the eggs one at a time, beating well after each addition. Then add your vanilla extract and almond extract. The mixture might look a bit curdled at this point—that’s totally normal and nothing to worry about.
Step 5: Gradually add the flour mixture to the butter mixture, mixing on low speed just until combined. Here’s a pro tip: don’t overmix once the flour goes in. As soon as you stop seeing dry flour patches, stop mixing. Overmixed cookie dough leads to tough cookies, and nobody wants that.
Rolling and Cutting
Step 6: Lightly flour your work surface and rolling pin. Take about a third of the dough and roll it out to about ¼-inch thickness. I’ve found that ¼ inch is the sweet spot—thin enough to bake quickly but thick enough to stay soft and hold decorations.
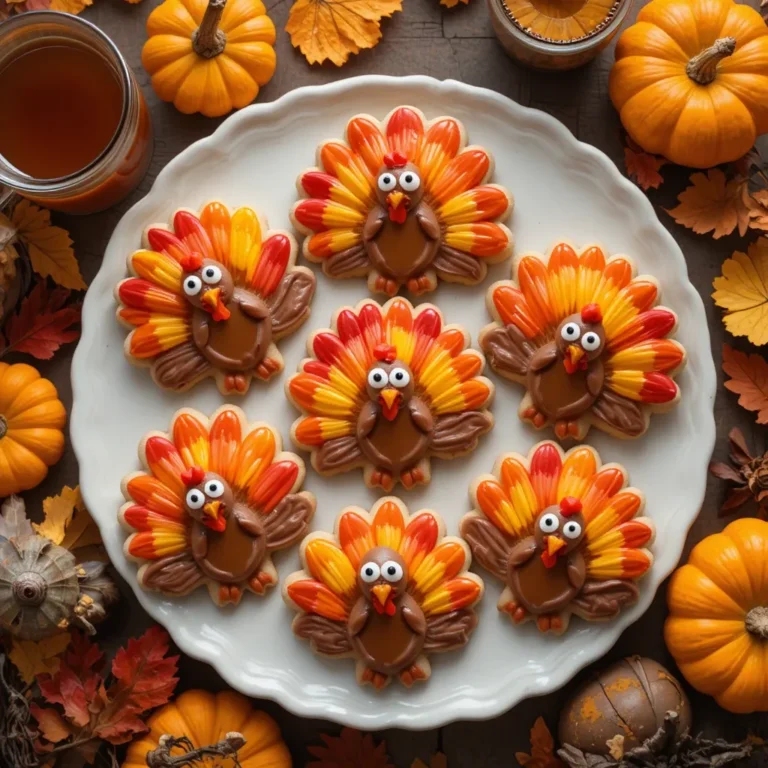
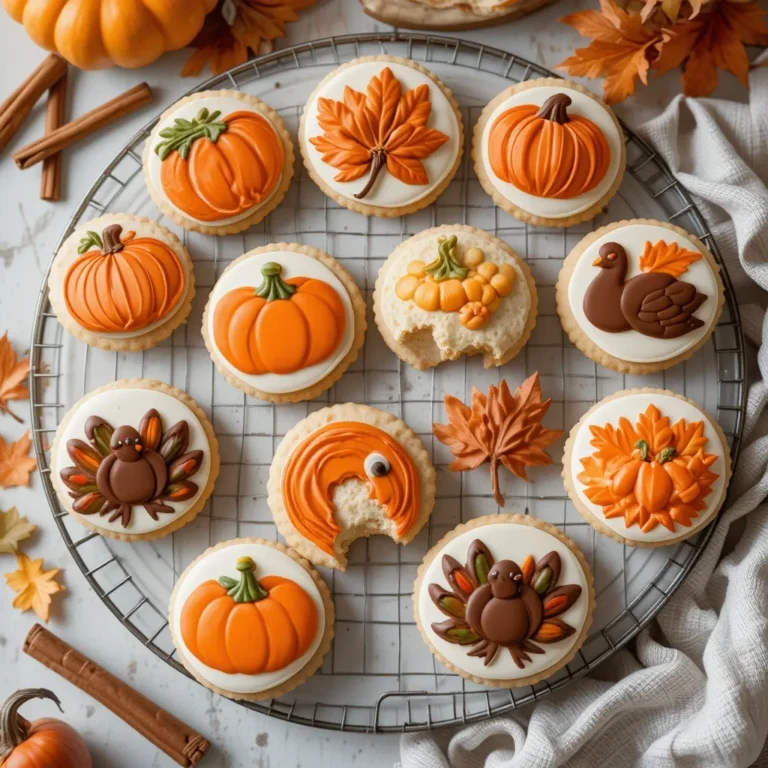
Step 7: Use your favorite Thanksgiving cookie cutters to cut out shapes. We’ve collected turkeys, pumpkins, leaves, and even a pilgrim hat over the years. Press the cutter straight down and lift straight up—twisting can warp the shape. Place cookies about 2 inches apart on your prepared baking sheets.
Step 8: Here’s something I learned after making these probably ten times—gather your scraps, re-roll them, and cut more cookies. But only re-roll once. After the second rolling, the dough gets tough from overworking. Those last scraps? Let the kids make weird abstract shapes with them. They’ll think it’s hilarious.
Baking Time
Step 9: Bake for 8-10 minutes. You’ll know they’re done when the edges are barely, just barely, starting to turn golden. The centers will still look slightly underdone—that’s perfect. They’ll continue cooking a bit on the hot pan after you remove them from the oven.
This is where timing really matters. I set a timer for 8 minutes, then watch them like a hawk. In my oven, they’re perfect at 9 minutes and 30 seconds, but every oven is different. The first time I made these, I baked them for the full 10 minutes and they came out a little too crisp. Now I pull them early and they’re always perfect.
Step 10: Let the cookies cool on the baking sheet for 5 minutes (this prevents them from breaking apart), then transfer them to a wire rack to cool completely before decorating.

Decorating Fun
Step 11: Make your frosting by whisking together powdered sugar and milk until smooth. Start with 2 tablespoons of milk and add more if needed—you want it thick enough to stay put but thin enough to spread easily.
Step 12: Divide your frosting into small bowls and add food coloring. We usually make orange, brown, red, and yellow for Thanksgiving. Let the kids go wild! There’s no wrong way to decorate these.
I’ve noticed that giving kids their own small bowls of frosting and a butter knife prevents the “sticking hands directly into the frosting bowl” situation. Trust me on this one.
My Favorite Ways to Serve These
These Thanksgiving sugar cookies for kids are perfect on their own, but here’s how we usually enjoy them at our house:
For a Kids’ Thanksgiving Table: Arrange decorated cookies on a platter as a centerpiece. Kids get so proud seeing their creations on display, and it keeps them occupied while adults finish cooking.
With Hot Chocolate: On those chilly November afternoons when we’re decorating, I make hot chocolate with marshmallows. A turkey cookie dunked in hot chocolate? My kids are convinced it’s the best snack ever invented.
As Party Activities: I’ve done this at my daughter’s Thanksgiving-themed birthday party (she was born in November). Set up a decorating station with plain cookies, frosting, and toppings. Kids decorate their own, and it’s both the activity AND the party favor.
Alongside Apple Cider: The subtle sweetness of these cookies pairs beautifully with spiced apple cider. This is actually how I enjoy them most—after the kids are in bed, with a warm mug and a good book.
Pro Tips From My Kitchen
After making these dozens of times with various kids of different ages, I’ve learned some tricks that make everything go smoother.
Don’t Skip the Room Temperature Butter
I cannot stress this enough. Cold butter won’t cream properly with the sugar, and melted butter will make your dough too soft to work with. Leave your butter out for about 45 minutes before you start, or cut it into chunks to speed up the softening process. I’ve learned to just leave mine out after breakfast if I’m planning to bake after school.
The Flour Matters Less Than You Think
I’ve made these with all-purpose flour, bread flour (accidentally), and even a gluten-free blend for my niece with celiac disease. They all work. The texture varies slightly, but they’re all delicious. So if you’re worried about buying fancy flour, don’t be.
Can I Make These Ahead of Time?
Yes! The dough actually freezes beautifully. I’ll make a double batch, freeze half as a disk wrapped in plastic wrap, and pull it out whenever we want fresh cookies. Let it thaw in the fridge overnight, then roll and bake as usual. The baked cookies also freeze well for up to two months—just layer them between parchment paper in an airtight container.
My Foolproof Timing Trick
Set your timer for 2 minutes less than the recipe suggests, then check them. It’s way easier to bake cookies for an additional minute than to try to salvage overbaked ones. I learned this after cremating a batch while helping my son with homework.
Add More Vanilla Than You Think
The recipe calls for 2 teaspoons, but I usually add closer to a tablespoon. Vanilla extract is expensive, I know, but it makes such a difference in sugar cookies. It adds depth and masks any “flour-y” taste that can sometimes happen with kid-made cookies where the measurements might be a bit… creative.
The Secret to Extra Flavor
Before baking, I sometimes sprinkle a tiny bit of colored sugar on top of the unbaked cookies. It adds a subtle crunch and makes them look more professional. My kids love this step because they get to use the sprinkle shakers.
Storing and Keeping Them Fresh
The thing about making Thanksgiving sugar cookies for kids is that you usually end up with a lot of them (especially if you’re like me and can’t resist making just one more batch).
Short-Term Storage
Store completely cooled cookies in an airtight container at room temperature. I use a big plastic container with a tight-fitting lid. They’ll stay soft for 5-7 days. If they start to get a bit firm after a few days, toss a slice of white bread in the container overnight—it’ll soften them right up. I have no idea why this works, but it does.
Freezing for Later
Undecorated cookies freeze perfectly for up to 3 months. Stack them between layers of parchment paper in a freezer-safe container. When you’re ready to use them, let them thaw at room temperature for about 30 minutes, then decorate as usual.
Decorated cookies are trickier to freeze because frosting can get weird, but I’ve done it successfully by flash-freezing them on a baking sheet first, then carefully packing them in a single layer. They’re not quite as pretty after thawing, but they taste fine.
Reheating Tips
Honestly, these are best at room temperature, but if you want them slightly warm, pop them in a 300°F oven for 3-4 minutes. Don’t microwave them—they’ll get weirdly chewy.
Common Questions I Get Asked
How thick should I roll the dough? About ¼ inch is perfect. I actually use those wooden rolling pin rings you can buy at kitchen stores—they guarantee even thickness every time and were worth the $8 I spent on them.
Can kids really make these by themselves? Kids ages 6 and up can do most of it with supervision. Younger kids (my four-year-old nephew) can help measure, mix, and definitely decorate, but need help with the oven parts. The recipe is forgiving enough that if measurements are a bit off, the cookies still turn out great.
What if I don’t have cookie cutters? Use a drinking glass to cut circles, or freehand some shapes with a butter knife. My kids have made hand-shaped cookies by tracing their hands on the rolled dough. They’re wonky but adorable.
How do I prevent the cookies from spreading? Make sure your butter is softened, not melted. Also, if your kitchen is really warm, chill the cut-out cookies on the baking sheet in the fridge for 10 minutes before baking. This has saved me more than once on hot days.
Can I make these dairy-free? I’ve successfully used plant-based butter (the stick kind, not tub margarine) and they turned out nearly identical. You might need to adjust the flour slightly—add a tablespoon or two if the dough seems too soft.
Variations to Try
Once you’ve mastered the basic Thanksgiving sugar cookies for kids, here are some fun twists we’ve tried:
Add Some Spice
Mix ½ teaspoon of cinnamon and a pinch of nutmeg into the dry ingredients for a subtle fall spice flavor. Not overwhelming, just a hint of warmth.
Chocolate Chip Version
Fold ½ cup of mini chocolate chips into the dough before rolling. My son requests these constantly—he calls them “special turkey cookies.”
Lemon Variation
Replace the almond extract with lemon extract and add 1 tablespoon of lemon zest to the dough. These are refreshing and different from traditional sugar cookies.
Why This Recipe Matters to Me
I know this might sound cheesy, but these cookies have become part of our family’s Thanksgiving tradition. The Tuesday before Thanksgiving, we clear the kitchen counter, blast some fun music, and spend the afternoon making these together.
Last year, my daughter announced she wanted to make cookies for her entire third-grade class. We made 87 cookies over two evenings. Were they all perfectly decorated? Absolutely not. Did her classmates love them? Absolutely yes. And watching her beam with pride as she handed them out? That’s what this recipe is really about.
The beauty of Thanksgiving sugar cookies for kids isn’t just that they taste good (though they do). It’s that they’re easy enough for real kids to help with, forgiving enough that mistakes don’t matter, and fun enough that nobody realizes they’re actually learning kitchen skills.
So grab your favorite little helpers, dust your counter with flour, and make some memories. The messy kitchen is worth it. (I promise, it’s worth it.)
Happy baking! And hey, when you make these, snap a photo and let me know how it goes. I love seeing everyone’s creative decorating ideas—my kids and I are always looking for new inspiration for next batch.