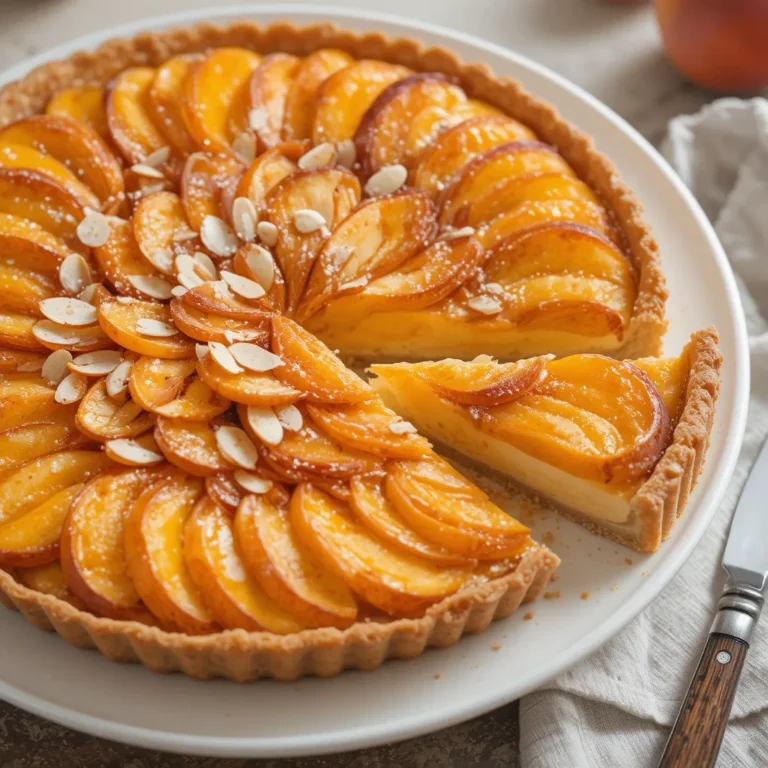
Easy Apple Tart on Puff Pastry – Ready in 45 Minutes
There’s something magical about an apple tart on puff pastry—golden, buttery layers cradling sweet cinnamon apples that practically melt in your mouth. This stunning dessert looks like it came straight from a French patisserie, but here’s the secret: it’s surprisingly simple to make at home! I discovered this recipe on a chilly autumn afternoon when unexpected guests were arriving in an hour.
With just a handful of ingredients and store-bought puff pastry, I created a dessert that had everyone asking for seconds. The best part? It takes only 15 minutes to prep and 30 minutes to bake. If you loved my classic apple pie recipe, you’ll adore this easier, quicker version that delivers all the flavor with half the effort. Let’s create some baking magic together!
This recipe is 100% AI-generated and was not personally tested by us. We’re always thinking of our readers, and feedback from those who’ve cooked other recipes on our site has been encouraging.
What is Apple Tart on Puff Pastry?
Ever wonder why this dessert sounds so fancy? Well, an apple tart on puff pastry is essentially France’s gift to busy home bakers everywhere! It’s a rustic yet elegant dessert where thin apple slices nestle atop buttery, crispy puff pastry—no complicated pie crust required. Some call it a “lazy baker’s dream,” and honestly, I’m not offended by that! The French have a saying: “La simplicité est la sophistication suprême” (simplicity is the ultimate sophistication).
This tart proves it beautifully. Whether you’re a seasoned baker or just starting your culinary journey, this recipe will make you look like a pastry chef. Ready to impress your family and friends? Let’s get those apples sliced!
Why You’ll Love This Apple Tart on Puff Pastry
The Perfect Balance of Crispy and Tender
The star of this apple tart on puff pastry is the incredible texture contrast. Imagine biting through shatteringly crisp, golden pastry that gives way to tender, caramelized apples infused with warm cinnamon and a hint of vanilla. The puff pastry puffs up beautifully around the edges, creating a natural border that holds all those lovely apple juices. Each bite delivers that satisfying crunch followed by sweet, spiced apple goodness.
Budget-Friendly Elegance
Making an apple tart on puff pastry at home costs a fraction of what you’d pay at a bakery—usually around $5-7 for a tart that easily serves 6-8 people! Compare that to the $25-35 you’d spend on a similar dessert at a café. Store-bought puff pastry is your secret weapon here, available at any grocery store for just a few dollars. Combined with affordable apples and pantry staples like sugar and cinnamon, you’re creating a showstopper dessert without breaking the bank.
Customizable and Versatile
What makes this recipe truly special is how adaptable it is. Love caramel? Drizzle some over the warm tart. Prefer a nutty crunch? Sprinkle toasted almonds on top. You can even add a dollop of vanilla ice cream or whipped cream for extra indulgence. The apples themselves can be varied—try Granny Smith for tartness, Honeycrisp for sweetness, or mix varieties for complexity. If you enjoyed my peach galette recipe, you’ll appreciate how similar techniques create entirely different flavor profiles. This versatility means you can make this tart year-round and never get bored.
How to Make Apple Tart on Puff Pastry
Quick Overview
This apple tart on puff pastry is perfect for both beginner and experienced bakers. The recipe combines simple techniques with impressive results. You’ll love how the puff pastry creates hundreds of flaky layers while the apples caramelize to perfection. The warm spices fill your kitchen with an irresistible aroma that signals comfort and home.
Preparation Details:
- Prep Time: 15 minutes
- Cook Time: 30-35 minutes
- Total Time: 45-50 minutes
- Servings: 6-8 slices
- Difficulty Level: Easy
Key Ingredients for Apple Tart on Puff Pastry
For the Tart:
- 1 sheet frozen puff pastry (about 14 oz), thawed
- 3-4 medium apples (Granny Smith, Honeycrisp, or Gala work beautifully)
- 3 tablespoons granulated sugar
- 1 tablespoon brown sugar
- 1 teaspoon ground cinnamon
- ¼ teaspoon ground nutmeg
- 2 tablespoons unsalted butter, melted
- 1 tablespoon lemon juice
- 1 teaspoon vanilla extract
- 1 egg, beaten (for egg wash)
- 2 tablespoons apricot jam or honey (for glazing)
- Pinch of salt
Optional Toppings:
- Powdered sugar for dusting
- Vanilla ice cream
- Whipped cream
- Caramel sauce
- Toasted sliced almonds
Step-by-Step Instructions
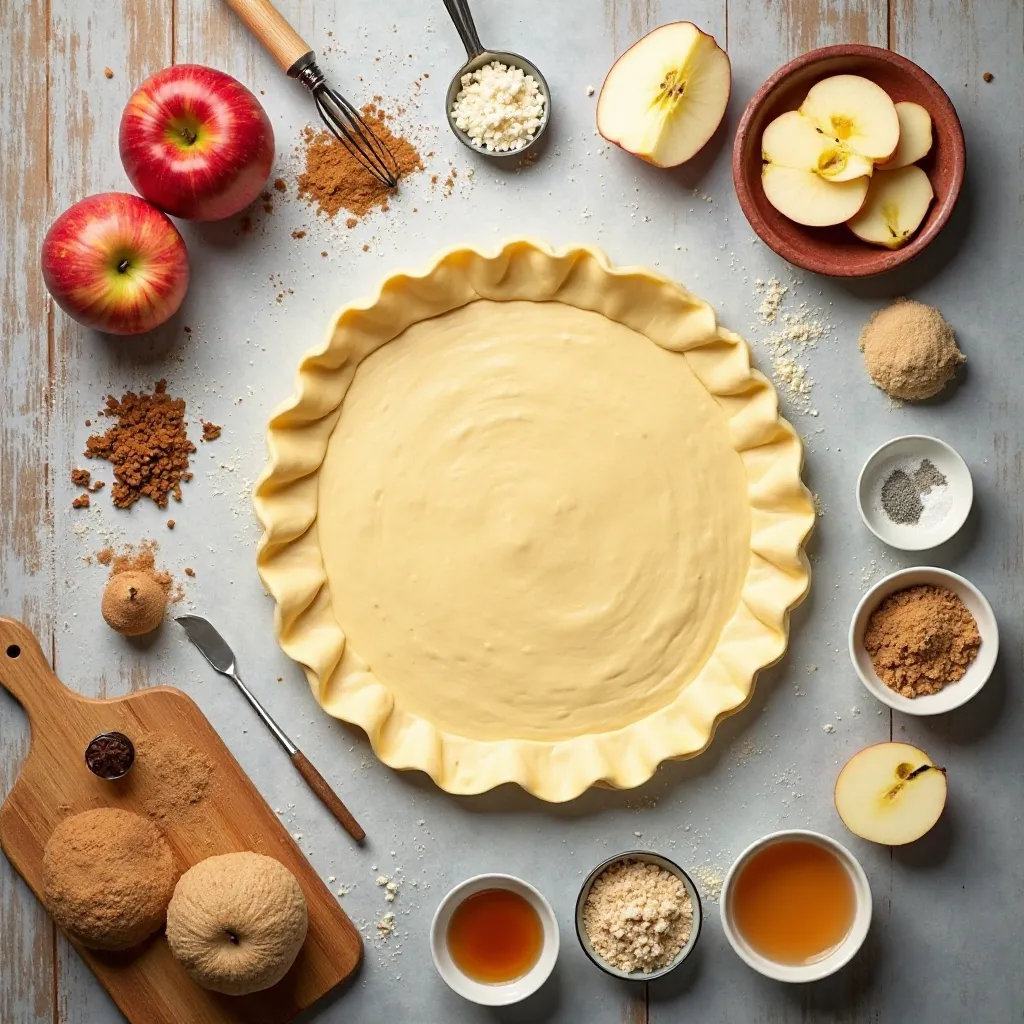
Step 1: Prepare Your Workspace
Preheat your oven to 400°F (200°C). Line a large baking sheet with parchment paper. This prevents sticking and makes cleanup a breeze. Let your puff pastry thaw at room temperature for about 30-40 minutes if frozen, or follow package directions. Don’t rush this step—properly thawed pastry unfolds easily without cracking.
Step 2: Prepare the Apples
Wash, peel, and core your apples. Cut them in half, then slice them thinly—about ⅛ inch thick. The thinner the slices, the more tender they’ll become during baking. Place apple slices in a medium bowl and immediately toss with lemon juice to prevent browning. This also adds a subtle brightness to the flavor. Add vanilla extract and toss again.
Step 3: Season the Apples
In a small bowl, mix together the granulated sugar, brown sugar, cinnamon, nutmeg, and a pinch of salt. Sprinkle this mixture over the apple slices and gently toss until every slice is coated. The sugar will draw out moisture from the apples, creating a light syrup. Let this sit for 5 minutes while you work on the pastry.
Step 4: Roll Out the Puff Pastry
Lightly flour your work surface. Unfold the thawed puff pastry sheet and gently roll it out to smooth any creases, creating a rectangle approximately 10×14 inches. Don’t overwork it—just a few gentle rolls will do. Transfer the pastry to your prepared baking sheet. Using a sharp knife, score a border about 1 inch from the edges all around, being careful not to cut all the way through. This border will puff up during baking, creating a beautiful frame.
Step 5: Arrange the Apples
Pat the apple slices with a paper towel to remove excess moisture—this helps the pastry stay crispy. Arrange the apple slices in overlapping rows within the scored border. You can create a traditional straight-row pattern, a fan design, or concentric circles—whatever appeals to you! Make sure to overlap the slices slightly for maximum coverage and visual appeal. Don’t worry about perfection; rustic charm is part of this tart’s beauty.
Step 6: Add the Final Touches
Brush the border of the pastry with beaten egg—this creates that gorgeous golden-brown finish. Drizzle the melted butter evenly over the apples. This adds richness and helps with caramelization. If you have any remaining cinnamon-sugar mixture, sprinkle a bit more over the top.
Step 7: Bake to Perfection
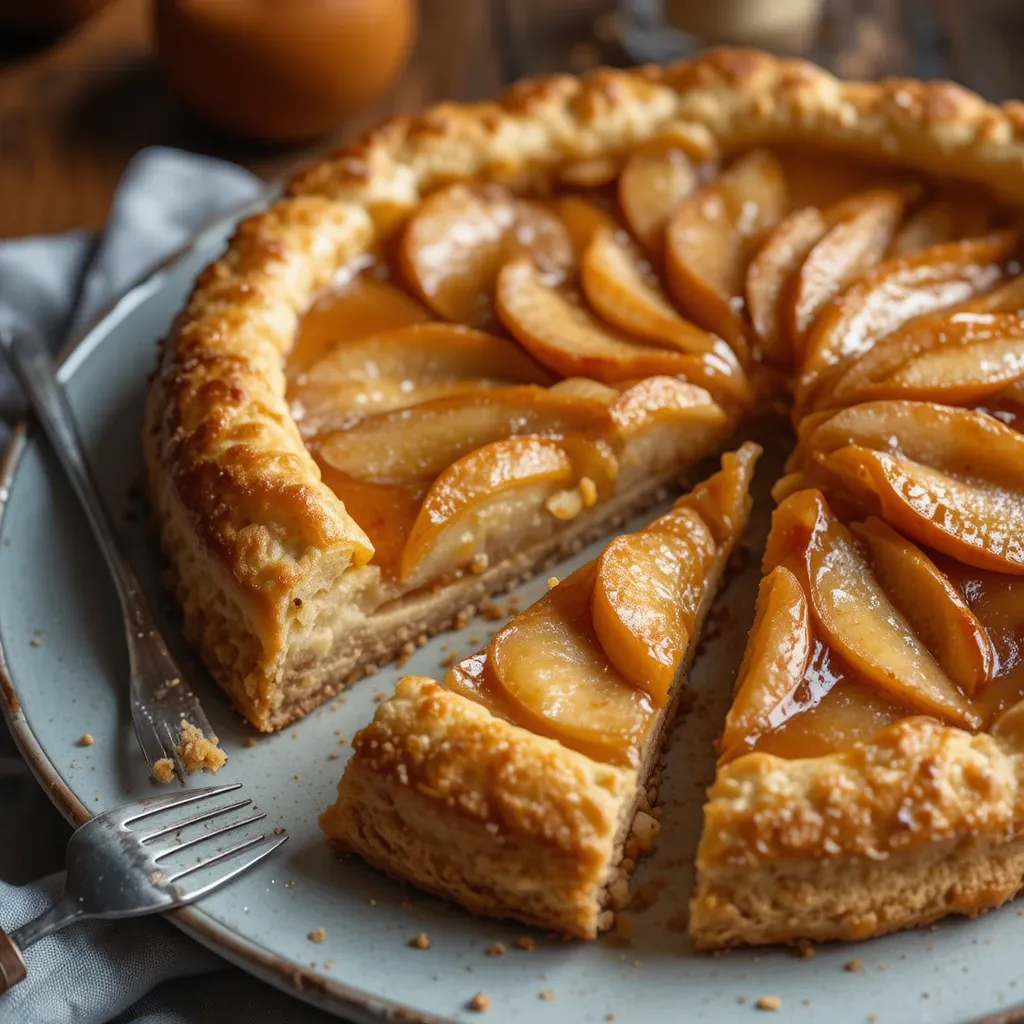
Place the baking sheet in the preheated oven. Bake for 30-35 minutes, or until the pastry is deep golden brown and puffed around the edges, and the apples are tender and slightly caramelized. The kitchen will smell absolutely amazing! If the edges brown too quickly, tent them lightly with aluminum foil.
Step 8: Glaze and Serve
While the tart is still warm, heat the apricot jam or honey in the microwave for about 15 seconds until it’s fluid. Brush this glaze over the apples—it creates a beautiful shine and adds a touch of sweetness. Let the tart cool on the baking sheet for 10 minutes before slicing. This allows the pastry to set and makes cutting easier. Dust with powdered sugar if desired, slice into squares or rectangles, and serve warm or at room temperature.
What to Serve Apple Tart on Puff Pastry With
This apple tart on puff pastry is versatile enough to shine on its own, but pairing it thoughtfully can elevate your dessert experience to new heights.
Classic Pairings: A scoop of vanilla ice cream melting over warm apple tart is pure heaven. The cold creaminess contrasts beautifully with the warm, spiced apples. Freshly whipped cream with a hint of vanilla or cinnamon is another wonderful option—lighter than ice cream but equally delicious.
Beverage Suggestions: Serve with hot coffee, especially a rich espresso or cappuccino for an afternoon treat. Herbal tea like chamomile or apple cinnamon tea complements the flavors perfectly. For a cozy evening, try warm spiced apple cider or hot chocolate. Kids love it with cold milk!
Complementary Sides: If serving this as part of a brunch spread, pair it with fresh fruit salad, yogurt parfaits, or scrambled eggs for a sweet-savory balance. For an elegant dinner party dessert, consider serving alongside a cheese plate featuring sharp cheddar or aged Gouda—the sweet-tart contrast is surprisingly sophisticated.
Top Tips for Perfecting Apple Tart on Puff Pastry
Choose the Right Apples
Not all apples are created equal for baking! Granny Smith apples are my go-to because they hold their shape and provide a pleasant tartness that balances the sugar. Honeycrisp adds sweetness and maintains texture. Avoid Red Delicious or McIntosh—they become mushy when baked. For the best flavor, use a mix of two or three varieties. This creates complexity and interesting texture variations.
Keep Everything Cold
Puff pastry works best when it’s cold but pliable. If your kitchen is warm, work quickly and return the pastry to the fridge for 10 minutes if it becomes too soft. Cold butter layers create those signature flaky puffs. Never microwave puff pastry to thaw it—this melts the butter and ruins the texture.
Don’t Skip the Egg Wash
That beaten egg brushed on the border isn’t just for looks—it creates a seal that helps the pastry puff properly and gives that bakery-worthy golden sheen. For extra shine, add a teaspoon of water or milk to your egg wash.
Watch the Moisture
Excess moisture is the enemy of crispy pastry. That’s why we pat the apples dry after seasoning them and why the lemon juice is used sparingly. If your apples are particularly juicy, let them drain for an extra few minutes.
Experiment with Spices
While cinnamon is classic, don’t be afraid to experiment. Try adding cardamom for an exotic twist, or a pinch of ground ginger for warmth. A tiny bit of allspice or cloves can add depth. Just remember—a little goes a long way with strong spices.
Perfect Your Slicing
Uniformly thin apple slices cook evenly and create a prettier presentation. If you struggle with knife skills, a mandoline slicer is a worthwhile investment. Set it to about ⅛ inch thickness for perfect slices every time. Always use the safety guard!
Storing and Reheating Tips
Room Temperature Storage: Your apple tart on puff pastry tastes best the day it’s made, but it can sit at room temperature, loosely covered with aluminum foil, for up to 8 hours. This is perfect if you’re baking in the morning for an evening event. The pastry will soften slightly but remains delicious.
Refrigerator Storage: For longer storage, place cooled tart in an airtight container or wrap tightly with plastic wrap and refrigerate for up to 3 days. The pastry will lose some crispness, but the flavor remains excellent. Bring to room temperature before serving, or reheat as described below.
Freezing Instructions: While I don’t typically recommend freezing the finished tart (the pastry texture suffers), you can freeze it in a pinch. Wrap individual slices tightly in plastic wrap, then in aluminum foil. Freeze for up to 1 month. Thaw in the refrigerator overnight before reheating.
Reheating for Best Results: To restore some of that fresh-baked crispness, reheat in a 350°F oven for 8-10 minutes. Place the tart directly on the oven rack or on a baking sheet—avoid covering it, as this creates steam and makes it soggy. A toaster oven works wonderfully for individual slices. Avoid the microwave, which turns the pastry gummy and chewy.
Make-Ahead Strategy: You can prep components ahead for easier assembly. Slice and season the apples up to 4 hours ahead, keeping them refrigerated. Roll out the pastry, score the border, and keep it chilled until ready to assemble. Assemble and bake just before serving for the best texture and warmth.
Frequently Asked Questions
Can I use homemade puff pastry instead of store-bought?
Absolutely! Homemade puff pastry is wonderful if you have the time and skill. It takes several hours with multiple folding and chilling sessions, so store-bought is a practical choice for most home bakers. If using homemade, make sure it’s rolled to about ⅛ inch thickness for the best rise.
Why didn’t my puff pastry puff up?
Several factors can prevent proper puffing. The most common issue is overworked or warm pastry—the butter layers melt before they can create steam. Make sure your pastry is cold when it goes into the oven. Also, ensure your oven is properly preheated to 400°F. An oven thermometer can verify accuracy. Finally, check that your puff pastry hasn’t expired—old pastry loses its leavening power.
Can I make this tart ahead of time?
While it’s best fresh, you can bake it up to 6 hours ahead and leave it at room temperature, loosely covered. Reheat briefly before serving if desired. For longer advance prep, assemble the tart completely but don’t bake it. Cover tightly and refrigerate for up to 4 hours, then bake when ready. Add 5 extra minutes to the baking time if baking from cold.
What if I don’t have apricot jam for the glaze?
No problem! Honey works beautifully and adds a lovely floral sweetness. You can also use peach preserves, orange marmalade, or even maple syrup. In a pinch, a simple sugar syrup (equal parts sugar and water, heated until dissolved) works for shine without adding much flavor.
Can I use other fruits besides apples?
Definitely! This technique works wonderfully with pears, peaches, plums, or a mix of berries. Adjust the sugar based on fruit sweetness—berries often need more sugar than apples. Stone fruits like peaches should be sliced similarly thin. Pears work especially well with a drizzle of honey and a sprinkle of cardamom.
Is there a way to make this less sweet?
Reduce the granulated sugar to 2 tablespoons and skip the brown sugar entirely. Use tart apples like Granny Smith, and don’t glaze the finished tart. The natural apple sweetness combined with just a touch of sugar still tastes wonderful. You can also add a squeeze of extra lemon juice for brightness.
My pastry got soggy. What went wrong?
Soggy pastry usually results from too much moisture. Make sure to pat your apples very dry after tossing them with sugar. Don’t add too much lemon juice. Avoid placing wet apples directly on the pastry—let them drain first. Also, ensure your oven is hot enough (400°F) to crisp the pastry quickly before the apple juices soak in.
Can I make mini individual tarts instead of one large tart?
Absolutely! Cut your puff pastry into 4-6 squares or circles. Score a smaller border on each, arrange fewer apple slices, and bake for 20-25 minutes. Individual tarts are perfect for parties and look incredibly elegant. They also bake faster and are easier to serve.
Tips for Avoiding Common Baking Mistakes
Mistake #1: Skipping the Border Score Always score that 1-inch border without cutting through completely. This creates the signature raised edge that contains the apples and adds professional appeal. Use a sharp knife and press firmly but not too deep—about halfway through the pastry thickness.
Mistake #2: Overcrowding the Apples While you want good coverage, piling apples too thick prevents even cooking. The bottom apples steam instead of caramelize, and the top ones may burn. Stick to overlapping thin slices in a single layer for the best results.
Mistake #3: Opening the Oven Door Too Often Every time you open the oven, you lose heat and disrupt the puffing process. The sudden temperature drop can cause pastry to deflate. Check the tart through the oven window instead. Only open the door once at the 30-minute mark to check for doneness.
Mistake #4: Using Wet Apples This cannot be stressed enough—pat those apples dry! The sugar-coated apples will release juice, which is fine in moderation, but starting with wet apples leads to a soggy bottom. Paper towels are your friend here.
Mistake #5: Not Preheating the Oven Fully Puff pastry needs immediate high heat to create steam for those layers. Placing it in a still-warming oven results in flat, greasy pastry. Wait until your oven beeps indicating it’s reached 400°F, then wait 5 more minutes for good measure.
Mistake #6: Cutting the Tart Too Soon I know it’s tempting to dive right in, but give your tart at least 10 minutes to cool and set. Cutting too soon causes the layers to compress and the filling to run. Patience pays off with cleaner slices and better texture.
Mistake #7: Ignoring Pastry Temperature Working with pastry that’s too cold (frozen solid) causes cracking. Pastry that’s too warm (soft and greasy) won’t puff. Aim for that sweet spot where it’s cool to the touch but bends easily without breaking. If it gets too warm while working, refrigerate for 10 minutes.
Nutrition Information
| Nutrient | Per Serving (1 slice) |
|---|---|
| Calories | 285 |
| Total Fat | 14g |
| Saturated Fat | 6g |
| Cholesterol | 25mg |
| Sodium | 145mg |
| Total Carbohydrates | 38g |
| Dietary Fiber | 2g |
| Sugars | 16g |
| Protein | 3g |
| Vitamin C | 8% DV |
| Calcium | 2% DV |
| Iron | 6% DV |
Nutritional values are approximate and based on one serving of 8 slices. Values may vary based on specific ingredients used.
Final Thoughts
Creating an apple tart on puff pastry at home is one of those beautiful moments where simple ingredients transform into something truly special. There’s an undeniable joy in pulling a golden, fragrant tart from your oven, knowing you made it yourself.
The beauty of this recipe lies not just in its delicious outcome but in its forgiving nature and versatility. Whether you’re baking for a special occasion, a casual family dinner, or just because you’re craving something sweet, this tart delivers every single time.
I’ve made this recipe dozens of times, and it never fails to impress. From hurried weeknight desserts to elegant dinner parties, this apple tart on puff pastry has become my secret weapon. The combination of buttery, flaky pastry and tender, spiced apples creates a dessert that tastes like you spent hours in the kitchen, when really, it came together in less than an hour.
Don’t be intimidated by what looks like a fancy French pastry—this recipe is designed for real people with real lives. You don’t need special equipment, years of baking experience, or expensive ingredients. Just a few apples, some puff pastry, and the willingness to try something wonderful.
So go ahead, preheat that oven, and let the aroma of cinnamon and caramelized apples fill your home. Your family and friends are about to think you’re a professional pastry chef, and you don’t have to tell them how easy it actually was.
Happy baking, and enjoy every flaky, apple-filled bite!
Have you tried this apple tart on puff pastry recipe? I’d love to hear how it turned out! Share your photos and any creative variations in the comments below. Don’t forget to pin this recipe for later and share it with fellow baking enthusiasts!