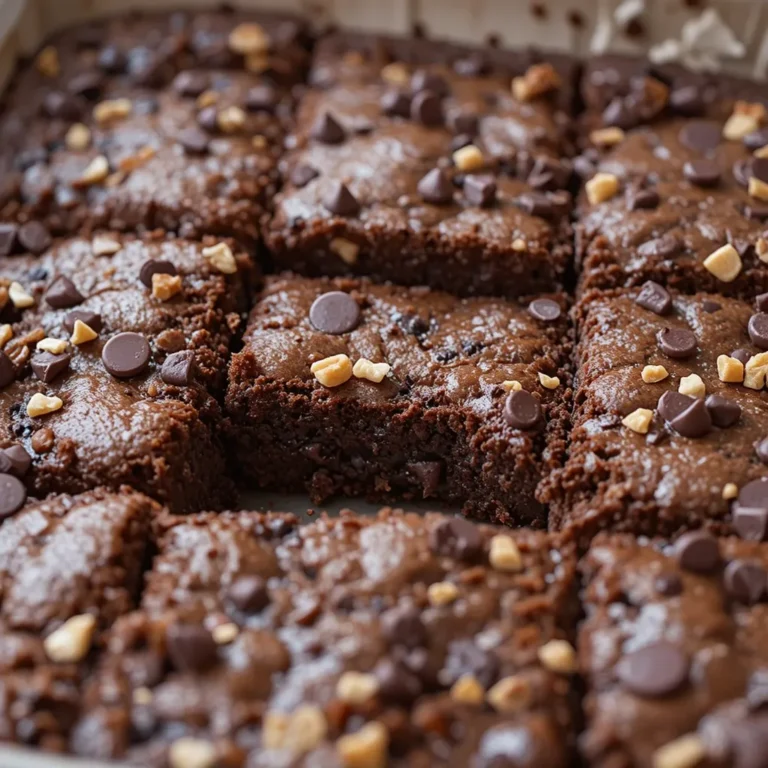
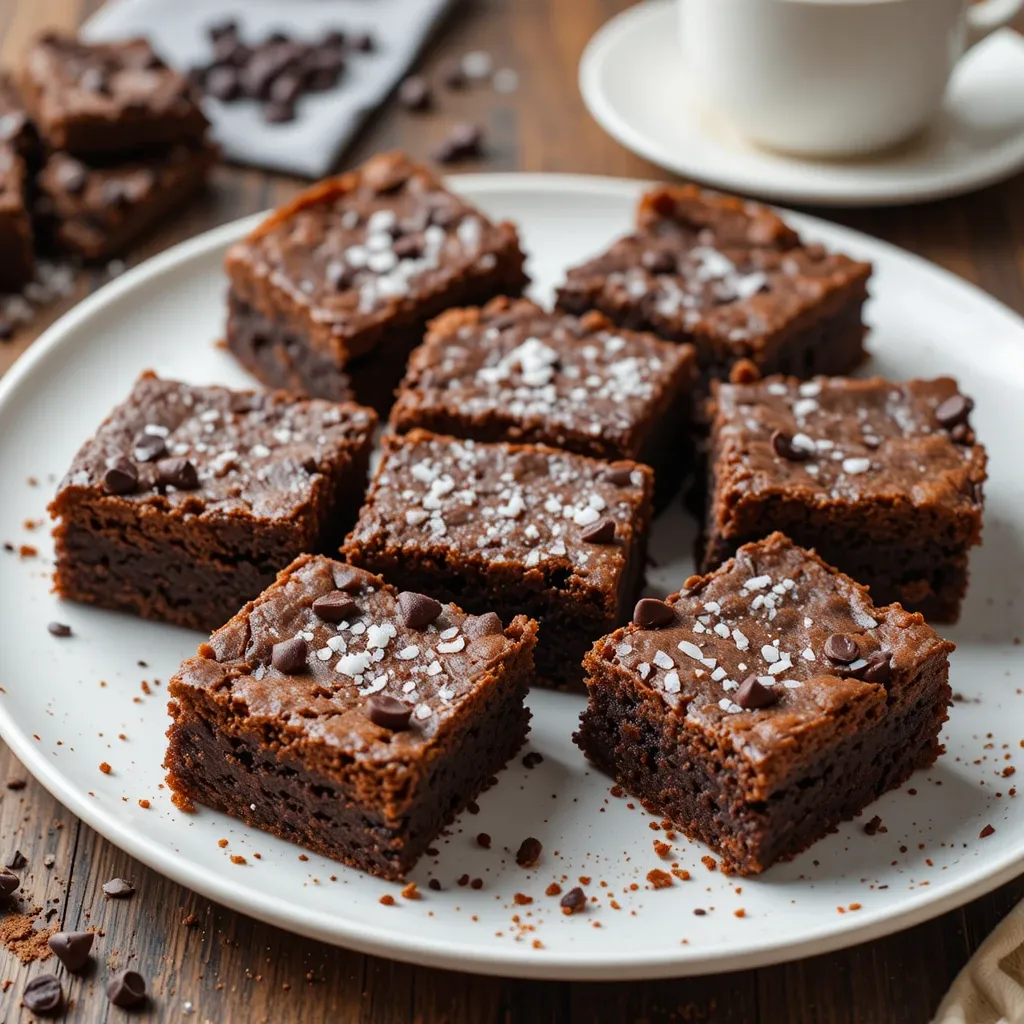
Best Black Bean Brownies Recipe – Ready in 30 Minutes
Imagine biting into a fudgy, rich chocolate brownie that’s secretly packed with protein and fiber. Black bean brownies are the guilt-free dessert you never knew you needed! These decadent squares prove that healthy eating doesn’t mean sacrificing flavor.
They’re incredibly simple to whip up, taking just 30 minutes from start to finish, making them perfect for busy weeknights or impromptu gatherings. If you loved my chocolate chip banana bread, you’ll absolutely adore this clever twist on classic brownies. Let’s dive into this game-changing recipe!
This recipe is fully AI-written and untested at home. We share it thoughtfully, and readers who’ve made other recipes from our site tell us they turned out nicely.
What Are Black Bean Brownies?
Ever wondered how beans could possibly transform into dessert? Black bean brownies are exactly what they sound like – rich, chocolatey brownies made with black beans as the star ingredient! I know it sounds wild, but trust me on this one.
The beans create an incredibly moist, fudgy texture that rivals any traditional brownie recipe. As they say, the way to a person’s heart is through their stomach, and these brownies prove it every single time. Don’t knock it until you’ve tried it – grab your apron and let’s get baking!
Why You’ll Love This Black Bean Brownies Recipe
Sneaky Nutrition That Tastes Amazing
The magic of black bean brownies lies in their ability to fool even the pickiest eaters. Nobody will guess these contain beans unless you tell them! The black beans blend seamlessly with cocoa powder, creating a deep chocolate flavor while adding 8 grams of protein and 7 grams of fiber per serving. Your kids will think they’re getting a treat, while you’ll know they’re eating something nutritious.
Budget-Friendly Baking
Making these brownies at home costs a fraction of what you’d spend on fancy health food store treats. A can of black beans costs less than a dollar, and you probably have most other ingredients in your pantry already. Compare this to spending five dollars per brownie at a specialty bakery! Plus, one batch makes 16 generous servings, perfect for meal prep or sharing with friends.
Customizable Toppings
The beauty of this recipe is how versatile it becomes with simple additions. Sprinkle sea salt on top for a sweet-salty combination, swirl in peanut butter before baking, or fold in dark chocolate chips for extra decadence. You can even add a handful of crushed walnuts for crunch. If you enjoyed experimenting with my oatmeal cookies recipe, you’ll love playing around with these brownies too. The possibilities are endless, so don’t be afraid to make them your own!
How to Make Black Bean Brownies
Quick Overview
This recipe comes together in one bowl with minimal effort required. You’ll blend everything until smooth, pour into a pan, and bake. The result is a dense, fudgy brownie with crispy edges and a soft center that melts in your mouth.
Prep Time: 10 minutes
Cook Time: 25-30 minutes
Total Time: 40 minutes
Servings: 16 brownies
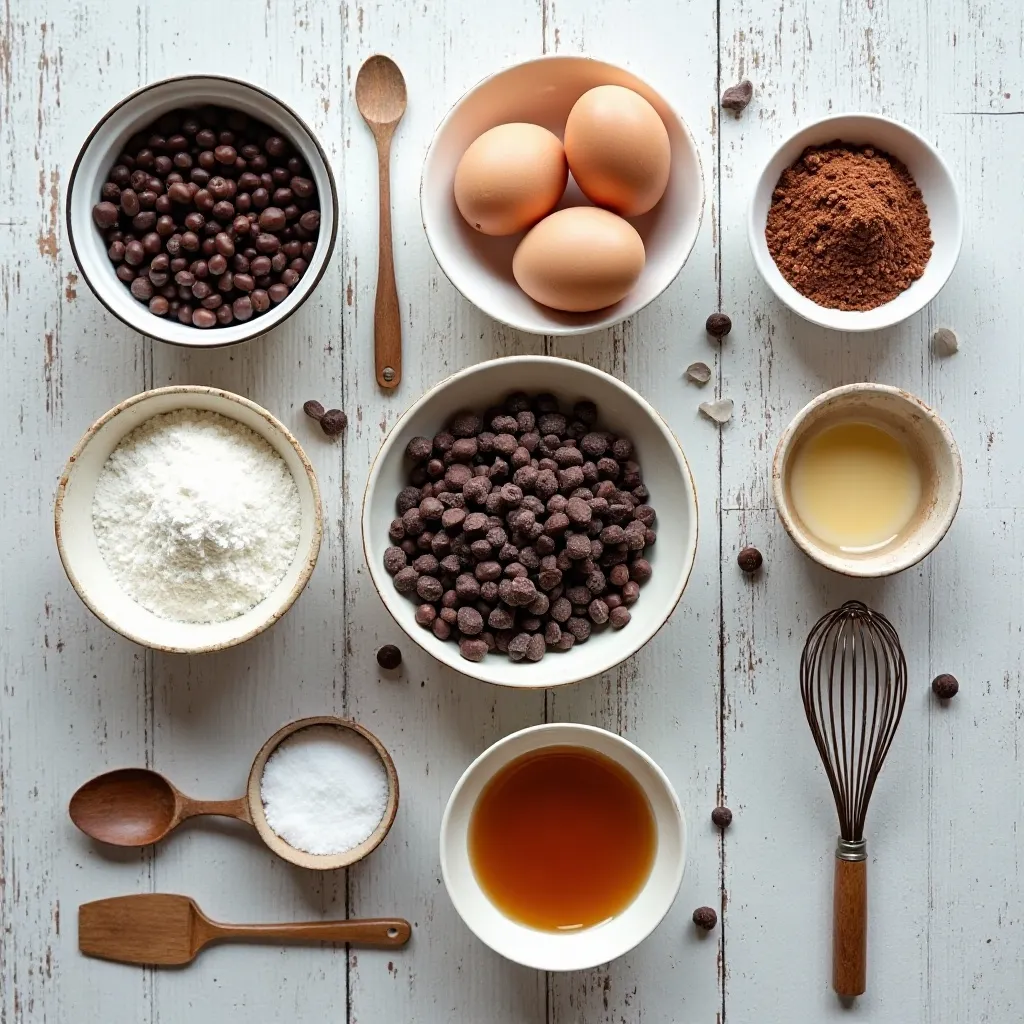
Key Ingredients for Black Bean Brownies
- 1 can (15 oz) black beans, drained and rinsed thoroughly
- 3 large eggs, at room temperature
- 1/3 cup cocoa powder (unsweetened)
- 1/2 cup honey or maple syrup
- 1/4 teaspoon sea salt
- 1/2 cup dark chocolate chips (optional)
- Additional sea salt for topping (optional)
- baking powder (1-2 tsp
- oil/butter/fat ¼-⅓ cup
- vanilla extract
Step-by-Step Instructions
Step 1: Prepare Your Pan and Preheat
Start by preheating your oven to 350°F (175°C). Line an 8×8 inch baking pan with parchment paper, leaving some overhang on the sides for easy removal later. This step is crucial because it prevents sticking and makes cleanup a breeze. Lightly grease the parchment with a bit of coconut oil if you want extra insurance against sticking.
Step 2: Blend the Black Beans
Rinse your black beans under cold water until the water runs clear. This removes the canning liquid and reduces any “beany” flavor. Pat them dry with a paper towel, then add them to your food processor or high-powered blender. Pulse a few times to break them down initially. You want them completely smooth with no chunks remaining, as this creates that perfect fudgy texture we’re after.
Step 3: Add Wet Ingredients
To the partially blended beans, add your eggs, melted coconut oil, honey (or maple syrup), and vanilla extract. Blend on high speed for about 60-90 seconds until the mixture becomes completely smooth and glossy. Stop halfway through to scrape down the sides of your food processor to ensure everything incorporates evenly. The mixture should look like thick chocolate batter at this point.
Step 4: Incorporate Dry Ingredients
Add the cocoa powder, baking powder, and sea salt directly into the food processor with your wet mixture. Pulse 10-15 times until just combined. Don’t over-blend at this stage – you just want the dry ingredients fully incorporated without deflating the batter. The mixture will be thick and rich, similar to brownie batter consistency.
Step 5: Add Chocolate Chips
If you’re using chocolate chips, pour the batter into a large bowl and gently fold them in with a spatula. Reserve a handful to sprinkle on top if desired. This step adds those classic brownie chocolate pockets that everyone loves. Dark chocolate works beautifully here and adds antioxidants too!
Step 6: Bake to Perfection
Pour the batter into your prepared pan and smooth the top with a spatula, spreading it evenly into all corners. Sprinkle with additional sea salt or reserved chocolate chips if using. Bake for 25-30 minutes, until the edges look set and a toothpick inserted in the center comes out with just a few moist crumbs. The center should still look slightly underdone – this ensures fudgy brownies instead of cakey ones.
Step 7: Cool Completely
This is the hardest part! Let the brownies cool in the pan for at least 20 minutes before attempting to remove them. Then lift them out using the parchment paper overhang and let them cool completely on a wire rack for another 20-30 minutes. Cutting them while warm will result in a messy, crumbly situation. Patience pays off with clean, beautiful squares!
What to Serve Black Bean Brownies With
These brownies shine on their own, but pairing them with the right accompaniments takes them to the next level.
Fresh Berries: Serve alongside fresh raspberries, strawberries, or blueberries for a burst of freshness that cuts through the richness. The tartness of berries balances the deep chocolate flavor perfectly.
Creamy Toppings: A dollop of Greek yogurt or coconut whipped cream adds a luxurious element. For special occasions, try them warm with a scoop of vanilla ice cream melting on top.
Hot Beverages: Pair with a cup of strong coffee, chai tea, or hot chocolate for the ultimate cozy dessert experience. The warmth of the drink complements the dense, fudgy texture beautifully.
Nut Butters: Spread a thin layer of almond butter or cashew butter on top of a warmed brownie for added protein and a delightful nutty flavor that enhances the chocolate.
Top Tips for Perfecting Black Bean Brownies
Rinse Those Beans Thoroughly
This cannot be stressed enough! The liquid in canned beans has a distinct flavor that can come through in your final brownies. Rinse them under cold water for at least 30 seconds, until the water runs completely clear. Some people even soak them in fresh water for 5 minutes before rinsing again. This extra step ensures your brownies taste purely of chocolate.
Don’t Skip the Food Processor
While it’s tempting to use a regular blender or even try mashing by hand, a food processor is truly essential for getting that silky smooth consistency. Regular blenders can leave chunks, and hand mashing will never achieve the texture you need. The food processor breaks down the beans completely, creating that signature fudgy brownie texture.
Use Quality Cocoa Powder
Since chocolate is the dominant flavor here, investing in good quality unsweetened cocoa powder makes a noticeable difference. Dutch-processed cocoa gives a deeper, more sophisticated chocolate taste, while natural cocoa powder provides a brighter, more acidic chocolate flavor. Either works beautifully, so choose based on your preference.
Don’t Overbake
The key to fudgy brownies is pulling them out when they still look slightly underdone in the center. They’ll continue cooking as they cool. If you wait until a toothpick comes out completely clean, you’ll end up with dry, cakey brownies. Look for moist crumbs on your toothpick, not wet batter.
Adjust Sweetness to Taste
If you prefer less sweet brownies, start with 1/3 cup of honey instead of 1/2 cup. You can always add more sweetness, but you can’t take it away. Taste your batter before baking (the eggs are the only raw ingredient, so a small taste is fine) and adjust accordingly.
Let Them Rest
These brownies actually taste better the next day! The flavors meld together, and the texture becomes even more fudgy. If you can resist eating them all immediately, try making them a day ahead for the best results.
Storing and Reheating Tips
Room Temperature Storage
Black bean brownies stay fresh at room temperature for up to 3 days when stored in an airtight container. Layer parchment paper between brownie squares to prevent them from sticking together. This method works perfectly if you plan to eat them relatively quickly and prefer a softer, fudgier texture.
Refrigerator Storage
For longer storage, keep your brownies in the refrigerator for up to 7 days. Place them in an airtight container or wrap them tightly in plastic wrap. The cold temperature actually enhances the fudgy texture, making them taste almost like chocolate fudge. Bring them to room temperature for 15-20 minutes before serving, or enjoy them cold for a firmer, truffle-like experience.
Freezer Storage
These brownies freeze exceptionally well for up to 3 months! Wrap individual brownies in plastic wrap, then place them all in a freezer-safe bag or container. This method allows you to grab a single brownie whenever a chocolate craving hits. Thaw at room temperature for 30 minutes, or microwave for 15-20 seconds for a warm, gooey treat.
Reheating Instructions
For the ultimate indulgent experience, reheat brownies in the microwave for 10-15 seconds. This makes them warm and soft, perfect for adding a scoop of ice cream on top. Alternatively, warm them in a 300°F oven for 5 minutes if reheating several at once. The gentle heat brings back that fresh-from-the-oven quality without drying them out.
Tips for Avoiding Common Baking Mistakes
Mistake #1: Not Draining Beans Properly
The liquid from the can adds unwanted moisture and an off-flavor. Always drain and rinse your beans thoroughly, then pat them dry with paper towels. This extra step prevents watery batter and ensures the best chocolate flavor shines through.
Mistake #2: Under-Blending the Batter
Lumpy batter means lumpy brownies with an unpleasant texture. Blend for a full 60-90 seconds until the mixture is completely smooth and homogeneous. There should be absolutely no visible bean pieces remaining. When in doubt, blend longer rather than shorter.
Mistake #3: Using the Wrong Pan Size
An 8×8 inch pan is specified for a reason – it creates brownies with the perfect thickness. Using a larger pan spreads the batter too thin, resulting in crispy, cookie-like brownies instead of fudgy ones. A smaller pan makes them too thick and difficult to cook through evenly. Stick to the recommended size for best results.
Mistake #4: Opening the Oven Door Too Often
Every time you open the oven door, the temperature drops significantly. This causes uneven baking and can lead to brownies that sink in the middle. Set your timer and trust the process. Only check at the minimum baking time of 25 minutes, and work quickly if you need to test for doneness.
Mistake #5: Cutting While Still Warm
I know it’s tempting, but warm brownies will crumble and fall apart when cut. The structure needs time to set as they cool. Wait at least 20 minutes in the pan, then another 20-30 minutes after removing. For the cleanest cuts, chill them in the refrigerator for an hour, then use a sharp knife wiped clean between each cut.
Mistake #6: Not Measuring Ingredients Accurately
Baking is a science, and even small measurement errors can affect the outcome. Use proper measuring cups and spoons, and level off dry ingredients with a straight edge. Too much cocoa powder makes them dry and bitter, while too little sweetener leaves them bland.
Frequently Asked Questions
Can you taste the black beans in these brownies?
Not at all! When blended properly with cocoa powder and other ingredients, the black beans become completely undetectable. They provide moisture and structure without any bean flavor. Even skeptics are usually amazed that they can’t taste anything unusual. The dominant flavor is rich, deep chocolate with hints of vanilla.
Can I use a different type of beans?
Black beans work best because of their mild flavor and dark color that blends with chocolate. However, you can substitute with kidney beans or pinto beans in a pinch. Keep in mind that lighter colored beans might give your brownies a slightly different hue, though the taste will remain similar.
Are black bean brownies actually healthy?
They’re definitely healthier than traditional brownies! Each serving contains more protein, fiber, and nutrients than regular brownies, with no refined flour. However, they still contain sugar and should be enjoyed as an occasional treat rather than a health food. They’re perfect for satisfying chocolate cravings while sneaking in some nutrition.
Why are my black bean brownies too wet?
This usually happens when the beans aren’t drained and rinsed thoroughly enough, or if you’ve added too much liquid sweetener. Make sure to measure your honey or maple syrup accurately using a liquid measuring cup. Also, ensure your oven temperature is accurate – an oven thermometer can help verify this.
Can I make these brownies vegan?
Yes! Replace the three eggs with three “flax eggs” (3 tablespoons ground flaxseed mixed with 9 tablespoons water, let sit for 5 minutes). The texture will be slightly different but still delicious. Ensure your chocolate chips are vegan if using them, and use maple syrup instead of honey.
How do I make these brownies less sweet?
Reduce the honey or maple syrup to 1/3 cup instead of 1/2 cup. You can also use 100% dark chocolate chips instead of semi-sweet. Some people add a tablespoon of instant coffee to enhance the chocolate flavor without adding sweetness, which creates a more sophisticated, less candy-like taste.
Can I add other mix-ins?
Absolutely! Chopped walnuts, pecans, or almonds add great texture. Dried cherries or cranberries provide tartness. Peanut butter swirled on top creates a beautiful marble effect. Espresso powder intensifies the chocolate flavor. Feel free to experiment with your favorite brownie add-ins.
Why did my brownies turn out cakey instead of fudgy?
This usually means they were overbaked. Remember to remove them when a toothpick comes out with moist crumbs, not completely clean. Also check that you didn’t accidentally add too much baking powder, which can make them rise too much and become cake-like rather than dense and fudgy.
Nutrition Information
| Nutrient | Per Serving (1 brownie) |
|---|---|
| Calories | 95 |
| Protein | 3g |
| Carbohydrates | 14g |
| Fiber | 3g |
| Sugar | 8g |
| Fat | 4g |
| Saturated Fat | 2g |
| Sodium | 45mg |
| Iron | 5% DV |
| Calcium | 2% DV |
Note: Nutrition information is approximate and calculated without optional chocolate chips. Adding chocolate chips will increase calories, fat, and sugar content.
Creative Variations to Try
Mint Chocolate Brownies
Add 1/2 teaspoon peppermint extract along with the vanilla for a refreshing twist. Top with crushed sugar-free mints or a thin layer of homemade mint frosting for special occasions.
Espresso Brownies
Dissolve 1 tablespoon of instant espresso powder in 1 tablespoon of hot water, then add it to your wet ingredients. Coffee enhances chocolate flavor without making the brownies taste like coffee. This creates a more sophisticated, adult-friendly brownie.
Orange Chocolate Brownies
Add 1 tablespoon of fresh orange zest and 1/2 teaspoon orange extract to the batter. The citrus brightens the chocolate and creates an elegant flavor combination reminiscent of those fancy chocolate oranges.
Brownie Bites
Instead of using a square pan, portion the batter into a mini muffin tin for individual brownie bites. These are perfect for parties and portion control. Bake for just 12-15 minutes and watch them carefully to prevent overbaking.
Why This Recipe Works
The science behind black bean brownies is fascinating. Black beans contain starch that, when blended smooth, mimics the structure that flour provides in traditional brownies. The protein in beans creates structure while the fiber adds moisture, resulting in that signature fudgy texture we all crave.
Cocoa powder is fat-free and intensely flavored, so it works perfectly with the mild beans. The combination creates depth without heaviness. The eggs bind everything together and provide lift, while the small amount of baking powder gives just enough rise without making them cakey.
The coconut oil adds richness and helps create those beautiful crispy edges, while honey or maple syrup provides sweetness and additional moisture. Every ingredient has a purpose, working together in harmony to create brownies that rival any traditional recipe.
Final Thoughts
Black bean brownies have completely changed my perspective on healthy baking. These aren’t just “healthy brownies” – they’re genuinely delicious brownies that happen to be nutritious. The first time I made them, I was skeptical. Now, I make them at least twice a month and have converted countless doubters into believers.
Whether you’re trying to sneak more nutrients into your diet, avoiding gluten, or simply looking for a delicious chocolate treat that won’t leave you in a sugar coma, these brownies deliver. They’re proof that healthy and delicious aren’t mutually exclusive.
So grab that can of black beans sitting in your pantry and give these a try. I promise you won’t be disappointed. And don’t forget to share this recipe with someone who needs a chocolate fix – they’ll thank you forever!