Spooky & Delicious Halloween Treats Using Oreos
Halloween just got sweeter with these incredible Oreo-based treats that transform ordinary cookies into spine-tingling delights! Did you know that Oreos are America’s favorite cookie, with over 450 billion sold worldwide since 1912?
These Halloween treats using Oreos are perfect for busy parents who want to create memorable spooky snacks without spending hours in the kitchen. Just like our popular Christmas cookie bark recipe, these treats require minimal effort but deliver maximum wow factor for your Halloween celebrations.
What Are Halloween Treats Using Oreos?
Ever wondered why Oreos became the ultimate Halloween treat base? These chocolate sandwich cookies are like the Swiss Army knife of dessert making! With their perfect black color mimicking the dark Halloween night and cream filling that’s as versatile as a ghost’s wardrobe, Oreos practically scream “transform me into something spooky!”
As they say, the way to a child’s heart during Halloween is definitely through creative cookie creations. Ready to become the neighborhood’s Halloween hero?
Why You’ll Love This Halloween Treats Using Oreos Recipe
The main highlight of these Halloween treats is their incredible versatility – you can create everything from spooky spiders to graveyard dirt cake using just one base ingredient. The rich chocolate flavor of Oreos pairs perfectly with orange frosting, gummy worms, and candy eyes to create treats that look professionally made.
Cost-saving benefits are huge when making these at home. Store-bought Halloween treats can cost $3-5 each, but our homemade versions cost less than $1 per serving. You’ll save money while controlling ingredients and avoiding unnecessary preservatives.
Flavorful combinations make these treats irresistible. The contrast between crunchy Oreo crumbs, creamy filling, and colorful Halloween candies creates a texture party in your mouth. Similar to our popular birthday cake pops, these treats offer that perfect balance of familiar flavors with exciting presentation that both kids and adults adore.
Time to grab your aprons and create some Halloween magic in your kitchen!
How to Make Halloween Treats Using Oreos
Quick Overview
These Halloween Oreo treats are incredibly easy to make and require no baking! The beauty lies in their simplicity – just crush, mix, shape, and decorate.
What makes it special:
- No-bake convenience
- Kid-friendly assembly
- Customizable decorations
- Rich chocolate flavor
- Professional-looking results
Preparation time: 30 minutes Chilling time: 2 hours Total time: 2 hours 30 minutes Servings: 24 treats
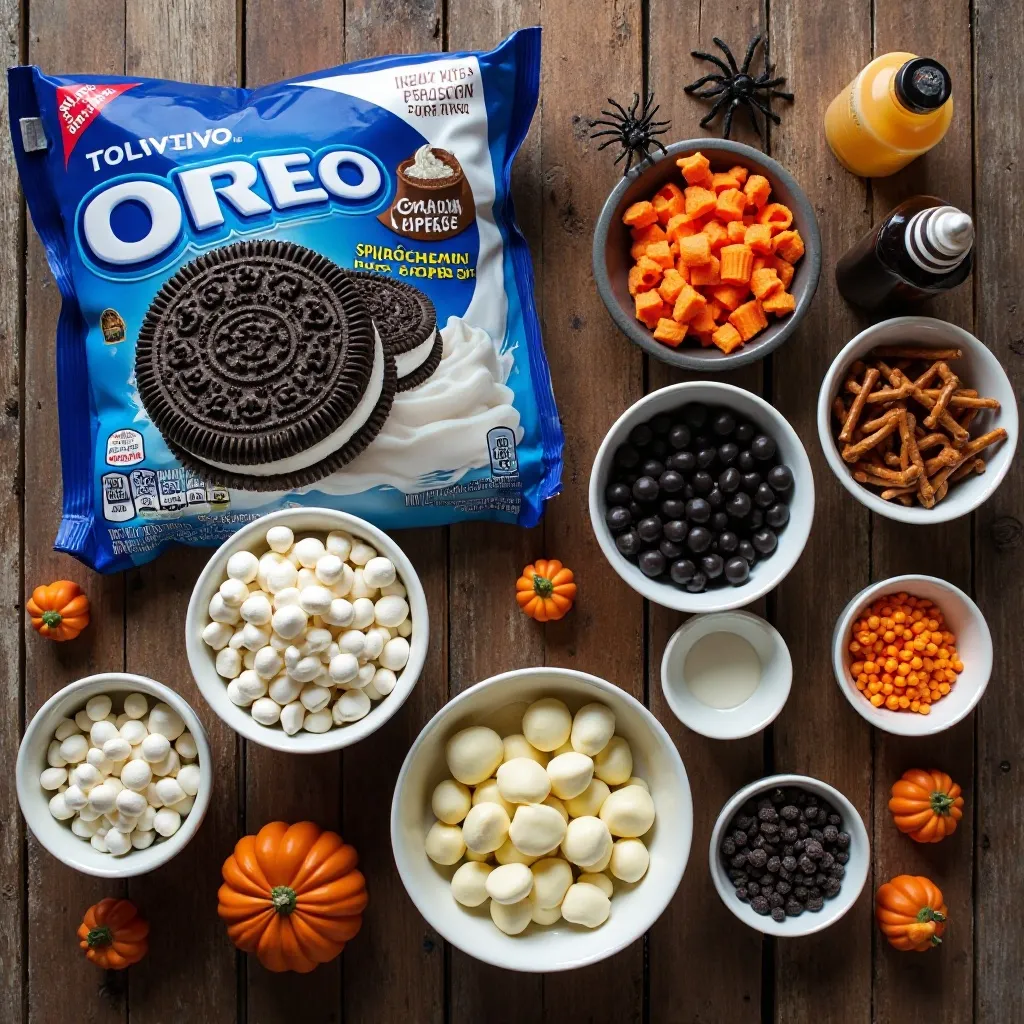
Key Ingredients for Halloween Treats Using Oreos
Base Ingredients:
- 36 Oreo cookies (regular or Halloween edition)
- 8 oz cream cheese, softened
- 2 cups white chocolate chips
- 2 tablespoons coconut oil
Decoration Supplies:
- Orange food coloring
- Candy eyes (various sizes)
- Gummy worms
- Orange sprinkles
- Black gel icing
- Pretzel sticks
- Mini chocolate chips
Step-by-Step Instructions
Step 1: Prepare the Oreo Base Remove the cream filling from 24 Oreos and set aside. Place the chocolate cookies in a food processor and pulse until you have fine crumbs. You should have about 2 cups of crumbs.
Step 2: Make the Binding Mixture In a large bowl, mix the softened cream cheese with the reserved Oreo cream filling. Beat until smooth and well combined. This creates the perfect binding agent for your treats.
Step 3: Combine and Shape Add the Oreo crumbs to the cream cheese mixture and stir until evenly combined. The mixture should hold together when pressed. Roll into 24 balls, each about 1.5 inches in diameter.
Step 4: Chill the Balls Place the Oreo balls on a parchment-lined baking sheet and refrigerate for at least 2 hours or until firm. This step is crucial for easy dipping.
Step 5: Prepare the Coating Melt white chocolate chips with coconut oil in a microwave-safe bowl in 30-second intervals, stirring between each interval until smooth. Divide into bowls and add orange food coloring to desired shades.
Step 6: Dip and Decorate Using a fork or dipping tool, dip each chilled ball into the melted chocolate, allowing excess to drip off. Place on parchment paper and immediately add decorations while chocolate is still wet.
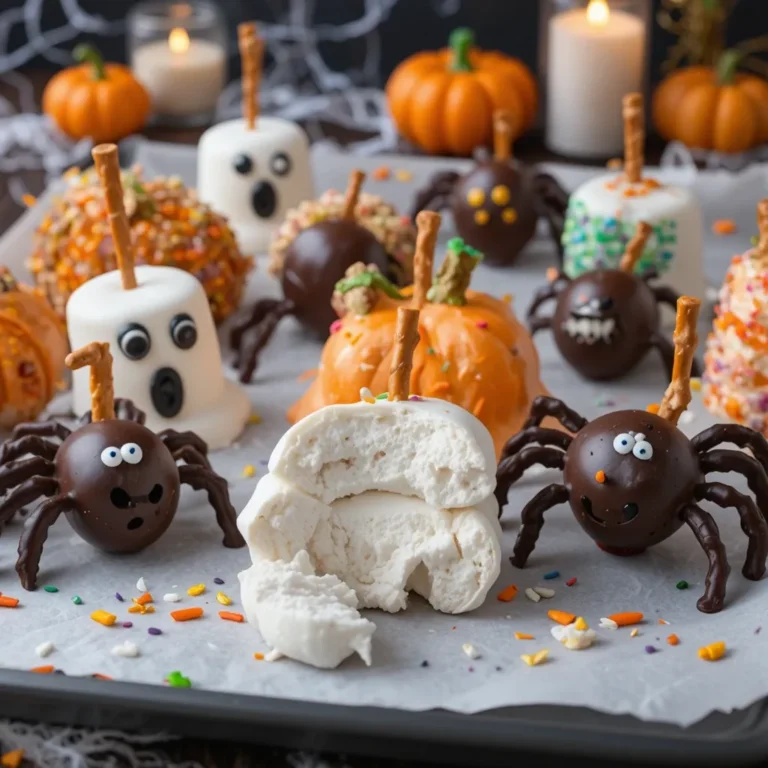
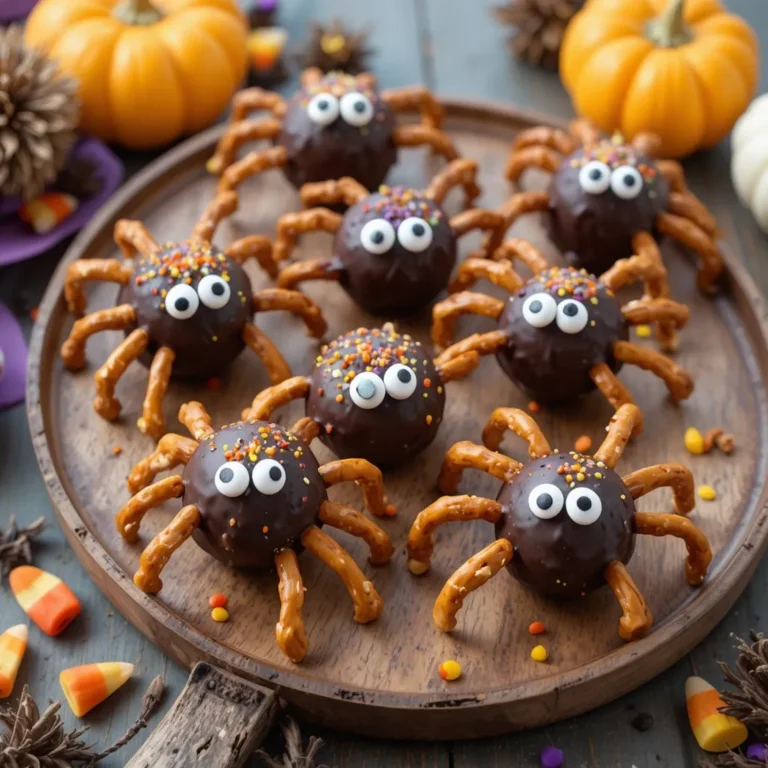
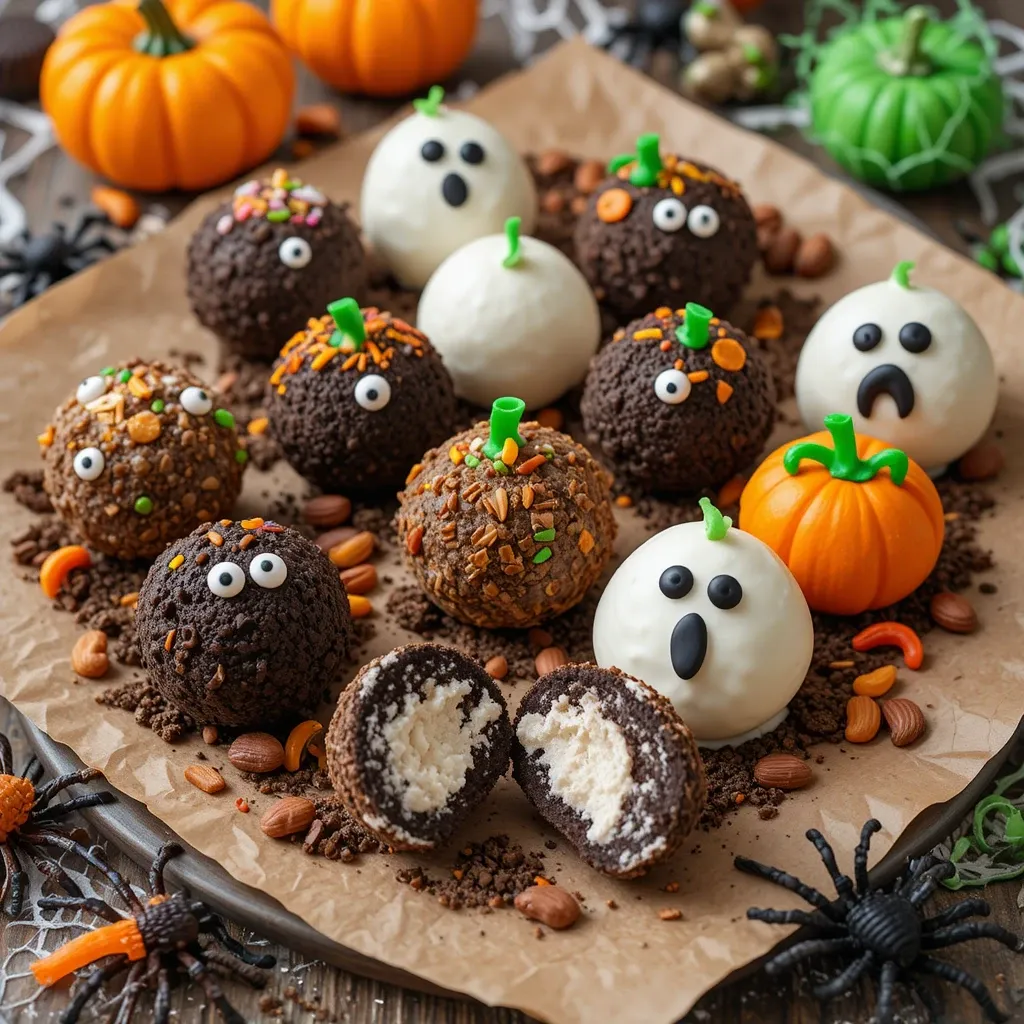
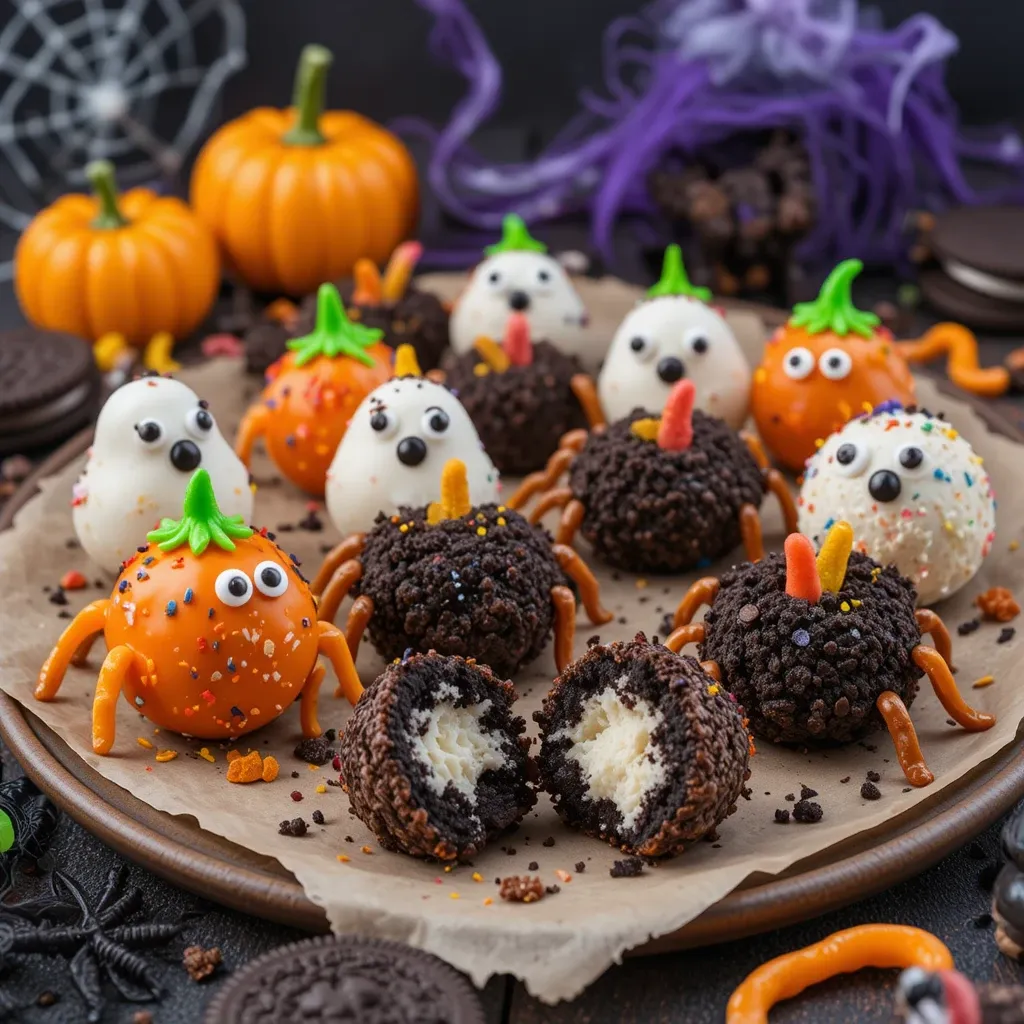
Step 7: Create Spooky Designs
- Spiders: Add 8 pretzel stick halves as legs and candy eyes
- Pumpkins: Use orange chocolate and add green icing stems
- Ghosts: Keep white and add black gel icing dots for eyes and mouth
- Dirt Balls: Roll in crushed remaining Oreos and top with gummy worms
Step 8: Final Setting Refrigerate decorated treats for 30 minutes to set the chocolate coating completely.
What to Serve Halloween Treats Using Oreos With
These versatile treats pair wonderfully with various Halloween beverages and snacks:
Hot Beverages:
- Spiced apple cider
- Hot chocolate with marshmallows
- Pumpkin spice latte
Cold Drinks:
- Orange punch
- Black cherry soda
- Witches’ brew (grape juice cocktail)
Complementary Treats:
- Caramel apples
- Pumpkin cupcakes
- Halloween sugar cookies
- Candy corn trail mix
Top Tips for Perfecting Halloween Treats Using Oreos
Temperature Control: Keep your hands slightly damp when rolling balls to prevent sticking. If the mixture becomes too soft, chill it for 15 minutes before continuing.
Chocolate Dipping Success: Add coconut oil to melted chocolate for a smoother, shinier coating that sets beautifully. If chocolate becomes too thick, add more coconut oil one teaspoon at a time.
Decoration Timing: Work quickly when adding decorations – you have about 2-3 minutes before the chocolate starts to set. Prepare all decorations beforehand for efficiency.
Ingredient Substitutions:
- Use Greek yogurt cream cheese for tangier flavor
- Substitute almond bark for white chocolate if preferred
- Try different Oreo flavors like pumpkin spice or orange cream
Common Mistakes to Avoid:
- Don’t skip the chilling step – it prevents messy dipping
- Avoid overprocessing cookies into powder
- Don’t add decorations to set chocolate – they won’t stick
Storing and Reheating Tips
Short-term Storage: Store completed treats in an airtight container in the refrigerator for up to 1 week. Layer between parchment paper to prevent sticking.
Long-term Storage: These treats freeze beautifully! Wrap individually in plastic wrap and store in freezer bags for up to 3 months. Thaw in refrigerator for 2 hours before serving.
Transportation Tips: Keep treats chilled until ready to serve, especially in warm weather. Use a cooler with ice packs for parties or trick-or-treat events.
No Reheating Needed: These treats are best served chilled and require no reheating. The chocolate coating may become soft at room temperature but will re-set when chilled.
Frequently Asked Questions
Can I make these treats without cream cheese?
Yes! Substitute with 4 tablespoons of softened butter mixed with 2 tablespoons of powdered sugar for a different but equally delicious binding agent.
How far in advance can I make Halloween Oreo treats?
These treats can be made up to 3 days ahead and stored in the refrigerator. Add final decorations the day of serving for best appearance.
What’s the best way to crush Oreos without a food processor?
Place cookies in a sealed plastic bag and crush with a rolling pin. For finer crumbs, use a blender or mortar and pestle.
Can I use different cookie flavors?
Absolutely! Try golden Oreos for “mummy” treats, mint Oreos for green “monster” balls, or birthday cake Oreos for colorful Halloween fun.
Why isn’t my chocolate coating smooth?
This usually happens when chocolate overheats or comes in contact with water. Start over with fresh chocolate and add coconut oil for smoothness.
How do I prevent the treats from cracking?
Ensure treats are properly chilled before dipping and don’t move them too much while the chocolate is setting.
Nutritional Information
| Nutrient | Per Serving (1 treat) |
|---|---|
| Calories | 185 |
| Total Fat | 9g |
| Saturated Fat | 5g |
| Carbohydrates | 24g |
| Sugar | 18g |
| Protein | 3g |
| Sodium | 145mg |
| Fiber | 1g |
Note: Values are approximate and may vary based on specific ingredients used.
Creative Variations to Try
Seasonal Themes: Adapt these treats for other holidays by changing colors and decorations. Use red and green for Christmas, pastels for Easter, or school colors for team events.
Dietary Modifications: Create vegan versions using dairy-free Oreos, vegan cream cheese, and dark chocolate. For gluten-free options, substitute with gluten-free chocolate sandwich cookies.
Advanced Decorating: Try edible glitter, gold leaf, or hand-painted details with food coloring for elegant Halloween parties.
Mini Versions: Make bite-sized versions using a small cookie scoop for elegant Halloween cocktail parties or large gatherings.
Troubleshooting Common Issues
Treats Too Soft: Add more crushed Oreos gradually until mixture holds shape well.
Chocolate Won’t Stick to Decorations: Ensure chocolate hasn’t set completely before adding decorations. Work in small batches.
Uneven Coating: Use a dipping fork or two forks to ensure even coverage and smooth dripping.
These Halloween treats using Oreos will become your go-to recipe for creating memorable, delicious, and Instagram-worthy Halloween celebrations. The combination of simplicity, affordability, and spectacular results makes them perfect for busy families who want to create special Halloween memories without the stress!
Happy Halloween baking!