10 Easy Halloween Treats with Apples Step-by-Step Tutorial
Looking for the perfect Halloween treats with apples that’ll have your trick-or-treaters screaming with delight? These spooky apple creations are wickedly delicious, incredibly fun to make, and way healthier than a pillowcase full of candy! From monster mouths to caramel-dipped delights, these apple treats combine the crisp freshness of fall’s favorite fruit with Halloween magic.
Whether you’re hosting a party or just want to add some festive flair to snack time, these treats are easier than carving a jack-o’-lantern and twice as tasty!
What Are Halloween Treats with Apples?
Ever wonder why apples became the unofficial mascot of Halloween snacks? These Halloween treats with apples transform ordinary fruit into spooky masterpieces that kids and adults absolutely love.
From grinning apple mouths with almond teeth to caramel-covered apples decorated like mummies, these treats prove that the way to anyone’s heart is through their stomach—especially when it’s wearing a costume!
Think of them as the friendly ghosts of the dessert world: slightly sweet, totally fun, and way less scary than processed sugar overload. Ready to turn your kitchen into a haunted orchard? Let’s get started!
Why You’ll Love These Halloween Treats with Apples
Healthy Halloween Magic
These Halloween treats with apples give you the best of both worlds: festive fun without the guilt. While candy corn and chocolate bars pile up in buckets, you’re serving treats packed with fiber, vitamins, and natural sweetness. Apples are nature’s perfect canvas for creativity, and they’re already portion-controlled!
Budget-Friendly Spookiness
Making Halloween treats at home saves serious money compared to buying pre-made party snacks. A bag of apples costs less than fancy decorated cookies, and you probably have most ingredients already in your pantry. Plus, you control the quality and quantity of toppings.
Endless Flavor Combinations
The beauty of these treats lies in their versatility. Coat them in caramel, chocolate, or yogurt. Add crushed cookies, candy eyes, pretzels, or sprinkles. Create monster mouths, mummy wraps, or candy apples that glow in the dark (okay, not literally, but they’ll shine at your party!). Each bite combines crisp apple crunch with your chosen toppings for a texture party in your mouth.
If you love creative seasonal treats, you’ll also want to check out our pumpkin spice desserts that perfectly complement these apple creations. Why not make both and create the ultimate fall dessert table?
These treats aren’t just delicious—they’re memory-makers. Imagine your kids’ faces lighting up when they bite into an apple slice decorated like Dracula’s fangs. Ready to transform simple apples into Halloween showstoppers? Let’s dive into making these frighteningly fun treats!
How to Make Halloween Treats with Apples
Quick Overview
These Halloween treats with apples are surprisingly simple to create, even if you’re not a crafty person. The best part? Most variations take just 15-30 minutes from start to finish, with minimal cooking required.
Time Breakdown:
- Prep Time: 15-20 minutes
- Decorating Time: 10-15 minutes per treat type
- Total Time: 25-35 minutes
- Servings: 6-8 treats (depending on apple size)
The magic happens when crisp, fresh apples meet creative toppings and decorations. We’ll cover multiple variations so you can choose your favorites or make them all for variety!
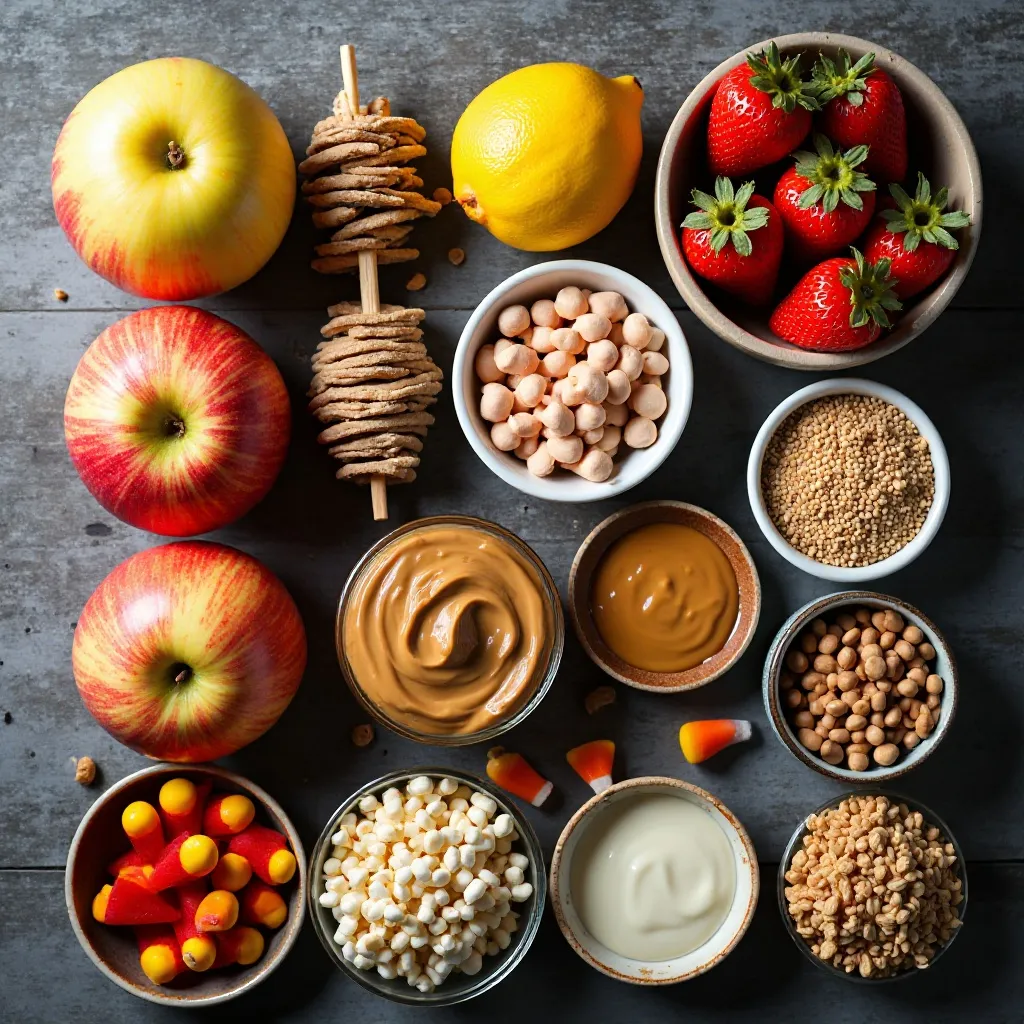
Key Ingredients for Halloween Treats with Apples
Base Ingredients:
- 6-8 medium apples (Granny Smith, Gala, or Honeycrisp work best)
- Lemon juice (2 tablespoons) – prevents browning
- Wooden popsicle sticks or skewers
For Monster Mouth Apples:
- 1/4 cup natural peanut or almond butter
- 1/4 cup sliced almonds (for teeth)
- 24-32 candy eyes
- Strawberry slices (for tongues)
For Caramel Apple Monsters:
- 1 bag (11 oz) caramel candies or 1 cup caramel sauce
- 2 tablespoons heavy cream
- Candy eyes, chocolate chips, pretzel pieces
- Crushed cookies or graham crackers
- Mini chocolate chips
For Chocolate-Dipped Ghost Apples:
- 2 cups white chocolate chips
- 1 tablespoon coconut oil
- Black decorating gel or mini chocolate chips for eyes
For Candy Apple Witches:
- 2 cups granulated sugar
- 1 cup light corn syrup
- 1/2 cup water
- Food coloring (green, purple, or orange)
- Witch hat decorations or black licorice
Optional Toppings & Decorations:
- Sprinkles (Halloween colors)
- Crushed Oreos
- Chopped nuts
- Shredded coconut (can be dyed green for “grass”)
- Gummy worms
- Mini marshmallows
Step-by-Step Instructions
Preparation (All Variations):
Step 1: Prep Your Apples Wash and thoroughly dry all apples. Remove any waxy coating by rubbing with a paper towel dipped in hot water. This helps toppings stick better. Insert a wooden stick firmly into the stem end of each apple, pushing about halfway through.
Step 2: Prevent Browning If making apple slice treats, mix lemon juice with 1 cup water. Dip apple slices and pat dry. This keeps them looking fresh and prevents oxidation.
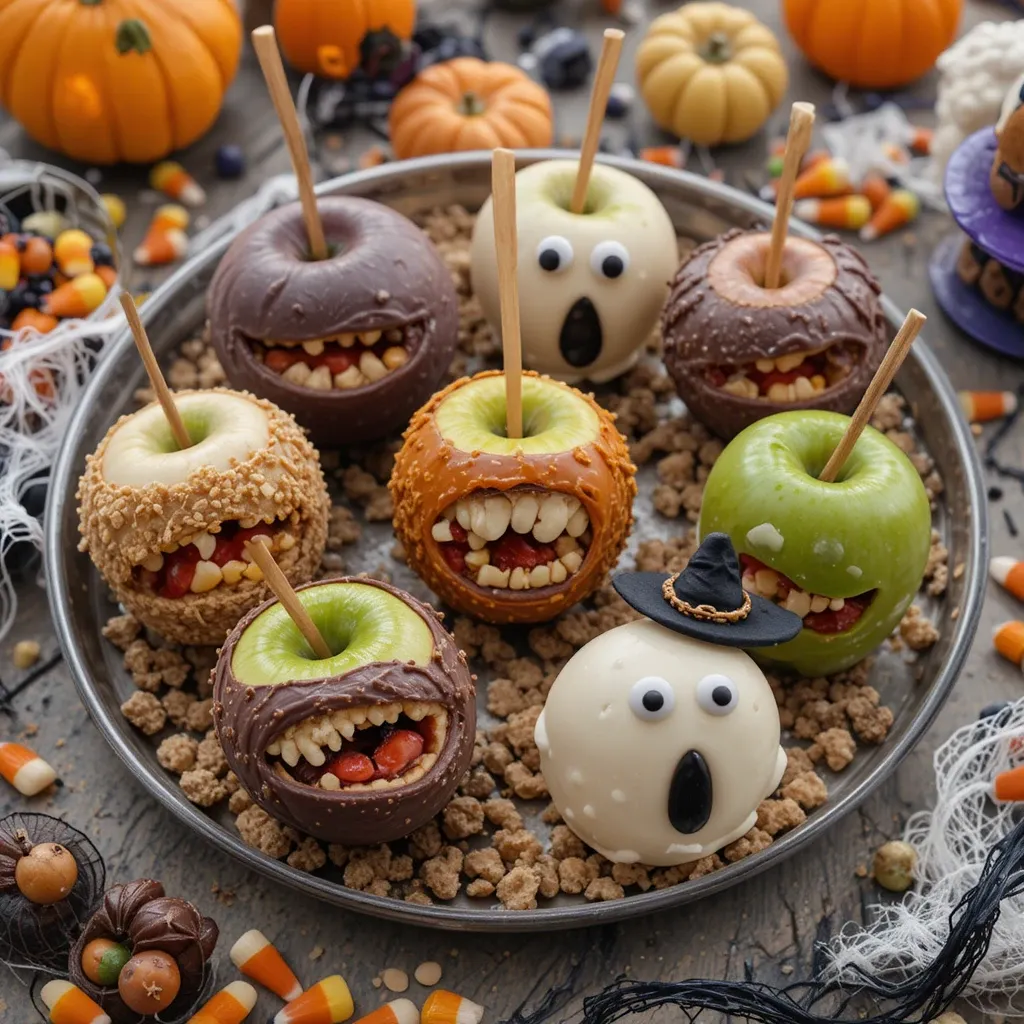
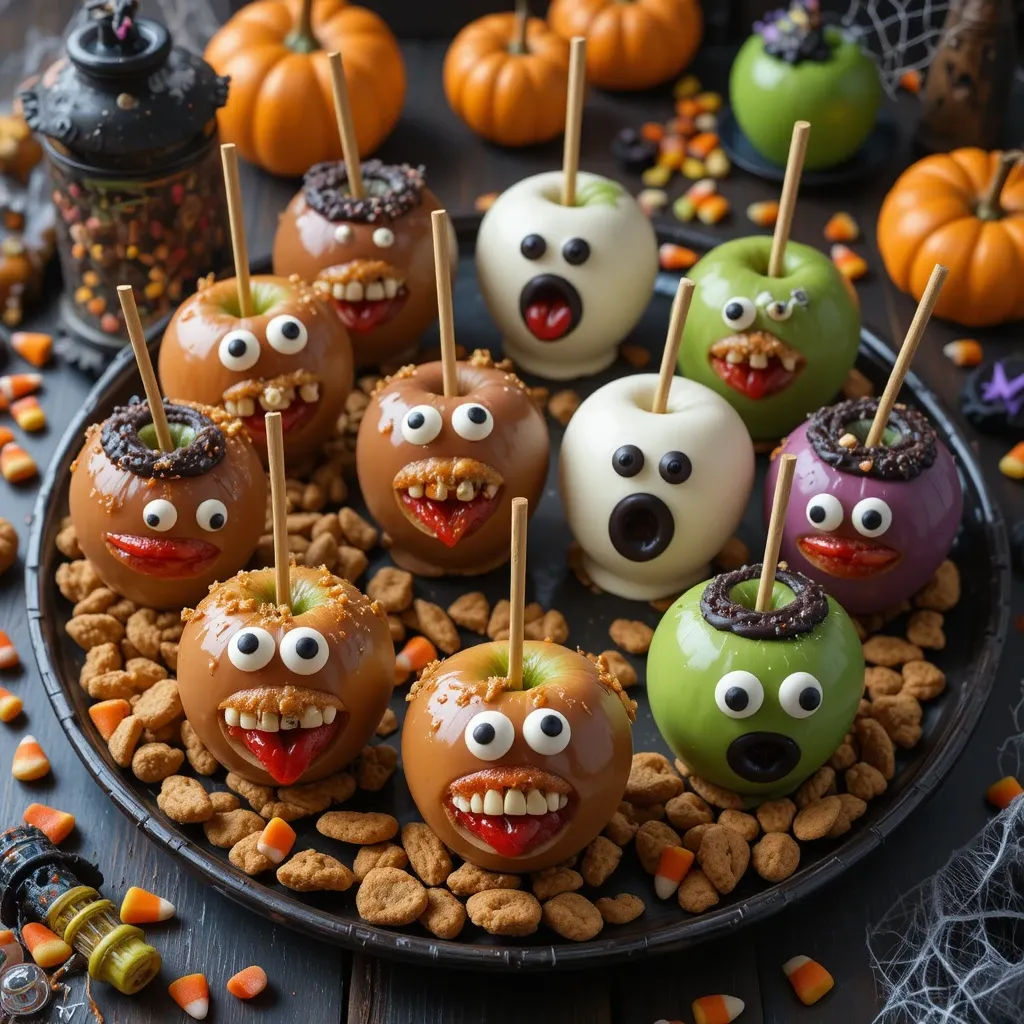
Monster Mouth Apples:
Step 3: Create the Mouth Cut each apple into quarters, then cut a wedge from the skin side of each quarter to create a “mouth” opening. Don’t cut all the way through—leave about 1/4 inch at the base.
Step 4: Add the Spread Spread a thin layer of peanut or almond butter inside the mouth opening on both the top and bottom sections. This acts as “glue” for your decorations.
Step 5: Insert Teeth Press sliced almonds into the nut butter along the edge to create jagged monster teeth. Space them evenly for the best effect. Use 4-6 almonds per quarter.
Step 6: Add Eyes and Tongue Attach candy eyes above the mouth using a tiny dab of nut butter. Cut a small strawberry slice and tuck it into the mouth for a silly tongue. Your monsters are ready to munch!
Caramel Apple Monsters:
Step 7: Melt the Caramel Unwrap caramel candies and place in a microwave-safe bowl with heavy cream. Microwave in 30-second intervals, stirring between each, until smooth and melted (about 2-3 minutes total).
Step 8: Dip the Apples Hold each apple by its stick and dip into the caramel, tilting the bowl and rotating the apple to coat evenly. Let excess drip off for 10-15 seconds.
Step 9: Roll in Toppings Immediately roll the bottom half of the caramel-coated apple in crushed cookies, nuts, or sprinkles. Work quickly before the caramel sets.
Step 10: Decorate While the caramel is still slightly sticky, press on candy eyes, chocolate chip mouths, and pretzel piece arms or antennae. Place on parchment paper to set completely (about 30 minutes at room temperature or 10 minutes in the refrigerator).
Chocolate-Dipped Ghost Apples:
Step 11: Melt White Chocolate Combine white chocolate chips and coconut oil in a microwave-safe bowl. Microwave in 30-second intervals, stirring each time, until completely smooth.
Step 12: Dip and Drip Dip each apple into the white chocolate, coating it completely. Let excess chocolate drip off, then place on parchment paper. For a ghost effect, let some chocolate drip down the sides naturally.
Step 13: Create Ghost Faces Before the chocolate sets, press two mini chocolate chips for eyes and use black decorating gel to draw a spooky mouth. Let set for 15-20 minutes.
Candy Apple Witches:
Step 14: Make Candy Coating In a heavy saucepan, combine sugar, corn syrup, and water. Heat over medium-high heat, stirring until sugar dissolves. Stop stirring and let boil until mixture reaches 300°F (hard crack stage) on a candy thermometer.
Step 15: Add Color Remove from heat and quickly stir in 3-4 drops of food coloring. Work fast—the candy coating sets quickly!
Step 16: Dip Carefully Tilt the pan and carefully dip each apple, rotating to coat evenly. Let excess drip off, then place on a greased parchment paper. The coating hardens in 5-10 minutes.
Step 17: Add Witch Hats Once set, add witch hat decorations on top using a dab of melted chocolate as glue. You can make simple hats from chocolate cookies and Hershey’s Kisses!
What to Serve Halloween Treats with Apples With
These Halloween treats with apples shine brightest when part of a festive spread. Here are perfect pairings:
Beverage Buddies:
- Hot apple cider with cinnamon sticks
- Warm spiced chai tea
- Orange punch with floating “eyeball” lychees
- Hot chocolate with ghost marshmallows
- Sparkling apple juice in fancy glasses
Savory Balances:
- Cheese and cracker platters (contrast the sweetness)
- Spooky finger sandwiches
- Veggie cups with ranch dip
- Popcorn balls with orange and black drizzle
- Mini pizzas cut into pumpkin shapes
Dessert Table Companions:
- Pumpkin cupcakes
- Ghost-shaped sugar cookies
- Chocolate spider brownies
- Candy corn bark
- Mummy wrapped hot dogs (for savory contrast)
Party Presentation Tips: Arrange your apple treats on a black serving platter with dry ice underneath for a spooky fog effect. Scatter plastic spiders and fake cobwebs around the display. Use cake stands at different heights to create visual interest.
Top Tips for Perfecting Halloween Treats with Apples
Choose the Right Apples: Tart varieties like Granny Smith work best for caramel and candy coatings because they balance the sweetness. Sweeter apples like Gala or Honeycrisp are perfect for monster mouths and chocolate dipping. Avoid mealy apples like Red Delicious—they lack the crisp crunch these treats need.
Temperature Matters: Apples should be room temperature before dipping in warm caramel or chocolate. Cold apples cause coatings to crack and slide off. However, once decorated, refrigerate them to help everything set faster.
Remove the Wax: Store-bought apples have a waxy coating that prevents toppings from sticking. Dip each apple in boiling water for 5 seconds, then rub vigorously with a paper towel to remove the wax. This simple step prevents coating catastrophes!
Prevent Caramel Sliding: After removing wax, make sure apples are completely dry. Even a little moisture causes caramel to slip right off. Pat them thoroughly with paper towels and let them air dry for 10 minutes.
Color Coordination: Use gel food coloring instead of liquid for candy coatings—it’s more vibrant and doesn’t thin the mixture. Orange, purple, and green are classic Halloween colors, but don’t be afraid to experiment!
Make-Ahead Magic: Monster mouth apples are best made fresh (within 2-3 hours of serving) because the apples oxidize. However, caramel and candy apples can be made 1-2 days ahead. Just keep them refrigerated and bring to room temperature before serving.
Kid-Friendly Adjustments: Skip the hard candy coating if serving to young children—it’s too hard for little teeth. Stick with caramel or chocolate versions instead. Also, use sunflower seed butter instead of peanut butter for allergy-safe monster mouths.
Decoration Shortcuts: Use store-bought caramel squares instead of making it from scratch. Use decorating pens instead of trying to pipe melted chocolate. Buy pre-made candy eyes and edible decorations to save time and stress.
Serving Size Solutions: Full apples can be too much for small children. Cut larger apples into halves or thick slices on sticks for portion-perfect treats that are easier to eat.
Storing and Reheating Tips
Immediate Storage: Halloween treats with apples should be stored properly to maintain freshness and food safety.
Refrigeration Guidelines:
- Monster Mouth Apples: Store in an airtight container in the refrigerator for up to 24 hours. The apples will brown slightly even with lemon juice, so these are best eaten the same day.
- Caramel Apples: Keep in the refrigerator for up to 3-5 days. Wrap each apple individually in wax paper or plastic wrap to prevent them from sticking together.
- Candy Apples: Store at room temperature for up to 2 days or refrigerate for up to 1 week. Bring to room temperature before serving for the best texture.
- Chocolate-Dipped Apples: Refrigerate for up to 3-4 days in an airtight container. Condensation can make decorations soggy, so use within 2 days for best appearance.
Freezing Options: Freezing is not recommended for decorated apple treats because the texture of the apple becomes mealy and unpleasant when thawed. The decorations also tend to become soggy and slide off. These treats are best enjoyed fresh!
Room Temperature Rules: Candy apples can sit at room temperature for 2-3 days if your home is cool (below 70°F). However, caramel and chocolate-coated apples should always be refrigerated after 2 hours to prevent bacterial growth, especially if they have been handled during decorating.
Serving After Storage: Remove from the refrigerator 20-30 minutes before serving to bring to room temperature. This softens the caramel and makes the treats easier to bite into. Cold caramel can be tough and stick to teeth uncomfortably.
Signs of Spoilage: Discard apples if you notice any fermented smell, mold on the stick area, or if the coating separates from the apple with liquid underneath. When in doubt, throw it out!
Frequently Asked Questions
What are the best apples for Halloween treats?
Granny Smith apples are the top choice for candy and caramel coatings because their tartness balances sweet toppings perfectly. They’re also super crisp and hold up well. For chocolate-dipped treats or monster mouths, try Gala, Honeycrisp, or Fuji apples for their natural sweetness and firm texture. Avoid Red Delicious and Mcintosh—they’re too soft and mealy.
How do you keep apples from turning brown for Halloween treats?
Mix 2 tablespoons of lemon juice with 1 cup of cold water and dip cut apple pieces for 30 seconds. Pat dry thoroughly before decorating. For whole apples, the coating itself prevents browning. You can also use a commercial produce protector like Fruit Fresh. The key is minimizing air exposure—prepare apples just before decorating and serve within a few hours for the best appearance.
Can you make Halloween apple treats ahead of time?
Yes, but timing varies by type. Candy apples can be made 3-5 days ahead and stored at room temperature or refrigerated. Caramel apples are best made 1-2 days ahead and kept cold. Chocolate-dipped apples stay fresh for 2-3 days refrigerated. Monster mouth apples with fresh-cut pieces should be made the same day, within 2-3 hours of serving, to prevent browning and keep toppings fresh.
How do you get caramel to stick to apples?
The secret is removing the waxy coating first. Dip each apple in boiling water for 5 seconds, then scrub vigorously with a paper towel or soft brush. Dry completely—even tiny amounts of moisture prevent sticking. Use room temperature apples and freshly melted caramel. Adding a tablespoon of heavy cream to store-bought caramel also helps it adhere better and creates a smoother coating.
Are Halloween apple treats healthy?
They’re healthier than pure candy but still treats. One medium apple provides 4g fiber and vitamin C. Caramel apples add about 150-200 calories from coating. Chocolate versions vary widely. Monster mouth apples with nut butter add protein and healthy fats. To make them healthier, use dark chocolate instead of milk chocolate, reduce caramel thickness, or stick with yogurt-based coatings. They’re definitely better than eating a dozen fun-size candy bars!
What can I use instead of caramel for apple treats?
Try melted chocolate (white, milk, or dark), yogurt coating, honey with cinnamon, melted peanut butter with honey, or cream cheese frosting. For a completely different approach, use hummus or cream cheese on apple slices with fun toppings. You can also make a healthier “caramel” using dates blended with almond milk for a refined sugar-free option that still tastes indulgent.
How do you make Halloween apple treats allergy-friendly?
For nut allergies, replace almond slices with sunflower seeds and use sunflower seed butter instead of peanut butter. Choose nut-free chocolate brands. For dairy allergies, use dairy-free chocolate chips and coconut cream instead of heavy cream in caramel. Make sure all candy decorations are allergen-free by checking labels. Homemade coatings give you the most control over ingredients.
Why do my candy apples get sticky?
Candy apples become sticky when exposed to humidity or moisture. Store them in a cool, dry place with low humidity. Don’t refrigerate candy apples unless absolutely necessary—condensation makes them sticky. Make sure apples are bone-dry before dipping. Cook candy coating to the proper temperature (300°F) for hard crack stage. Undercooked coating stays tacky and never fully hardens.
Can kids help make Halloween apple treats?
Absolutely! Kids can wash apples, help insert sticks, arrange toppings, and decorate monster mouths. For hot caramel or candy coating, adults should handle the dipping while kids add final decorations. Monster mouth apples are perfect for kids—they can spread nut butter, press in almonds, and stick on candy eyes. It’s a fun family activity that teaches kitchen skills and creativity!
What’s the difference between candy apples and caramel apples?
Candy apples have a hard, glossy sugar shell made from boiled sugar syrup that cracks when you bite it. They’re bright red, orange, or other colors. Caramel apples have a soft, chewy coating made from melted caramel that’s easier to bite and often rolled in nuts or other toppings. Candy apples are crunchier; caramel apples are chewier and richer in flavor.
Nutrition Information
| Nutrient | Per Serving (1 treat) |
|---|---|
| Calories | 180-350 (varies by coating) |
| Total Fat | 3-12g |
| Saturated Fat | 1-6g |
| Cholesterol | 0-15mg |
| Sodium | 30-95mg |
| Total Carbohydrates | 35-65g |
| Dietary Fiber | 3-5g |
| Sugars | 28-55g |
| Protein | 1-4g |
| Vitamin C | 8-10% DV |
| Calcium | 2-8% DV |
| Iron | 2-4% DV |
Note: Values vary significantly based on coating type and topping choices. Monster mouth apples with nut butter are higher in protein (4g) and healthy fats. Candy apples are highest in sugar (50-55g). Plain chocolate-dipped apples fall in the middle range.
Extra Tips for Success
Party Planning Pointers:
Set up an apple decorating station at your Halloween party. Provide pre-dipped apples and let guests add their own toppings. This doubles as entertainment and dessert! Supply small bowls of sprinkles, candy eyes, pretzels, chocolate chips, and crushed cookies. Kids love the creativity, and adults enjoy it too.
Photography Tips:
These treats are Instagram gold! Photograph them on black or orange backgrounds with Halloween props nearby. Natural lighting works best. Take photos from multiple angles—straight on to show details, and overhead for a party spread shot. Add hashtags like #HalloweenTreats #AppleDesserts #HealthyHalloween for maximum reach.
Safety Considerations:
Always supervise children around hot caramel or candy coating. Use oven mitts when handling hot pots. Keep candy thermometers away from kids. For very young children, cut apples into smaller pieces to prevent choking hazards. Be mindful of common allergens and label treats at parties so guests know what’s in each variation.
Customization Ideas:
Match your apple treats to your Halloween costume theme! Making mummy costumes? Create mummy-wrapped apples with white chocolate drizzle and candy eyes. Vampire party? Focus on monster mouth apples with blood-red strawberry tongues. Hosting a witch-themed party? Make green candy apple witches with black licorice brooms.
Cost Breakdown:
For a batch of 8 treats, expect to spend $10-15 total depending on your decoration choices. Apples cost $3-5, coating ingredients $3-5, and decorations $4-5. That’s roughly $1.25-1.90 per treat compared to $3-6 each at specialty stores. The homemade version tastes better and lets you control ingredients!
Troubleshooting Common Issues:
- Caramel too thick: Add more cream, one teaspoon at a time
- Coating won’t stick: Remove wax coating more thoroughly and ensure apples are dry
- Chocolate seizes: Don’t let water get into melted chocolate; add coconut oil to smooth it out
- Decorations falling off: Use melted chocolate or extra caramel as “glue”
- Apples oxidizing quickly: Increase lemon juice concentration in the water bath
These Halloween treats with apples prove that healthy can be fun, festive, and absolutely delicious. Whether you’re team caramel, team chocolate, or team monster mouth, there’s an apple treat here for everyone. They’re the perfect balance of nostalgia and nutrition, bringing smiles to faces young and old.
So grab a bag of crisp apples and let your creativity run wild! Your Halloween party deserves treats that are as beautiful as they are tasty. Plus, you’ll feel good knowing you’re serving something with actual nutritional value hidden under all that spooky decoration.
Now get in that kitchen and start creating some frighteningly fantastic Halloween treats with apples. Your trick-or-treaters (and your Instagram followers) will thank you! 🍎🎃👻