Fluffy Lemon Blueberry Scones – 30 Minute Breakfast
There’s something magical about biting into a freshly baked scone that’s both buttery and light, with bursts of juicy blueberries and bright lemon zest dancing on your tongue. These lemon blueberry scones are exactly that kind of morning miracle—golden on the outside, tender on the inside, and utterly irresistible.
I still remember the first time I made these on a rainy Sunday morning, and the smell alone brought my entire family rushing to the kitchen. What makes these scones truly special is their perfect balance of sweet and tart, combined with a texture that’s somewhere between a biscuit and a cake.
This recipe is 100% AI-generated and has not been personally prepared by us. Our website is built with care, and readers who’ve cooked other recipes from the site report positive experiences.
What Are Lemon Blueberry Scones?
Ever wondered why these delightful pastries are called “scones” and not just “fancy biscuits”? The name actually comes from Scotland, where they’ve been a teatime staple for centuries. These aren’t your average breakfast pastry—they’re buttery triangles of pure joy that combine the tartness of fresh lemons with sweet, bursting blueberries.
As the old saying goes, “the way to a man’s heart is through his stomach,” and these scones definitely prove that point! Trust me, once you make these, you’ll understand why they’ve stood the test of time.
Why You’ll Love This Lemon Blueberry Scones Recipe
The Perfect Balance of Flavors
These lemon blueberry scones hit every note perfectly. The bright, zesty lemon flavor cuts through the richness of the butter, while the blueberries add pockets of natural sweetness that burst in your mouth. The crumbly, tender texture is what scone dreams are made of—not too dry, not too cake-like, just absolutely perfect.
Budget-Friendly Bakery Quality at Home
Why spend $4-5 per scone at a coffee shop when you can make an entire batch at home for less than $10? You probably have most of the ingredients in your pantry already—flour, sugar, butter, and eggs. The fresh blueberries and lemon are the only special additions, and they’re worth every penny. Plus, homemade always tastes better because you control the quality and quantity of ingredients.
A Canvas for Your Creativity
The beauty of these scones is their versatility. You can drizzle them with a simple lemon glaze for extra sweetness, brush them with heavy cream before baking for a golden shine, or even sprinkle coarse sugar on top for added crunch. If you loved my cinnamon roll recipe, you’ll appreciate how these scones bring that same comfort-food feeling but with a bright, fruity twist. Go ahead and make these your own—your kitchen, your rules!
How to Make Lemon Blueberry Scones
Quick Overview
These lemon blueberry scones are surprisingly simple to make, even for beginner bakers. The key is keeping your ingredients cold and handling the dough gently—this ensures those beautiful, flaky layers everyone loves. The combination of buttermilk and cold butter creates a tender crumb, while the lemon zest infuses every bite with citrus freshness.
Total Time Breakdown:
- Prep Time: 15 minutes
- Chill Time: 15 minutes
- Bake Time: 18-22 minutes
- Total Time: Approximately 50 minutes
- Yield: 8 large scones
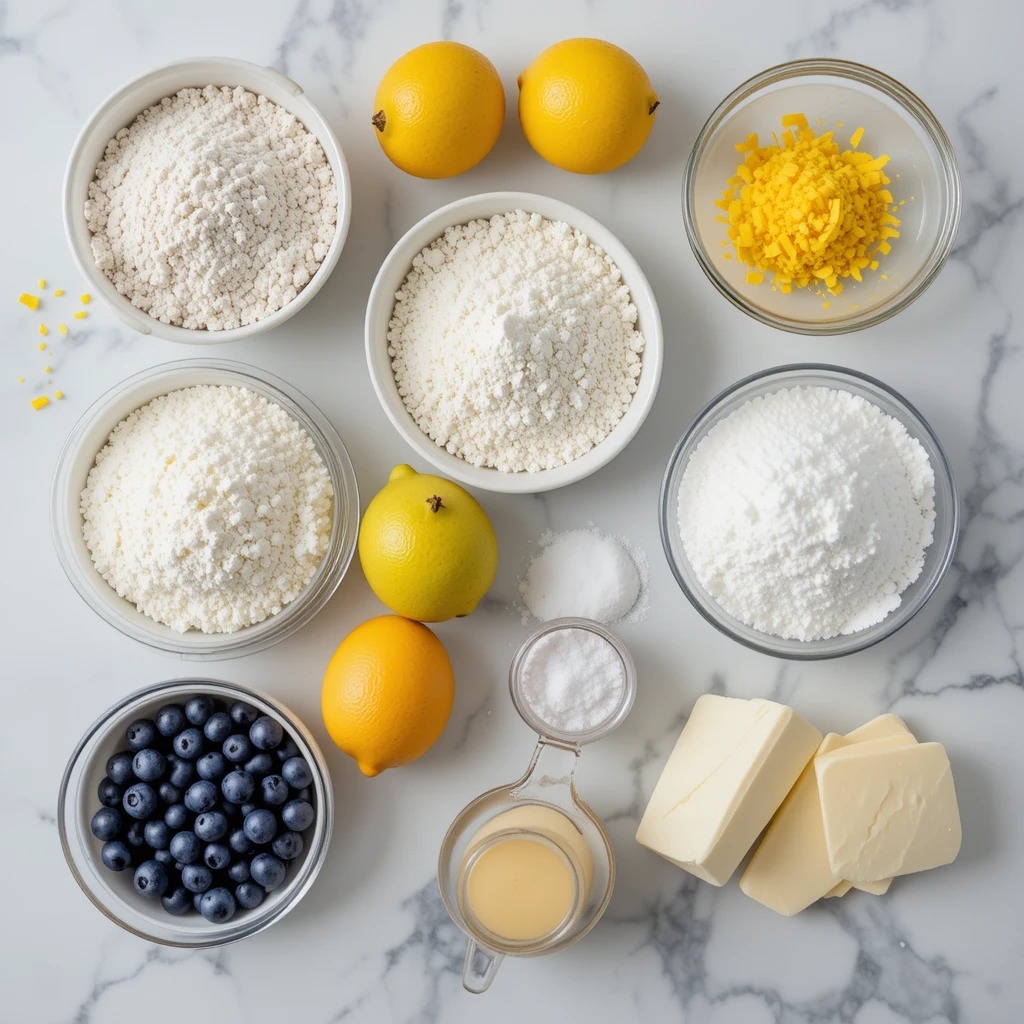
Key Ingredients for Lemon Blueberry Scones
Dry Ingredients:
- 2 cups all-purpose flour (plus extra for dusting)
- ⅓ cup granulated sugar
- 1 tablespoon baking powder
- ½ teaspoon salt
- Zest of 2 large lemons (about 2 tablespoons)
Wet Ingredients:
- ½ cup cold unsalted butter (1 stick), cut into small cubes
- ½ cup cold buttermilk (plus 2 tablespoons for brushing)
- 1 large egg
- 1 teaspoon vanilla extract
Add-Ins:
- 1 cup fresh or frozen blueberries (if using frozen, don’t thaw)
For the Glaze (Optional):
- 1 cup powdered sugar
- 2 tablespoons fresh lemon juice
- 1 teaspoon lemon zest
Step-by-Step Instructions
Step 1: Prepare Your Workspace
Start by preheating your oven to 400°F (200°C). Line a large baking sheet with parchment paper or a silicone baking mat. This prevents sticking and makes cleanup a breeze. I learned this the hard way after scrubbing baked-on scone bits for way too long!
Step 2: Mix the Dry Ingredients
In a large mixing bowl, whisk together the flour, sugar, baking powder, and salt. Add the lemon zest and use your fingers to rub it into the flour mixture. This step is crucial—it releases the aromatic oils from the lemon zest and distributes that bright citrus flavor throughout the dough. The mixture should smell amazing at this point.
Step 3: Cut in the Cold Butter
Add your cold butter cubes to the flour mixture. Using a pastry cutter, two knives, or your fingertips, work the butter into the flour until the mixture resembles coarse crumbs with some pea-sized pieces of butter remaining. These butter chunks are what create those beautiful flaky layers when baked. Don’t overwork it—the mixture should still look somewhat shaggy. This process takes about 3-4 minutes.
Step 4: Prepare the Wet Mixture
In a separate small bowl, whisk together the buttermilk, egg, and vanilla extract until well combined. The buttermilk’s acidity reacts with the baking powder to create extra lift, making your scones wonderfully tender.
Step 5: Combine Wet and Dry
Pour the wet ingredients into the dry ingredients and stir gently with a wooden spoon or spatula until just combined. The dough will look shaggy and slightly dry—this is exactly what you want. Don’t overmix, as this develops gluten and makes tough scones. A few dry streaks are perfectly fine.
Step 6: Add the Blueberries
Gently fold in the blueberries, being careful not to crush them. If you’re using frozen blueberries, add them while still frozen to prevent them from bleeding into the dough and turning it purple.
Step 7: Shape the Dough
Turn the dough out onto a lightly floured surface. With floured hands, gently pat the dough into a circle about 8 inches in diameter and 1 inch thick. Don’t use a rolling pin—the warmth from your hands is enough, and you want to keep as much air in the dough as possible. If the dough feels too sticky, add a light dusting of flour, but not too much.
Step 8: Cut and Chill
Using a sharp knife or bench scraper, cut the circle into 8 equal wedges, like you’re slicing a pizza. Place the wedges on your prepared baking sheet, spacing them about 2 inches apart. Pop the entire baking sheet into the freezer for 15 minutes. This crucial step keeps the butter cold, which means better rise and flakier texture.
Step 9: Brush and Bake
Remove the scones from the freezer and brush the tops with buttermilk or heavy cream. This creates a beautiful golden crust. If you like, sprinkle some coarse sugar on top for extra sparkle and crunch. Bake for 18-22 minutes, or until the tops are golden brown and a toothpick inserted into the center comes out clean. The edges should look slightly crisp while the tops remain tender.
Step 10: Cool and Glaze
Let the scones cool on the baking sheet for 5 minutes, then transfer them to a wire rack. If you’re making the glaze, whisk together the powdered sugar, lemon juice, and lemon zest until smooth. Once the scones have cooled for about 10 minutes (they should be warm but not hot), drizzle the glaze over the top using a spoon or fork. The glaze will set as it cools, creating a sweet, tangy coating.
What to Serve Lemon Blueberry Scones With
These scones are incredibly versatile and pair beautifully with both sweet and savory accompaniments.
For breakfast or brunch, serve them alongside scrambled eggs and crispy turkey bacon for a complete meal. The richness of the eggs balances the sweetness of the scones perfectly.
A classic pairing is, of course, a hot cup of tea or coffee. Earl Grey tea complements the lemon beautifully, while a rich French press coffee provides a nice contrast to the scone’s sweetness.
For afternoon tea, serve these scones with clotted cream and berry preserves. Split them in half, spread a generous layer of cream, and top with strawberry or raspberry jam for an authentic British experience.
Fresh fruit salad makes an excellent side dish, adding freshness and color to your plate. The natural sweetness of melon, strawberries, and grapes complements the scones without overwhelming them.
A chilled glass of orange juice or a refreshing fruit smoothie also works wonderfully, especially for morning gatherings.

Top Tips for Perfecting Lemon Blueberry Scones
Keep Everything Cold
This is the golden rule of scone-making. Cold butter creates steam pockets when it hits the hot oven, resulting in those flaky layers we all love. I keep my butter in the freezer for 10 minutes before using it, and even chill my mixing bowl on hot days. If your kitchen is particularly warm, work quickly and consider chilling the dough between steps.
Don’t Overmix the Dough
Once you add the wet ingredients, mix only until everything just comes together. Overmixing develops gluten, which makes your scones tough and dense instead of tender and crumbly. It’s okay if you see a few streaks of flour—they’ll incorporate as you shape the dough.
Use Fresh Baking Powder
Baking powder loses its potency over time. If yours has been sitting in the pantry for more than six months, do the freshness test: drop a teaspoon into hot water. If it fizzes vigorously, it’s good to go. If not, buy a fresh container. This makes a huge difference in how much your scones rise.
Size Matters for Even Baking
Try to make your scone wedges as uniform as possible so they bake evenly. If some pieces are thicker than others, the thinner ones might dry out while the thicker ones are still baking. Using a ruler to measure your dough circle ensures consistency.
Room Temperature vs. Fresh from the Oven
While warm scones are heavenly, they actually taste even better after cooling to room temperature for about 30 minutes. The flavors meld together, and the texture settles into that perfect crumbly consistency. If you can resist eating them all immediately, that is!
Substitution Options
Can’t find buttermilk? Make your own by adding 1 tablespoon of lemon juice or white vinegar to ½ cup of regular milk. Let it sit for 5 minutes before using. For a dairy-free version, use cold coconut oil instead of butter and plant-based milk with a splash of vinegar. You can also swap blueberries for raspberries, blackberries, or even chocolate chips if you prefer.
Storing and Reheating Tips
Room Temperature Storage
Store cooled scones in an airtight container at room temperature for up to 2 days. Place a piece of paper towel in the container to absorb any excess moisture and keep them from getting soggy. Don’t refrigerate them, as this actually dries them out faster.
Freezing for Later
These scones freeze beautifully! Once completely cooled, wrap each scone individually in plastic wrap, then place them all in a freezer-safe bag or container. They’ll keep for up to 3 months. You can also freeze the shaped, unbaked scones on a baking sheet until solid, then transfer to a freezer bag. When you’re ready to bake, add an extra 3-5 minutes to the baking time—no need to thaw.
Reheating Instructions
To bring back that fresh-baked warmth, wrap a scone in a damp paper towel and microwave for 15-20 seconds. For a crispier exterior, reheat in a 300°F oven for 5-7 minutes. The damp paper towel trick in the microwave prevents drying out while warming the center.
Glaze Considerations
If you plan to freeze your scones, wait to add the glaze until after reheating and just before serving. The glaze doesn’t freeze well and can become watery when thawed. Instead, make fresh glaze when you’re ready to enjoy them.
Common Baking Mistakes to Avoid
Mistake 1: Using Warm Ingredients
This is the number one scone saboteur. Warm butter melts into the dough before baking, eliminating those crucial butter pockets that create flaky layers. Always use cold butter straight from the refrigerator, and keep your buttermilk and egg cold too.
Mistake 2: Overworking the Dough
The more you handle scone dough, the tougher it becomes. Work quickly and gently. Think of it like handling a baby bird—firm enough to shape, but gentle enough not to damage. Those little bits of butter should still be visible in the dough.
Mistake 3: Skipping the Chill Time
I know it’s tempting to skip the freezer step and go straight to baking, but that 15-minute chill makes an enormous difference. It gives the flour time to fully hydrate, and it keeps the butter cold so your scones rise instead of spread.
Mistake 4: Cutting Scones with a Dull Knife
A dull knife squishes the edges of your scones together, sealing them and preventing proper rise. Use a sharp knife or bench scraper, and cut with confident, decisive strokes—no sawing motion.
Mistake 5: Placing Scones Too Close Together
Scones need space to expand as they bake. If they’re touching, the edges won’t crisp up properly, and they’ll steam instead of bake. Leave at least 2 inches between each scone on your baking sheet.
Mistake 6: Opening the Oven Door Too Soon
Resist the urge to peek! Opening the oven door releases heat and can cause your scones to collapse. Set a timer and trust the process. Only check them after the minimum baking time has elapsed.
Mistake 7: Overbaking
Scones continue to cook slightly after you remove them from the oven due to residual heat. Take them out when they’re just golden on top and the edges are slightly darker. They should still feel a tiny bit soft in the center—they’ll firm up as they cool.
Frequently Asked Questions
Can I use frozen blueberries instead of fresh?
Absolutely! Frozen blueberries actually work great in this recipe. The key is to add them to the dough while they’re still frozen—don’t thaw them first. This prevents the berries from releasing too much moisture and turning your dough purple. Frozen berries might add 1-2 minutes to your baking time.
Why are my scones dry and crumbly?
Dry scones usually result from overbaking or using too much flour. Make sure you’re measuring flour correctly by spooning it into the measuring cup and leveling it off—don’t pack it down. Also, check your oven temperature with an oven thermometer, as ovens often run hot. Finally, don’t bake them longer than 22 minutes.
Can I make the dough ahead of time?
Yes! You can shape the scones and freeze them unbaked for up to one month. When you’re ready to bake, place the frozen scones on a baking sheet and bake directly from frozen, adding 3-5 extra minutes to the baking time. You can also refrigerate shaped scones overnight and bake them fresh in the morning—just add 2-3 minutes to the baking time.
My scones spread instead of rising. What happened?
This usually means your butter was too warm or you skipped the chilling step. The cold butter needs to stay solid going into the oven so it creates steam pockets that make the scones rise. Also, make sure your baking powder is fresh—old baking powder won’t provide enough lift.
Can I make these scones without buttermilk?
Yes! Make a buttermilk substitute by adding 1 tablespoon of lemon juice or white vinegar to ½ cup of regular milk. Let it sit for 5 minutes until it curdles slightly, then use as directed. Greek yogurt thinned with a bit of milk also works beautifully.
How do I prevent the blueberries from sinking to the bottom?
Toss your blueberries in a tablespoon of flour before folding them into the dough. This light coating helps them stay suspended throughout the dough instead of sinking during baking. Also, fold them in gently at the very end to avoid crushing them.
Can I make mini scones instead?
Definitely! Cut your dough circle into 12-16 smaller wedges for mini scones. They’ll bake faster, so reduce your baking time to 12-15 minutes. Mini scones are perfect for parties or when you want just a small sweet treat.
What’s the difference between scones and biscuits?
While they’re similar, scones typically contain more sugar and sometimes eggs, making them slightly sweeter and richer than biscuits. Scones also often include add-ins like fruit or chocolate chips. Biscuits are usually more savory and served as a side dish, while scones are a breakfast or teatime treat.
Nutrition Information
| Nutrient | Per Scone (without glaze) |
|---|---|
| Calories | 285 |
| Total Fat | 12g |
| Saturated Fat | 7g |
| Cholesterol | 50mg |
| Sodium | 280mg |
| Total Carbohydrates | 39g |
| Dietary Fiber | 2g |
| Sugars | 14g |
| Protein | 5g |
| Vitamin C | 8% DV |
| Calcium | 10% DV |
| Iron | 8% DV |
Note: Nutrition information is approximate and may vary based on specific ingredients used. Adding the lemon glaze will increase calories by approximately 60 per scone.
Final Thoughts
These lemon blueberry scones have become a regular in my weekend breakfast rotation, and I have a feeling they’ll become one of your favorites too. There’s something deeply satisfying about making pastries from scratch, and when they turn out this delicious, it feels like a real accomplishment.
The beauty of this recipe is its reliability—follow the steps, keep things cold, and you’ll have perfect scones every single time. They’re fancy enough for brunch with friends but simple enough for a regular Tuesday morning when you need something special.
I love how these scones make my whole house smell like a European bakery, and how they bring everyone to the kitchen with eager faces and empty plates. They’re best enjoyed warm with a cup of tea, good company, and maybe a few minutes to yourself before the day gets busy.
So grab your apron, gather your ingredients, and get ready to bake something wonderful. Your future self will thank you when you’re biting into a warm, buttery, lemon-kissed scone with your morning coffee. Happy baking!