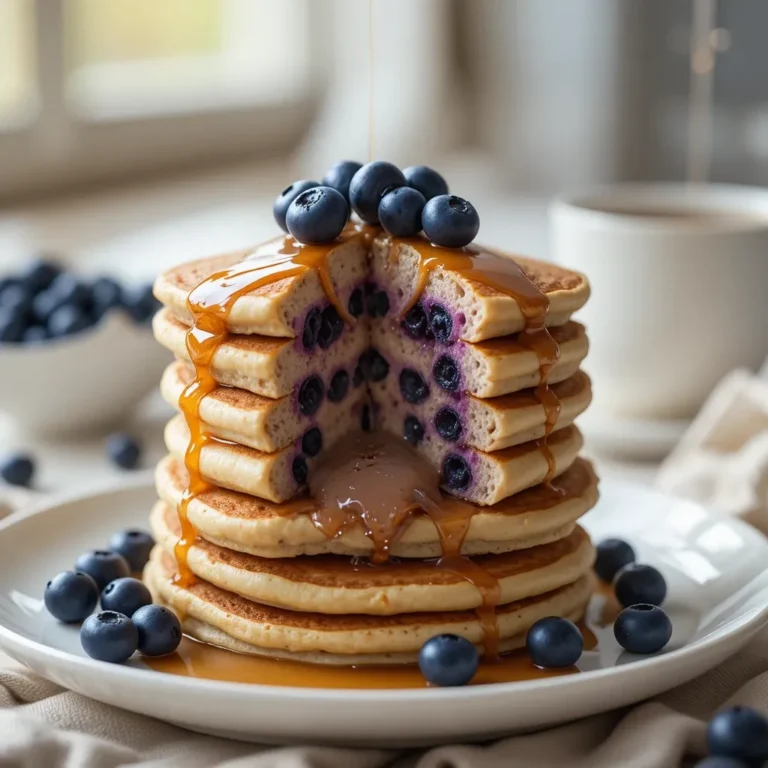
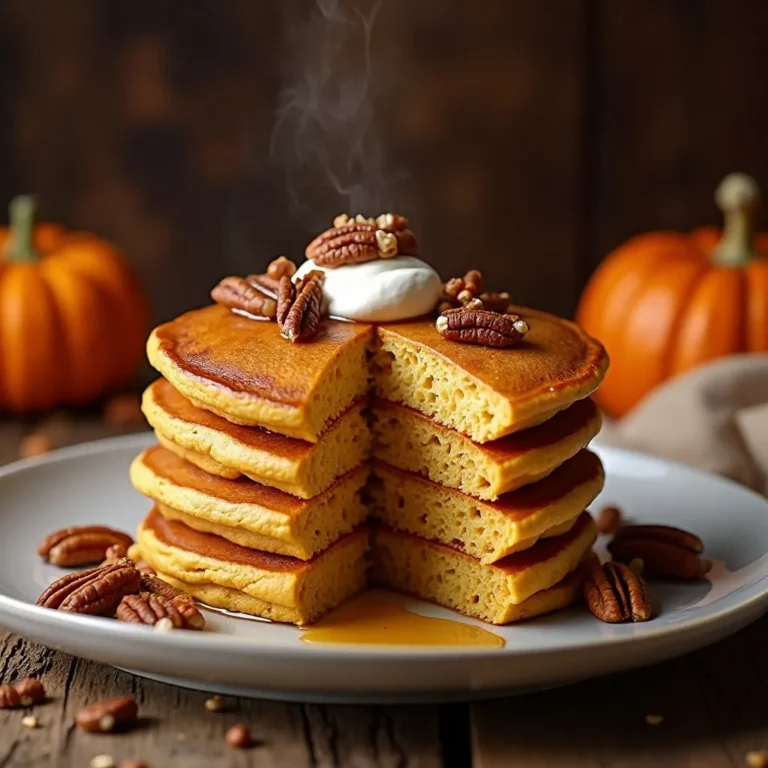
Fluffy Protein Pancakes Oatmeal – Easy 15-Minute Breakfast
Imagine fluffy, golden pancakes that fuel your body while satisfying your sweet tooth—that’s exactly what protein pancakes oatmeal delivers! These aren’t your average breakfast cakes. They’re packed with wholesome oats and protein that keep you energized for hours.
I stumbled upon this recipe during my morning workout routine, desperately needing something filling yet healthy. Since then, it’s become my go-to breakfast. It takes just 15 minutes from bowl to plate, making it perfect for busy mornings when you need something quick and family-friendly.
This recipe is AI-created and has not been personally tested by us. We care about our readers’ experience, and members of our site family say some recipes they’ve tried turned out well.
What is Protein Pancakes Oatmeal?
Ever wondered why we combine protein and oatmeal in pancakes? Well, it’s simple—we’re giving traditional pancakes a nutritious upgrade! These aren’t just regular flapjacks with fancy ingredients thrown in. They’re specially crafted to balance taste with nutrition, creating the ultimate breakfast powerhouse.
You know that classic saying, “the way to a man’s heart is through his stomach”? These protein-packed beauties prove it’s true! Go ahead, whip up a batch this weekend and watch them disappear.
Why You’ll Love This Protein Pancakes Oatmeal
Incredible Texture and Flavor
The combination of ground oats and protein powder creates the most amazing fluffy texture you’ve ever experienced in pancakes. Each bite melts in your mouth while delivering that satisfying, hearty feeling that regular pancakes just can’t match. The natural sweetness from bananas or honey eliminates the need for excessive sugar, making every mouthful guilt-free and delicious.
Budget-Friendly Home Cooking
Making protein pancakes oatmeal at home saves you serious money compared to ordering protein-packed breakfasts at trendy cafes. A single serving at a restaurant can cost $12-15, but you can make an entire batch at home for just a few dollars. Plus, you control exactly what goes in, ensuring quality ingredients every time.
Customizable Toppings Paradise
The real magic happens with toppings! Fresh berries, sliced bananas, a drizzle of natural nut butter, Greek yogurt, or a sprinkle of dark chocolate chips transform these pancakes into a personalized breakfast masterpiece. Similar to my popular overnight oats recipe, this dish offers endless customization options that never get boring.
Don’t wait another day—grab your mixing bowl and let’s create breakfast magic together!
How to Make Protein Pancakes Oatmeal
Quick Overview
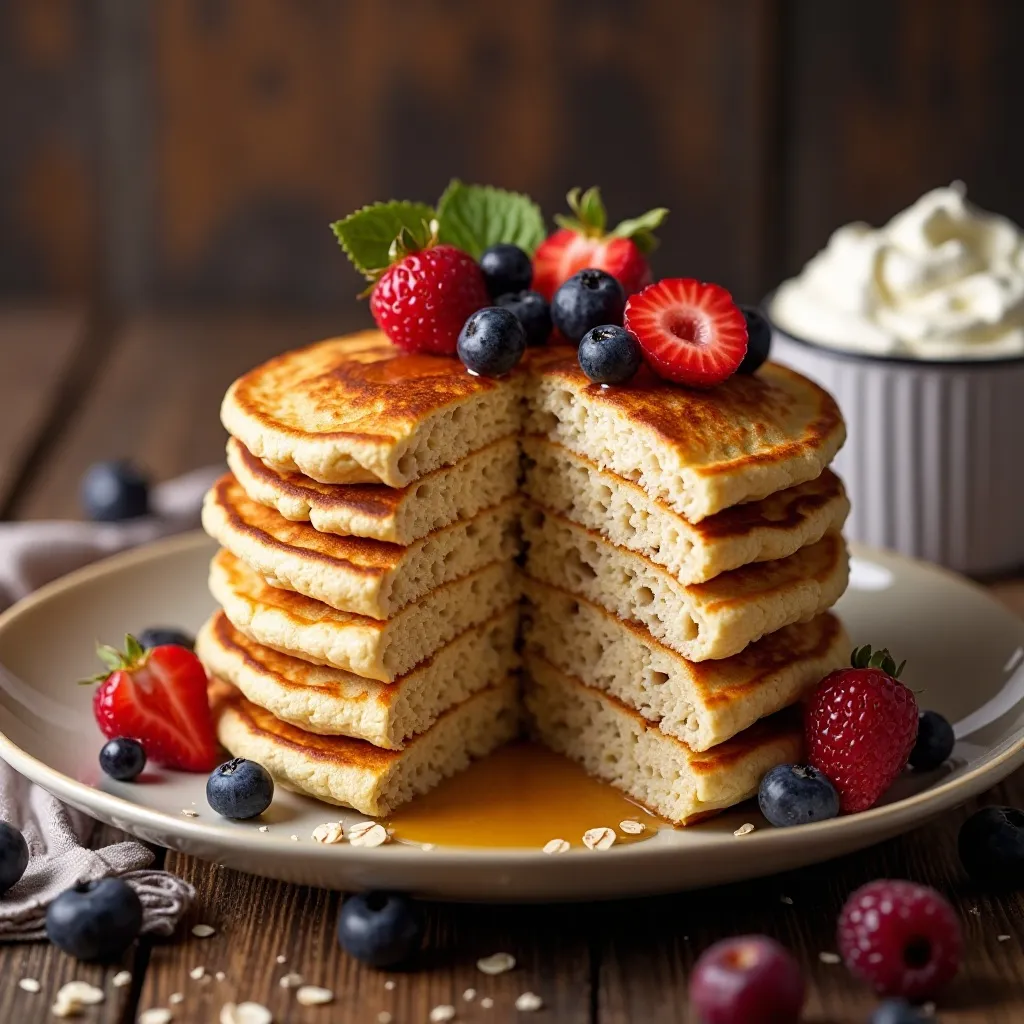
This recipe delivers perfectly fluffy, protein-rich pancakes with a delightful oat texture that satisfies hunger and tastes incredible. The natural ingredients work together beautifully, creating pancakes that are neither too dense nor too thin. What I love most is how the oats add a subtle nuttiness while the protein powder keeps you full until lunch.
Total Time:
- Prep Time: 5 minutes
- Cook Time: 10 minutes
- Total: 15 minutes
- Servings: 8-10 pancakes
Key Ingredients for Protein Pancakes Oatmeal
Dry Ingredients:
- 1 cup rolled oats (old-fashioned oats work best)
- 1 scoop (30g) vanilla protein powder (whey or plant-based)
- 1 teaspoon baking powder
- ½ teaspoon cinnamon
- Pinch of salt
Wet Ingredients:
- 2 large eggs
- ¾ cup milk (dairy or non-dairy alternatives work great)
- 1 ripe banana, mashed
- 1 tablespoon honey or maple syrup
- 1 teaspoon vanilla extract
For Cooking:
- Coconut oil or butter for the pan

Step-by-Step Instructions
Step 1: Prepare the Oat Flour
Start by adding your rolled oats to a blender or food processor. Pulse for about 30 seconds until they transform into a fine flour-like consistency. You want it to resemble whole wheat flour, not too coarse but not completely powdered either. This creates the perfect pancake base that holds together beautifully while maintaining that signature oat texture.
Step 2: Mix the Dry Ingredients
In a large mixing bowl, combine your freshly ground oat flour with the protein powder, baking powder, cinnamon, and salt. Whisk these together thoroughly for about 20 seconds. This step is crucial because it distributes the baking powder evenly, ensuring your pancakes rise uniformly and develop that fluffy texture we’re aiming for.
Step 3: Combine the Wet Ingredients
Grab a separate medium bowl and crack in your eggs. Add the milk, mashed banana, honey, and vanilla extract. Whisk vigorously for about a minute until everything is smoothly combined and slightly frothy. The banana should be completely incorporated with no large chunks remaining—this ensures even sweetness throughout every pancake.
Step 4: Create the Batter
Pour your wet ingredients into the bowl with the dry mixture. Using a spatula or wooden spoon, gently fold everything together with about 10-15 strokes. Stop when you still see a few small lumps—this is actually what you want! Overmixing creates tough, rubbery pancakes, so resist the urge to make it perfectly smooth. Let the batter rest for 2-3 minutes while your pan heats up. This allows the oats to absorb moisture and creates fluffier pancakes.
Step 5: Heat Your Cooking Surface
Place a non-stick skillet or griddle over medium heat. Add about half a teaspoon of coconut oil or butter, letting it melt and coat the surface evenly. You’ll know it’s ready when a tiny drop of water sizzles immediately upon contact. The right temperature is essential—too hot and your pancakes burn on the outside while staying raw inside; too cool and they’ll be pale and dense.
Step 6: Cook the Pancakes
Using a ¼ cup measuring cup, pour the batter onto your heated pan. Don’t spread it out—let it naturally form a circle. You should be able to fit 2-3 pancakes depending on your pan size. Watch carefully for those telltale bubbles to form on the surface, which takes about 2-3 minutes. When the edges look set and bubbles have popped leaving small holes, it’s flip time.
Step 7: The Perfect Flip
Slide your spatula completely under the pancake in one confident motion and flip quickly. The second side cooks faster—usually just 1-2 minutes. You’re looking for a beautiful golden-brown color. Press gently with your spatula; if it springs back, it’s done. If it feels mushy, give it another 30 seconds.
Step 8: Keep Warm and Serve
Transfer your finished pancakes to a plate and cover loosely with aluminum foil to keep them warm while you cook the remaining batter. This prevents them from drying out. Stack them high, add your favorite toppings, and serve immediately for the best texture and flavor.
What to Serve Protein Pancakes Oatmeal With
These protein-packed pancakes pair wonderfully with various accompaniments that complement their hearty texture.
Fresh Fruit Options: Fresh berries like blueberries, strawberries, or raspberries add a burst of freshness and natural sweetness. Sliced bananas bring creaminess, while diced apples with a sprinkle of cinnamon create a comforting, pie-like experience.
Protein-Rich Additions: A dollop of Greek yogurt on the side adds extra protein and creates a lovely creamy contrast. Natural almond butter or peanut butter drizzled on top provides healthy fats that keep you satisfied longer.
Beverage Pairings: Pair your pancakes with a protein smoothie for the ultimate muscle-building breakfast. Hot herbal tea or a fresh-pressed orange juice balances the heartiness perfectly. A warm cup of coffee with a splash of milk complements the subtle sweetness beautifully.
Side Dishes: Scrambled eggs on the side transform this into a complete, balanced meal. Turkey sausage or vegetarian sausage links add savory elements that contrast nicely with the sweet pancakes.
Top Tips for Perfecting Protein Pancakes Oatmeal
Choose the Right Protein Powder
Not all protein powders behave the same in pancakes. Whey protein creates the fluffiest texture, while plant-based proteins like pea or brown rice protein work wonderfully but may require slightly more liquid. Avoid protein powders with artificial sweeteners that can leave a strange aftertaste. Vanilla or unflavored varieties work best, letting you control the sweetness level.
Don’t Skip the Banana
The mashed banana isn’t just for flavor—it acts as a natural binder and adds moisture. If you’re avoiding bananas, substitute with unsweetened applesauce or pumpkin puree in the same amount. Both create excellent texture while adding their own subtle flavors.
Master Your Heat
Medium heat is your best friend here. High heat creates pancakes that are burnt outside and raw inside. If your first pancake comes out too dark, lower the heat slightly and let the pan adjust for 30 seconds before continuing. If it’s too pale and taking forever, increase the heat just a touch.
The Resting Period Matters
Letting your batter rest for 2-3 minutes before cooking allows the oat flour to fully hydrate. This creates a better texture and helps prevent spreading too thin in the pan. Use this time to prepare your toppings or clean up your mixing bowls.
Flip Only Once
Resist the temptation to flip multiple times! Each flip releases steam and makes your pancakes denser. Wait for those surface bubbles, flip once confidently, and leave it alone until the second side is done.
Ingredient Substitutions
For dairy-free versions, use almond milk, oat milk, or coconut milk—all work perfectly. Swap regular eggs with flax eggs (1 tablespoon ground flaxseed mixed with 3 tablespoons water per egg) if you’re vegan. The texture will be slightly different but still delicious.
Storing and Reheating Tips
Refrigerator Storage: Let your cooked pancakes cool completely on a wire rack before storing. Layer them between sheets of parchment paper in an airtight container to prevent sticking. They’ll stay fresh in the refrigerator for up to 5 days. This makes meal prep easy—cook a big batch on Sunday and enjoy quick breakfasts all week!
Freezer Storage: These pancakes freeze beautifully! Place cooled pancakes in a single layer on a baking sheet and freeze for 1-2 hours until solid. Then transfer them to a freezer-safe bag or container with parchment paper between each pancake. They’ll maintain quality for up to 3 months in the freezer.
Reheating Methods: For refrigerated pancakes, the microwave works great—30-45 seconds on high for 2-3 pancakes. For frozen pancakes, microwave for 60-90 seconds, flipping halfway through. The toaster is my favorite method! Pop them in like regular toast for 2-3 minutes until heated through and slightly crispy on the edges. For larger quantities, reheat in a 350°F oven for 8-10 minutes, covering loosely with foil.
Pro Tip: Slightly undercook pancakes if you know you’ll be reheating them later. This prevents them from becoming dry or tough when warmed up again.
Common Baking Mistakes to Avoid
Mistake 1: Using Quick Oats Instead of Rolled Oats
Quick oats are too fine and create gummy, dense pancakes. Always stick with old-fashioned rolled oats for the best texture. Steel-cut oats won’t work either—they’re too hard to blend properly.
Mistake 2: Overmixing the Batter
Those lumps you see? They’re your friends! Overmixing develops the gluten in oats and creates tough, chewy pancakes instead of fluffy ones. Mix just until combined—15-20 gentle folds maximum.
Mistake 3: Not Grinding Oats Fine Enough
If your oat flour has too many large pieces, your pancakes will fall apart. Blend until you achieve a flour-like consistency with no visible oat flakes remaining.
Mistake 4: Cooking at the Wrong Temperature
Too high and you get burnt outsides with raw centers. Too low and pancakes become pale and dense. Medium heat is the sweet spot—be patient and let the pan preheat properly.
Mistake 5: Using Too Much Protein Powder
More protein doesn’t equal better pancakes. Too much makes them dry and chalky. Stick to the recipe ratio—one scoop for one cup of oats works perfectly.
Mistake 6: Skipping the Resting Time
Impatience ruins pancakes! Those 2-3 minutes of rest allow proper hydration and better texture. Use the time wisely—prep toppings or pour yourself some coffee.
Mistake 7: Flipping Too Early
If you flip before bubbles form and edges set, your pancakes will be misshapen and potentially break apart. Wait for those visual cues—they’re your roadmap to success.
Mistake 8: Not Adjusting for Protein Powder Type
Different protein powders absorb liquid differently. If your batter seems too thick, add milk one tablespoon at a time until it reaches a pourable consistency. Too thin? Let it rest longer or add a bit more oat flour.
Frequently Asked Questions
Can I make protein pancakes oatmeal without protein powder?
Absolutely! Simply replace the protein powder with an equal amount of oat flour. You can also add 2 tablespoons of ground flaxseed or chia seeds for extra nutrition. The texture will be slightly different but still delicious and filling.
How do I make these pancakes vegan?
Replace eggs with flax eggs (2 tablespoons ground flaxseed mixed with 6 tablespoons water, let sit for 5 minutes). Use plant-based milk and protein powder. Substitute honey with maple syrup. The result is just as tasty and completely plant-based!
Why are my protein pancakes rubbery?
This usually happens from overmixing the batter or using too much protein powder. Mix just until combined, leaving some lumps. Also, make sure you’re using the correct protein powder ratio—more isn’t better here.
Can I prep the batter the night before?
It’s better to mix dry and wet ingredients separately and combine them in the morning. Overnight batters become too thick as the oats absorb moisture. However, you can grind your oats and mix dry ingredients ahead to save morning time.
What’s the best protein powder for pancakes?
Vanilla whey protein creates the fluffiest texture and best flavor. For plant-based options, pea protein or a blend works wonderfully. Avoid protein powders with lots of added fiber or artificial sweeteners, as they can affect texture and taste.
How can I make my pancakes fluffier?
Use fresh baking powder, don’t overmix, let the batter rest, and cook at proper medium heat. Separating eggs and folding in beaten egg whites creates extra fluffy pancakes if you want to go the extra mile.
Are protein pancakes oatmeal good for weight loss?
Yes! They’re high in protein and fiber, which keeps you full longer and reduces overall calorie intake throughout the day. The slow-digesting oats provide sustained energy without blood sugar spikes.
Can I use instant oats?
You can, but rolled oats produce better texture. Instant oats are more processed and can create a slightly gummy consistency. If that’s all you have, they’ll work in a pinch—just use them as-is without blending.
How do I prevent pancakes from sticking?
Use a non-stick pan or well-seasoned griddle. Add a small amount of oil or butter before each batch. Make sure your pan is properly preheated—test with a drop of water that should sizzle immediately.
Can I add chocolate chips or blueberries?
Definitely! Fold them into the batter gently after mixing, or sprinkle them directly onto pancakes right after pouring batter into the pan. About ¼ cup of mix-ins per batch works perfectly.
Nutrition Information
| Nutrient | Per Serving (2 pancakes) |
|---|---|
| Calories | 245 |
| Protein | 18g |
| Carbohydrates | 32g |
| Fiber | 4g |
| Sugar | 8g |
| Fat | 6g |
| Saturated Fat | 2g |
| Sodium | 195mg |
| Potassium | 285mg |
| Calcium | 125mg |
| Iron | 2mg |
Note: Nutritional values are approximate and vary based on specific ingredients and brands used.
Final Thoughts
Protein pancakes oatmeal have completely transformed my morning routine, and I know they’ll do the same for you. There’s something incredibly satisfying about starting your day with a breakfast that tastes indulgent but fuels your body properly. The beauty of this recipe lies in its simplicity and versatility—once you master the basic technique, you can customize it endlessly to match your preferences.
Whether you’re an athlete looking for post-workout fuel, a busy parent needing quick family breakfasts, or simply someone who wants to eat healthier without sacrificing flavor, these pancakes check every box. They’ve become such a staple in my kitchen that I often double the batch just to stock my freezer.
Don’t be intimidated if your first attempt isn’t perfect. Like any skill, pancake-making improves with practice. Pay attention to your heat, trust the process, and soon you’ll be flipping these beauties like a pro. Your mornings are about to get a whole lot more delicious and nutritious!