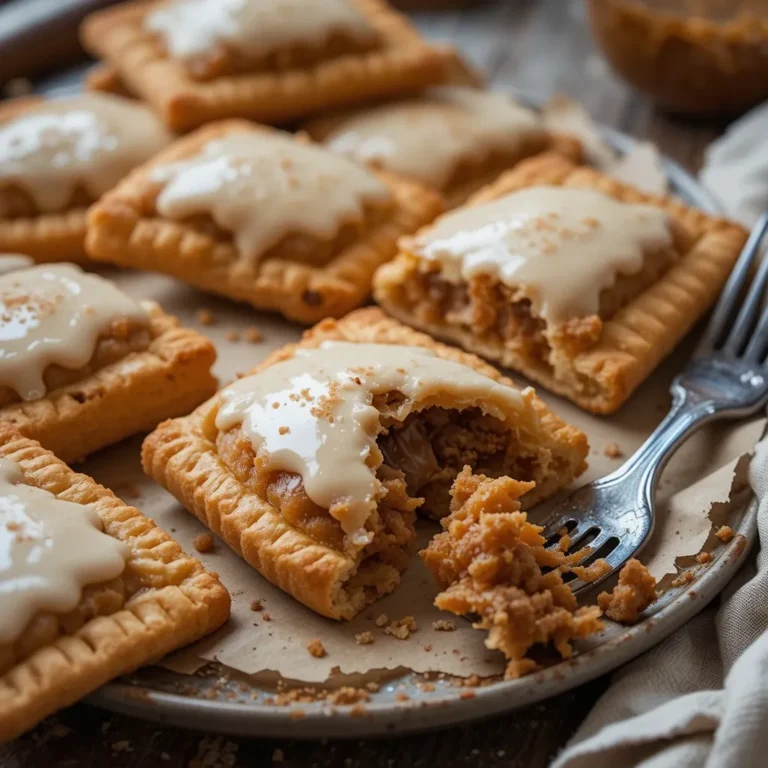
Sourdough Discard Pop Tarts The Ultimate Breakfast Treat
Picture this: flaky, buttery pastry wrapped around sweet, fruity filling—all made from that sourdough starter you’d otherwise toss out. These sourdough discard pop tarts are genuinely life-changing. They’re crispy on the outside, tender on the inside, and taste a million times better than store-bought versions.
Fun fact: homemade pop tarts date back to the 1960s when families started recreating the commercial version at home. Now you can join that tradition while reducing food waste! If you loved my sourdough discard crackers, you’ll absolutely adore these handheld breakfast pastries that come together surprisingly quickly.
This recipe is fully AI-written and was not cooked in our kitchen. We aim to be transparent and caring, and readers who’ve tried other recipes from our site have shared kind feedback.
What Are Sourdough Discard Pop Tarts?
Ever wondered what magic happens when your unfed sourdough starter meets classic pastry dough? That’s exactly what sourdough discard pop tarts are! Instead of throwing away that tangy starter, you’re transforming it into buttery, flaky rectangles of pure joy.
It’s like giving your discard a delicious second chance at life. You know the saying—”waste not, want not”? Well, these pop tarts prove that phrase brilliantly. The slight tang from the sourdough adds incredible depth that store-bought versions simply can’t match. Trust me, once you make these, you’ll never look at your discard jar the same way again!
Why You’ll Love This Sourdough Discard Pop Tarts Recipe
Zero Waste, Maximum Flavor
The best part about these sourdough discard pop tarts? You’re turning something you’d normally throw away into a spectacular breakfast treat. That unfed starter sitting in your fridge gets new purpose, adding a subtle tanginess that makes these pastries absolutely irresistible. The buttery, flaky layers practically melt in your mouth.
Budget-Friendly Homemade Goodness
Making pop tarts at home saves you serious money compared to buying boxes at the store. Plus, you control exactly what goes inside—no mysterious ingredients or preservatives here! Fill them with fresh berry jam, chocolate hazelnut spread, cinnamon sugar, or even savory options like cheese and herbs. The possibilities are endless, and your wallet will thank you.
Customizable and Fun
Unlike my sourdough discard pancakes, which are more forgiving, these pop tarts let you get creative with shapes, fillings, and toppings. Kids love helping crimp the edges and choosing their favorite flavors. Whether you prefer classic strawberry, decadent chocolate, or adventurous lemon curd, you’re in complete control. Make a batch on Sunday, and you’ve got grab-and-go breakfasts for the entire week!
How to Make Sourdough Discard Pop Tarts
Quick Overview
These sourdough discard pop tarts are surprisingly straightforward to make. The dough comes together in minutes, especially if you have a food processor. While there’s some chilling time involved (patience is key for flaky pastry!), the active work takes about 30 minutes. You’ll end up with golden, crispy pastries that rival any bakery creation.
Preparation Time:
- Prep Time: 20 minutes
- Chill Time: 1 hour (can be done overnight)
- Baking Time: 25 minutes
- Total Time: 1 hour 45 minutes
- Yield: 8 pop tarts
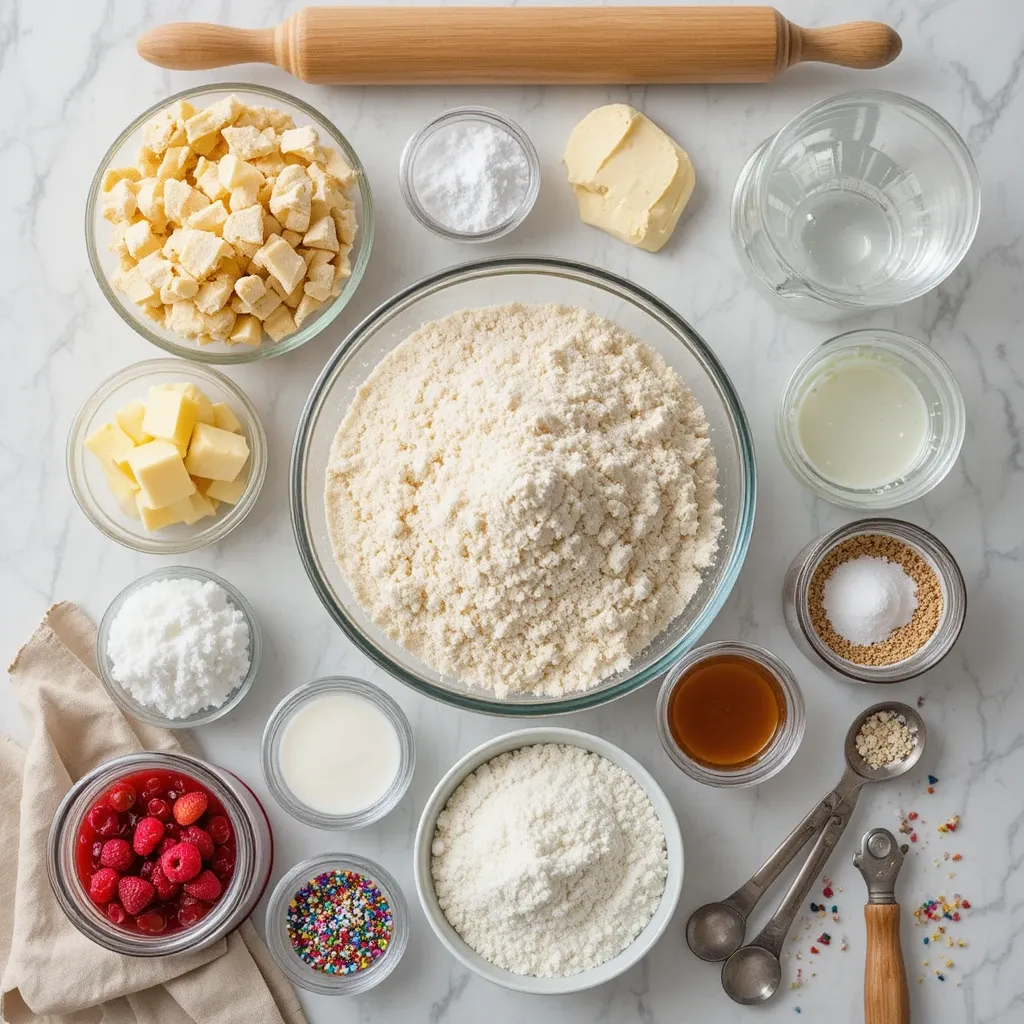
Key Ingredients for Sourdough Discard Pop Tarts
For the Pastry Dough:
- 1 cup (240g) sourdough discard, unfed and straight from the fridge
- 2 cups (250g) all-purpose flour, plus extra for dusting
- 1 tablespoon granulated sugar
- ½ teaspoon salt
- ¾ cup (170g) cold unsalted butter, cut into small cubes
- 2-4 tablespoons ice-cold water
- 1 egg, beaten (for egg wash)
For the Filling:
- ¾ cup (240g) jam or preserves of your choice (strawberry, raspberry, or blueberry work beautifully)
- OR ½ cup chocolate hazelnut spread
- OR ½ cup apple butter with cinnamon
For the Glaze (Optional):
- 1 cup (120g) powdered sugar
- 2-3 tablespoons milk or cream
- ½ teaspoon vanilla extract
- Sprinkles for decoration
Step-by-Step Instructions
Make the Pastry Dough
Start by combining the flour, sugar, and salt in a large mixing bowl. Whisk these dry ingredients together so everything distributes evenly. Add your cold butter cubes to the bowl. Using a pastry cutter or your fingertips, work the butter into the flour until the mixture resembles coarse breadcrumbs with pea-sized butter pieces throughout. This creates those flaky layers everyone loves.
Add your sourdough discard to the bowl and mix gently with a fork. The mixture will look shaggy and dry—that’s exactly what you want. Drizzle in the ice water, one tablespoon at a time, stirring after each addition. Stop adding water once the dough just barely comes together. You don’t want it wet or sticky.
Turn the dough out onto a clean work surface and knead it gently just 3-4 times until it forms a cohesive ball. Divide the dough in half, shape each half into a flat rectangle, and wrap both pieces tightly in plastic wrap. Refrigerate for at least 1 hour or up to 2 days. This chilling time is crucial—it allows the gluten to relax and the butter to firm up for maximum flakiness.
Roll Out the Dough
When you’re ready to assemble, preheat your oven to 375°F (190°C) and line two baking sheets with parchment paper. Remove one dough rectangle from the fridge and let it sit for about 5 minutes to soften slightly. On a lightly floured surface, roll the dough into a large rectangle about ⅛-inch thick. Don’t worry about perfect edges—you’ll trim them later.
Using a sharp knife or pizza cutter, cut the dough into 8 equal rectangles, roughly 3×4 inches each. If your rectangles aren’t perfect, that’s totally fine! Homemade charm is part of the appeal. Transfer these rectangles to one of your prepared baking sheets. Repeat the entire process with the second dough portion.
Fill and Seal the Pop Tarts
Place about 1½ tablespoons of your chosen filling in the center of half of your dough rectangles. Don’t overfill—I learned this the hard way when jam oozed everywhere during baking! Leave a ½-inch border around all edges. This border is essential for proper sealing.
Brush the edges of each filled rectangle with beaten egg. This acts like glue to seal your pop tarts. Carefully place an unfilled dough rectangle on top of each filled one, matching up the edges as closely as possible. Press the edges together firmly with your fingers, then crimp them with a fork to create that classic pop tart seal. The fork creates an attractive pattern while ensuring nothing leaks out.
Use a toothpick or fork to poke 3-4 small holes in the top of each pop tart. These steam vents prevent the pastries from puffing up too much or bursting in the oven. Brush the tops with more egg wash for a beautiful golden finish.
Bake to Golden Perfection
Place your baking sheets in the preheated oven and bake for 22-25 minutes. You’re looking for a gorgeous golden-brown color on top with slightly darker edges. The pop tarts should feel firm to the touch and sound hollow when tapped gently. If you notice any filling starting to leak, don’t panic—it happens! Just let them finish baking.
Remove from the oven and let the pop tarts cool on the baking sheets for 5 minutes. Then transfer them to a wire rack to cool completely before glazing. This cooling step is important because hot pastries will make your glaze melt right off.
Add the Glaze
While the pop tarts cool, whisk together powdered sugar, milk, and vanilla extract in a small bowl until smooth. The consistency should be thick but pourable—like thick cream. If it’s too thick, add more milk a teaspoon at a time. Too thin? Add more powdered sugar.
Once your pop tarts are completely cool, drizzle or spread the glaze over the top of each one. Add sprinkles immediately while the glaze is still wet so they stick. Let the glaze set for about 15 minutes before serving or storing.
What to Serve Sourdough Discard Pop Tarts With
These sourdough discard pop tarts are fantastic on their own, but they’re even better paired with the right accompaniments. Serve them warm with a hot cup of coffee or tea for a cozy breakfast. A glass of cold milk is perfect for kids (or adults who love dunking!).
For a more substantial brunch spread, pair them with scrambled eggs, fresh fruit salad, or crispy bacon. The sweet-savory combination is absolutely divine.
If you’re hosting a brunch gathering, set up a “pop tart bar” with different fillings and toppings so guests can customize their own. Include options like berry preserves, chocolate spread, cinnamon sugar, and various glaze colors.
These also make wonderful afternoon snacks with yogurt or a fruit smoothie. The subtle tang from the sourdough pairs surprisingly well with creamy, tangy yogurt.

Top Tips for Perfecting Sourdough Discard Pop Tarts
Keep Everything Cold
Cold butter is the secret to flaky pastry. If your kitchen is warm, pop the flour mixture in the fridge for 10 minutes before adding the butter. Work quickly when handling the dough to prevent the butter from melting. Warm butter creates tough, dense pastry instead of light, flaky layers.
Don’t Skip the Chilling Time
I know waiting is hard, but chilling the dough is absolutely essential. It prevents shrinkage during baking and allows the gluten to relax, making the dough easier to roll out. If you’re short on time, freeze the dough for 30 minutes instead of refrigerating for an hour.
Measure Your Filling Carefully
More filling doesn’t equal better pop tarts! Too much filling causes leaks and messy explosions in the oven. Stick to about 1½ tablespoons per pop tart. For thicker fillings like chocolate hazelnut spread, use slightly less—about 1 tablespoon.
Seal Those Edges Properly
The egg wash isn’t optional—it’s crucial for creating a tight seal. Press the edges together firmly with your fingers first, then use a fork to crimp. Make sure you’re pressing all the way through both layers of dough. A poor seal means filling leaking out everywhere.
Experiment With Flavors
Don’t limit yourself to sweet fillings! Try savory versions with cream cheese and herbs, pizza sauce and cheese, or even pesto. For sweet versions, brown sugar and cinnamon, lemon curd, or apple pie filling all work beautifully. Just make sure your filling isn’t too runny.
Customize Your Discard Amount
If your sourdough discard is particularly thick or thin, you might need to adjust the water in the recipe. Thick discard may need an extra tablespoon of water, while thin discard might need less. The dough should come together without being sticky.
Tips for Avoiding Common Baking Mistakes
Mistake #1: Rolling the Dough Too Thin If your dough is thinner than ⅛-inch, it might tear when you fill it or become too crispy after baking. Aim for a consistent ⅛-inch thickness throughout. Use rolling pin rings or guides if you struggle with even thickness.
Mistake #2: Overfilling This is the most common error! When filling oozes out during baking, it burns and creates a mess. It also causes the pop tarts to open up. Always leave that ½-inch border completely clear, and measure your filling carefully.
Mistake #3: Not Sealing Properly If you don’t press the edges firmly enough, they’ll pop open during baking. After pressing with your fingers, always crimp with a fork for extra security. Some bakers even do a double crimp around the entire edge.
Mistake #4: Forgetting Steam Vents Those little holes on top aren’t just decorative—they’re functional. Without them, steam builds up inside and can cause the pop tarts to burst open or become soggy. Always poke at least 3-4 holes in the top.
Mistake #5: Baking at the Wrong Temperature Too high and the outside burns before the inside cooks. Too low and you’ll get pale, sad-looking pop tarts. Stick to 375°F and watch them carefully during the last few minutes of baking.
Mistake #6: Glazing Too Soon If you glaze warm pop tarts, the glaze will melt into a thin, drippy mess instead of setting nicely on top. Be patient and let them cool completely—it makes all the difference in presentation.
Storing and Reheating Tips
Room Temperature Storage: Once completely cooled and glazed, store your sourdough discard pop tarts in an airtight container at room temperature for up to 3 days. Place parchment paper between layers to prevent them from sticking together. They’ll stay crispy and delicious for quick grab-and-go breakfasts.
Refrigerator Storage: For longer storage, keep them in an airtight container in the refrigerator for up to 1 week. The cool temperature helps preserve the filling, especially if you used fresh fruit or dairy-based fillings. Let them come to room temperature before eating, or warm them slightly.
Freezer Storage: These pop tarts freeze beautifully! Place cooled, unglazed pop tarts on a baking sheet and freeze until solid (about 2 hours). Then transfer them to a freezer-safe bag or container, separating layers with parchment paper. They’ll keep for up to 3 months. Add the glaze after reheating for best results.
Reheating Instructions: For that just-baked taste, reheat pop tarts in a 350°F oven for 5-8 minutes until warmed through and the pastry crisps up again. You can also use a toaster oven on medium heat for 3-4 minutes. Avoid the microwave if possible—it makes the pastry soggy instead of crispy. If you must use the microwave, heat for just 15-20 seconds and expect a softer texture.
Freezing Unbaked Pop Tarts: You can also freeze assembled but unbaked pop tarts. Freeze them on a baking sheet until solid, then transfer to a freezer bag. Bake from frozen, adding 5-7 minutes to the baking time. This is perfect for fresh pop tarts whenever you want them!
Frequently Asked Questions
Can I use active sourdough starter instead of discard?
Yes, you absolutely can! Active starter works just as well as discard in this recipe. The main difference is that discard is more cost-effective since you’re using something you’d otherwise throw away. Active starter might give a slightly tangier flavor, but both work beautifully.
Why is my pastry tough instead of flaky?
Tough pastry usually happens when the dough has been overworked or the butter wasn’t cold enough. Handle the dough as little as possible and make sure your butter stays cold throughout the process. Also, avoid adding too much water—this can develop the gluten too much, creating toughness.
Can I make these pop tarts gluten-free?
While I haven’t tested this recipe with gluten-free flour, you should be able to substitute with a 1:1 gluten-free baking blend. The texture might be slightly different, and you may need to adjust the liquid. Make sure you’re using gluten-free sourdough discard as well.
How do I prevent filling from leaking out?
The key is not overfilling and sealing properly. Use only 1½ tablespoons of filling, leave a clear ½-inch border, brush with egg wash, and crimp firmly with a fork. Also, make sure your filling isn’t too runny—thicker jams work better than thin ones.
Can I make the dough ahead of time?
Absolutely! The dough actually benefits from resting in the refrigerator. You can make it up to 2 days in advance. You can also freeze the dough for up to 3 months. Just thaw it overnight in the refrigerator before rolling out.
What’s the best filling for beginners?
I recommend starting with a thick jam or preserve—strawberry, raspberry, or apricot all work wonderfully. They’re easy to work with, don’t leak as much as thinner fillings, and taste absolutely delicious. Avoid fresh fruit as it releases too much liquid during baking.
Do I have to add the glaze?
Not at all! The glaze is optional and purely for aesthetics and extra sweetness. The pop tarts are delicious without it, especially if you’re watching sugar intake. You can also dust them with powdered sugar or leave them plain.
Can I make savory pop tarts?
Yes! These make fantastic savory breakfast or snack pastries. Try fillings like cream cheese with herbs, pizza sauce with cheese, scrambled eggs with cheese, or spinach and feta. Skip the glaze and brush with egg wash and sea salt before baking instead.
Nutrition Information
| Nutrient | Per Pop Tart (with glaze) |
|---|---|
| Calories | 285 |
| Total Fat | 12g |
| Saturated Fat | 7g |
| Cholesterol | 45mg |
| Sodium | 180mg |
| Total Carbohydrates | 41g |
| Dietary Fiber | 1g |
| Sugars | 18g |
| Protein | 4g |
Note: Nutrition information is approximate and varies based on specific ingredients and filling choices used.
Final Thoughts
These sourdough discard pop tarts have become a staple in my kitchen, and I’m confident they’ll become one in yours too. There’s something deeply satisfying about transforming leftover starter into something this delicious and beautiful.
The beauty of this recipe lies in its flexibility. Once you master the basic technique, you can customize endlessly with different fillings, glazes, and even shapes. I’ve made heart-shaped ones for Valentine’s Day and star-shaped ones for summer celebrations.
Don’t be intimidated by the multiple steps—this recipe is much more forgiving than it appears. Even if your first batch isn’t picture-perfect, they’ll still taste absolutely incredible. Practice makes perfect, and honestly, there’s no such thing as an ugly homemade pop tart!
So next time you’re about to discard that sourdough starter, stop right there. Turn it into these phenomenal pastries instead. Your breakfast routine (and your family) will thank you. Happy baking!