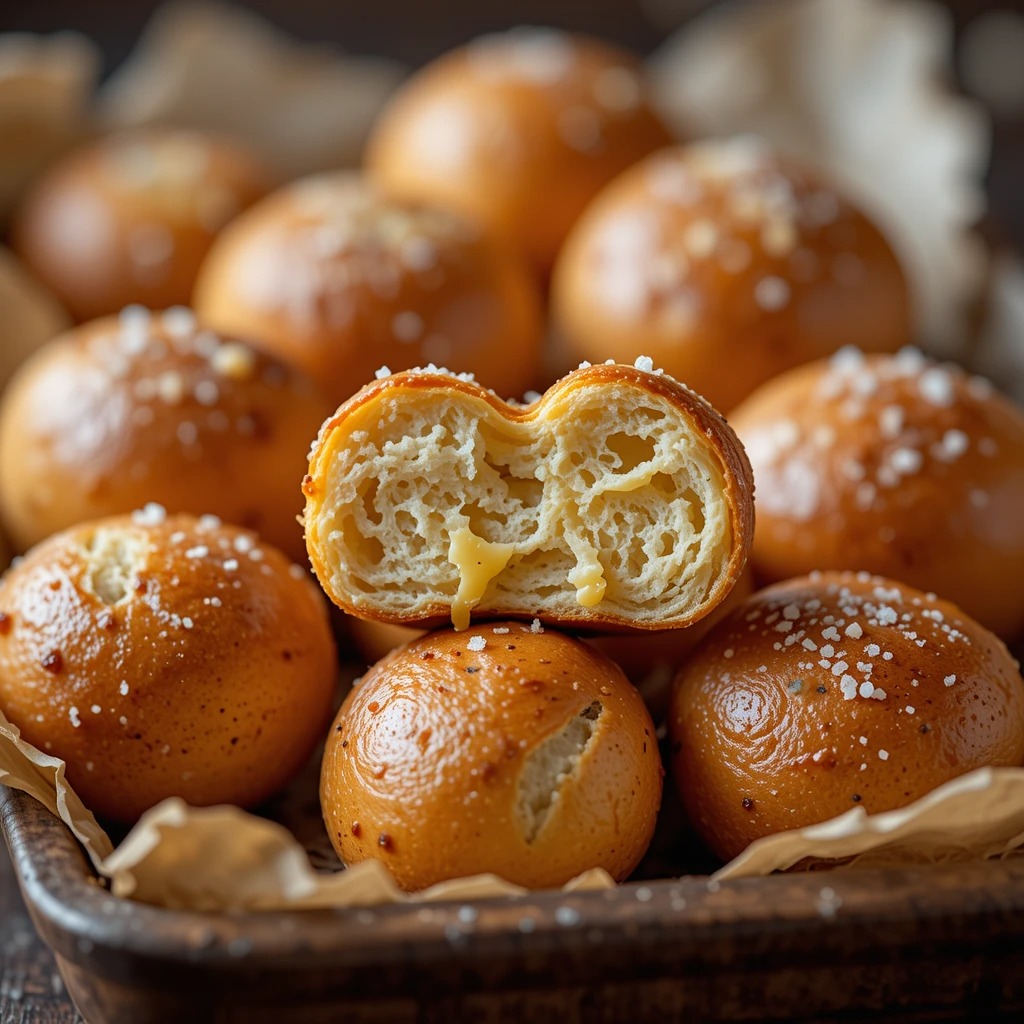
The Best Sourdough Discard Pretzel Bites Recipe
Have you ever stared at your sourdough discard wondering what magical creation you could whip up? These sourdough discard pretzel bites are about to become your new obsession! Golden, chewy, salty, and absolutely irresistible, these bite-sized treats transform something you’d normally throw away into a snack everyone will devour.
I made a batch last Sunday afternoon, and they disappeared before I could even sit down with my coffee. The best part? They’re surprisingly simple to make and ready in about an hour. If you loved my sourdough crackers recipe, wait until you taste these soft, pillowy pretzel bites that’ll have your kitchen smelling like a German bakery!
This recipe was created entirely by AI and has not been tested in our kitchen. Our site is built for readers like you, and many who have tried other recipes here have shared positive results.
What Are Sourdough Discard Pretzel Bites?
Ever wonder why we call them “bites”? Well, it’s simple – they’re perfectly poppable, snackable little nuggets of pretzel heaven! Instead of wrestling with large pretzels and getting that classic twisted shape just right, these bites let you skip the fancy shaping and go straight to the delicious part.
You know what they say, “the way to a man’s heart is through his stomach,” and honestly, these golden-brown beauties have won over everyone who’s tried them at my house. Don’t let your sourdough discard go to waste – turn it into something absolutely spectacular instead!
Why You’ll Love This Sourdough Discard Pretzel Bites Recipe
Zero Waste, Maximum Flavor
The main highlight here is how beautifully your sourdough discard transforms into something with incredible depth of flavor. That slight tanginess from the starter adds a complexity you just can’t get from regular pretzel recipes. The texture is spot-on too – soft and chewy on the inside with that signature pretzel exterior that has just the right amount of bite.
Budget-Friendly Baking
Making these at home saves you serious money compared to buying soft pretzels at the mall or specialty bakeries. You’re already maintaining your sourdough starter, so why toss that discard when it can become something delicious? With just a handful of pantry staples, you’ll have a batch of pretzel bites that would cost you $15-20 at a pretzel shop. Plus, you control exactly what goes into them – no mystery ingredients or preservatives.
Customizable Toppings Galore
The classic coarse salt topping is phenomenal, but here’s where your creativity can shine! Think everything bagel seasoning, cinnamon sugar for a sweet twist, garlic butter, parmesan and herbs, or even a spicy jalapeño cheese coating. Each bite is like a little canvas waiting for your flavor inspiration. If you enjoyed experimenting with my sourdough flatbread recipe, you’ll love how versatile these pretzel bites can be. Go ahead and make a double batch – trust me, you’ll want extras for movie night!
How to Make Sourdough Discard Pretzel Bites
Quick Overview
This recipe delivers perfectly chewy, golden-brown pretzel bites with minimal effort and maximum reward. The sourdough discard adds that signature tangy flavor while keeping the texture wonderfully soft. The baking soda bath creates that gorgeous mahogany color and authentic pretzel taste you’re craving. Best of all, the active hands-on time is only about 20 minutes!
Time Breakdown:
- Prep Time: 15 minutes
- First Rise: 30-45 minutes
- Shaping & Boiling: 10 minutes
- Baking Time: 12-15 minutes
- Total Time: 70-85 minutes
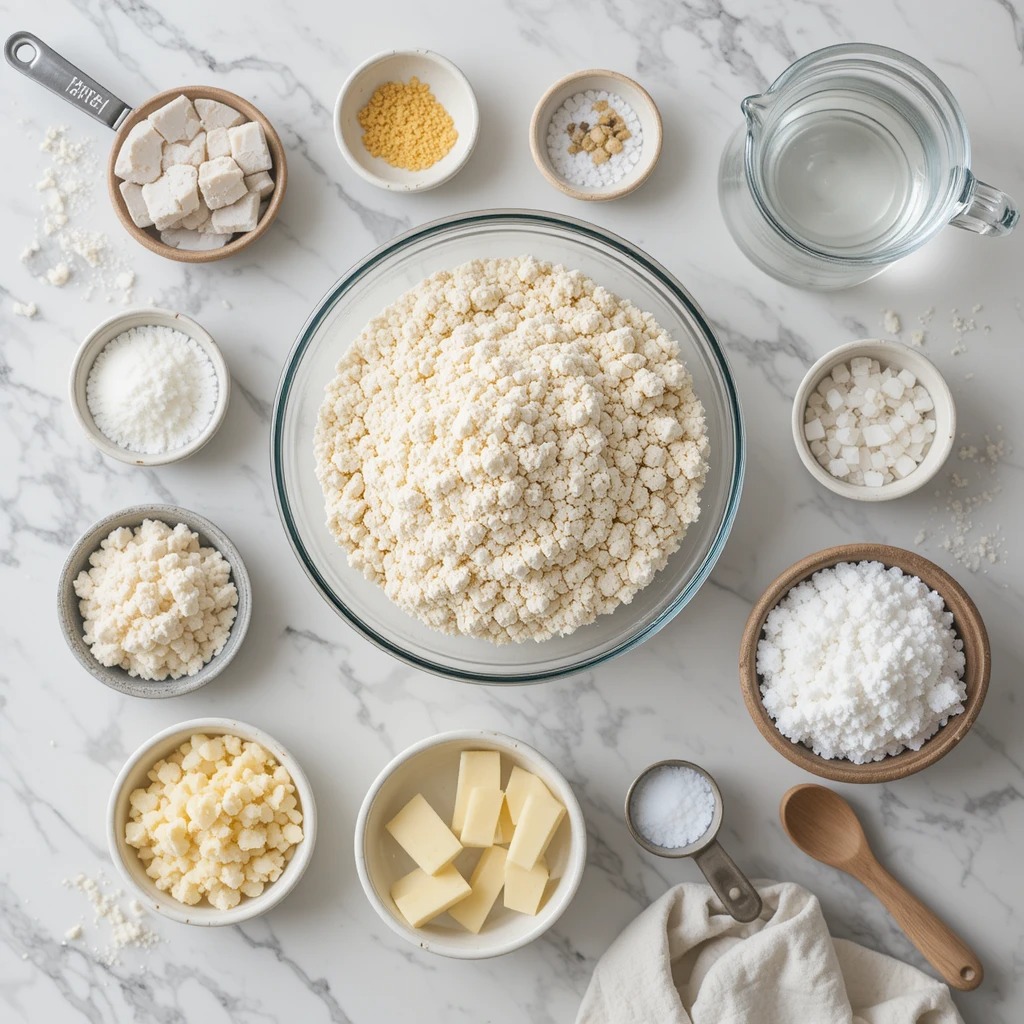
Key Ingredients for Sourdough Discard Pretzel Bites
For the Dough:
- 1 cup (240g) sourdough discard, unfed and at room temperature
- 2 ½ cups (315g) all-purpose flour, plus extra for dusting
- 2 tablespoons (25g) granulated sugar
- 1 tablespoon (9g) instant yeast
- 1 teaspoon (6g) salt
- ¾ cup (180ml) warm water (110°F/43°C)
- 2 tablespoons (28g) melted butter, cooled slightly
For the Baking Soda Bath:
- 8 cups water
- ¼ cup baking soda
For Topping:
- 3 tablespoons (42g) melted butter
- Coarse sea salt or pretzel salt
- Optional: everything bagel seasoning, cinnamon sugar, garlic powder, or parmesan cheese
Step-by-Step Instructions
Prepare the Dough
Start by combining your sourdough discard, warm water, and melted butter in a large mixing bowl. Give it a good whisk until everything is well blended. In a separate bowl, whisk together the flour, sugar, yeast, and salt. This ensures the salt doesn’t directly contact the yeast, which can slow down its activity. Pour the dry ingredients into the wet mixture and stir with a wooden spoon until a shaggy dough forms. Don’t worry if it looks rough at this stage – that’s perfectly normal!
Knead and Develop the Gluten
Turn the dough out onto a lightly floured surface and knead for about 8-10 minutes. You want the dough to become smooth, elastic, and slightly tacky but not sticky. If it’s too sticky, add flour one tablespoon at a time. If it’s too dry, wet your hands slightly and continue kneading. The dough is ready when you can stretch a small piece thin enough to see light through it without it tearing immediately – bakers call this the “windowpane test.”
First Rise
Place your kneaded dough in a greased bowl, turning it once to coat all sides with oil. Cover with a damp kitchen towel or plastic wrap and let it rise in a warm spot for 30-45 minutes. It should nearly double in size. I like to place mine near my preheating oven or in a slightly warm oven with just the light on.
Shape the Pretzel Bites
Once risen, punch down the dough gently to release the air. Turn it out onto your work surface and divide it into 4 equal portions. Working with one piece at a time (keep the others covered), roll the dough into a long rope about ¾-inch thick. Don’t stress about making it perfectly uniform – the rustic look is part of the charm! Using a sharp knife or bench scraper, cut the rope into 1-inch pieces. You should get about 50-60 bite-sized pieces total.
Prepare the Baking Soda Bath
While you’re shaping, bring 8 cups of water to a rolling boil in a large pot. Once boiling, carefully add the baking soda – it will bubble up dramatically, so add it slowly! Reduce the heat to maintain a gentle boil. This alkaline bath is the secret to that authentic pretzel flavor and gorgeous brown color. Don’t skip this step!
Boil the Pretzel Bites
Preheat your oven to 425°F (220°C) and line two baking sheets with parchment paper. Working in batches of about 10-12 pieces, carefully drop the pretzel bites into the boiling water. Boil for 20-30 seconds Per side – they’ll puff up slightly and float to the surface. Using a slotted spoon, remove them from the water, letting excess water drip off, and place them on your prepared baking sheets about 1 inch apart.
Season and Bake
Once all your pretzel bites are boiled and arranged on the baking sheets, brush them generously with melted butter. Immediately sprinkle with coarse salt or your chosen topping while the butter is still wet so it sticks properly. Bake for 12-15 minutes, rotating the pans halfway through, until the pretzel bites are deep golden brown. The darker they get (without burning), the more authentic that pretzel flavor will be!
Cool and Serve
Remove from the oven and let them cool on the baking sheet for about 5 minutes before transferring to a wire rack. I know it’s tempting, but letting them rest briefly helps the texture set perfectly. Serve them warm with your favorite dipping sauce – they’re absolutely phenomenal fresh from the oven!
What to Serve Sourdough Discard Pretzel Bites With
These versatile bites pair beautifully with so many dips and accompaniments! For the classic experience, serve them alongside warm cheese sauce – think sharp cheddar or a creamy beer cheese dip. Honey mustard is another crowd-pleaser that balances sweet and tangy perfectly.
For something different, try them with marinara sauce and call it “pizza pretzel bites,” or go the sweet route with chocolate hazelnut spread or salted caramel sauce. A tangy ranch dip or spicy buffalo sauce works wonderfully too.
If you’re serving these as an appetizer, pair them with a crisp salad or vegetable crudités to balance the richness. They also make an excellent side for soup – especially tomato soup or beer cheese soup. For beverages, they pair nicely with lemonade, iced tea, or hot apple cider.
Top Tips for Perfecting Sourdough Discard Pretzel Bites
Use Room Temperature Discard
Your sourdough discard should be at room temperature for the best results. Cold discard from the fridge won’t incorporate as smoothly and can affect the rise time. Let it sit out for about 30 minutes before starting your recipe.
Don’t Over-Boil
The 20-30 second boiling time might seem short, but it’s crucial. Over-boiling makes the pretzel bites too tough and chewy in a bad way. Set a timer and stick to it! If you’re nervous, start with 20 seconds for your first batch.
Get That Deep Brown Color
Don’t be afraid of color when baking these. Pale pretzel bites won’t have that authentic pretzel flavor. Aim for a deep mahogany brown. If they’re getting too dark on top but not on the bottom, move your oven rack down one position for the next batch.
Prevent Sticking
Make sure your parchment paper is well-secured to your baking sheet. The moisture from the baking soda bath can make the paper curl. I like to use a tiny dab of butter on the corners to keep it flat.
Size Matters
Keep your pretzel bites uniform in size so they bake evenly. If some are much larger than others, the small ones might get too dark while the big ones are still pale. Aim for that 1-inch size consistently.
Fresh Is Best
These pretzel bites are absolutely incredible fresh from the oven. If you’re entertaining, time it so they come out of the oven about 15 minutes before you want to serve them. That warm, soft texture is unbeatable!
Storing and Reheating Tips
Room Temperature Storage
Store cooled pretzel bites in an airtight container at room temperature for up to 2 days. They’ll soften slightly as they sit, but they’re still delicious. Avoid storing them in the fridge, as this can make them stale faster due to the bread going through retrogradation.
Freezing Instructions
These freeze beautifully! Once completely cooled, place the pretzel bites in a single layer on a baking sheet and freeze for about 2 hours until solid. Then transfer them to a freezer-safe bag or container, removing as much air as possible. They’ll keep frozen for up to 3 months. Label the bag with the date so you remember when you made them.
Reheating for Best Results
To reheat, preheat your oven to 350°F (175°C). Place the pretzel bites on a baking sheet and warm for 5-7 minutes if thawed, or 10-12 minutes if frozen. For extra softness, wrap them loosely in aluminum foil before reheating. You can also microwave them for 15-20 seconds, though they won’t be quite as crispy on the outside. Brush with a little melted butter after reheating to refresh that just-baked flavor!
Common Baking Mistakes to Avoid
Skipping the Windowpane Test
Many bakers stop kneading too early, resulting in dense, tough pretzel bites. Take the extra 2-3 minutes to properly develop your gluten. Your dough should be smooth and elastic, not shaggy or breaking apart easily.
Using Old or Expired Yeast
Always check your yeast’s expiration date! Dead yeast means flat, dense pretzel bites that won’t rise properly. If you’re unsure, proof your yeast first by mixing it with the warm water and a pinch of sugar. It should foam up within 5-10 minutes.
Incorrect Water Temperature
Water that’s too hot will kill your yeast, while water that’s too cold won’t activate it properly. Aim for 110°F (43°C) – it should feel warm to the touch but not hot. I test mine on my wrist like you would baby formula.
Crowding the Pan
Leave enough space between pretzel bites on your baking sheet. If they’re touching, they’ll steam instead of getting that nice crispy exterior. About 1 inch of space between each bite is perfect.
Forgetting to Salt Immediately
That coarse salt needs to stick to the butter while it’s still wet. If you wait too long, the butter soaks in and the salt just bounces off. Season your pretzel bites right after brushing with butter, working in batches if needed.
Not Using Enough Baking Soda
The alkaline bath is what creates that distinctive pretzel flavor and color. Don’t reduce the amount of baking soda thinking it won’t matter – it absolutely does! That ⅓ cup might seem like a lot, but it’s essential.
Frequently Asked Questions
Can I use active sourdough starter instead of discard?
Absolutely! Active starter works perfectly fine in this recipe. Just keep in mind that very active, bubbly starter might make your dough rise a bit faster, so watch your timing. The flavor will be slightly more tangy, which is delicious!
Why are my pretzel bites too dense?
Dense pretzel bites usually result from under-kneading the dough or not allowing enough rise time. Make sure you knead for the full 8-10 minutes until the dough is smooth and elastic. Also, ensure your rising environment is warm enough – around 75-80°F is ideal.
Can I make these without the baking soda bath?
While you technically can skip it, your results won’t taste like authentic pretzels. The alkaline bath creates that characteristic pretzel flavor and deep brown color. Without it, you’ll essentially have soft breadsticks, which are still tasty but not true pretzels.
How do I know when the pretzel bites are done baking?
They should be a deep golden brown to mahogany color. If you tap the bottom of one, it should sound hollow. The internal temperature should reach about 200°F (93°C) if you want to be precise with a thermometer.
Can I make the dough ahead of time?
Yes! After the first rise, you can punch down the dough, cover it tightly, and refrigerate for up to 24 hours. Let it come to room temperature (about 30 minutes) before shaping and proceeding with the recipe. The cold fermentation actually adds even more flavor!
What’s the best flour to use for pretzel bites?
All-purpose flour works beautifully and is what I recommend for this recipe. Bread flour will give you a slightly chewier texture due to higher protein content, which some people prefer. Avoid cake flour or pastry flour, as they don’t have enough protein structure.
Why did my pretzel bites turn out too salty?
This usually happens from using too much topping salt or using fine table salt instead of coarse salt. Coarse pretzel salt or sea salt is less intense because less of it sticks to each bite. If you only have fine salt, use it more sparingly.
Can I make these dairy-free?
Yes! Replace the butter with olive oil or melted coconut oil. The flavor will be slightly different, but they’ll still be delicious. Make sure any toppings you use are also dairy-free if needed.
Nutrition Information
| Nutrient | Per Serving (4 bites) |
|---|---|
| Calories | 145 |
| Total Fat | 4g |
| Saturated Fat | 2g |
| Cholesterol | 10mg |
| Sodium | 320mg |
| Total Carbohydrates | 23g |
| Dietary Fiber | 1g |
| Sugars | 2g |
| Protein | 4g |
Nutrition information is approximate and will vary based on specific ingredients and toppings used.
These sourdough discard pretzel bites have honestly changed my weekend baking routine. There’s something so satisfying about transforming what would be “waste” into something this delicious. The first time I made them, my husband asked if I’d secretly gone to the pretzel shop because they tasted so authentic!
What I love most is how forgiving this recipe is. Whether you’re a sourdough veteran or just starting your starter journey, these pretzel bites will work beautifully. They’re perfect for game day snacks, after-school treats, party appetizers, or just because you’re craving something warm and comforting on a lazy Sunday afternoon.
The versatility factor is huge too. I’ve made sweet cinnamon sugar versions for breakfast, savory everything bagel versions for lunch boxes, and classic salted ones for dinner parties. Each variation has been a hit. My kids actually request these more than regular snacks now, and I’m happy to oblige since I know exactly what’s going into them.
So next time you’re about to discard that sourdough starter, stop right there! Grab this recipe, roll up your sleeves, and spend an hour creating something magical. Your kitchen will smell incredible, your family will be thrilled, and you’ll feel like a baking rockstar. Plus, you’ll never look at your sourdough discard the same way again – it’s not waste, it’s potential pretzel bites just waiting to happen!
Happy baking, and don’t forget to brush them with extra butter while they’re hot. You’re welcome!