Creamy Strawberry Cheesecake Dump Cake Better Than Bakery
Picture this: creamy cheesecake meets sweet strawberries and buttery cake, all in one simple pan. That’s the magic of strawberry cheesecake dump cake! This ridiculously easy dessert requires minimal effort but delivers maximum flavor. I discovered this recipe during a busy weekend when I needed dessert fast, and honestly, I was shocked at how incredible it turned out.
If you love our classic chocolate lava cake, you’ll be amazed at how this dump cake delivers similar wow-factor with even less work. The best part? You literally dump, bake, and devour. No mixing bowls, no complicated steps—just pure dessert bliss that’ll have everyone asking for seconds!
This recipe was produced fully by AI and was not prepared in our kitchen. We aim to be open and thoughtful, and readers who’ve made other site recipes have shared positive feedback.
What is Strawberry Cheesecake Dump Cake?
Ever wonder why it’s called a “dump” cake? Well, it’s not the most glamorous name, but it perfectly describes the wonderfully lazy technique! You simply dump all your ingredients into a pan without any mixing or fussing. No stand mixerRequired, no beating eggs until your arm hurts. Just layer, dump, and let the oven work its magic.
You know the saying, “the way to a man’s heart is through his stomach”? This dessert proves that the way to anyone’s heart is through incredibly easy baking! Trust me, once you make this fool-proof recipe, you’ll wonder why you ever spent hours on complicated desserts. Go ahead and give it a try—your future self will thank you!
Why You’ll Love This Strawberry Cheesecake Dump Cake
The star of this dessert is the gorgeous combination of tangy cream cheese, sweet strawberries, and golden cake topping. Each bite gives you that classic cheesecake flavor without the hassle of a water bath or worrying about cracks. The strawberries get wonderfully jammy and sweet as they bake, creating pockets of fruity goodness throughout.
Making this at home saves you serious money compared to buying fancy bakery desserts. Store-bought cheesecakes can cost $20-30, but this recipe feeds a crowd for a fraction of that price. Plus, you control the ingredients—no preservatives or mystery additives here!
The buttery cake topping gets delightfully crispy on top while staying soft underneath, and those little pools of melted butter add richness to every forkful. The cream cheese layer brings that signature tangy sweetness that makes cheesecake so irresistible.
If you enjoyed our easy banana pudding dessert, you’ll absolutely love how this dump cake simplifies the cheesecake experience. Both recipes prove that impressive desserts don’t require culinary school training.
Ready to become everyone’s favorite dessert maker? Grab your ingredients and let’s get dumping!
How to Make Strawberry Cheesecake Dump Cake
Quick Overview
This dessert is a game-changer for busy bakers and dessert lovers alike. The beauty lies in its simplicity—layer your ingredients, pop it in the oven, and wait for the magic to happen. You’ll get a warm, gooey dessert with a crispy golden top, creamy cheesecake filling, and burst-in-your-mouth strawberries. The contrast of textures is absolutely divine!
Preparation Time:
- Prep Time: 10 minutes
- Baking Time: 45-50 minutes
- Cooling Time: 15 minutes
- Total Time: About 1 hour 15 minutes
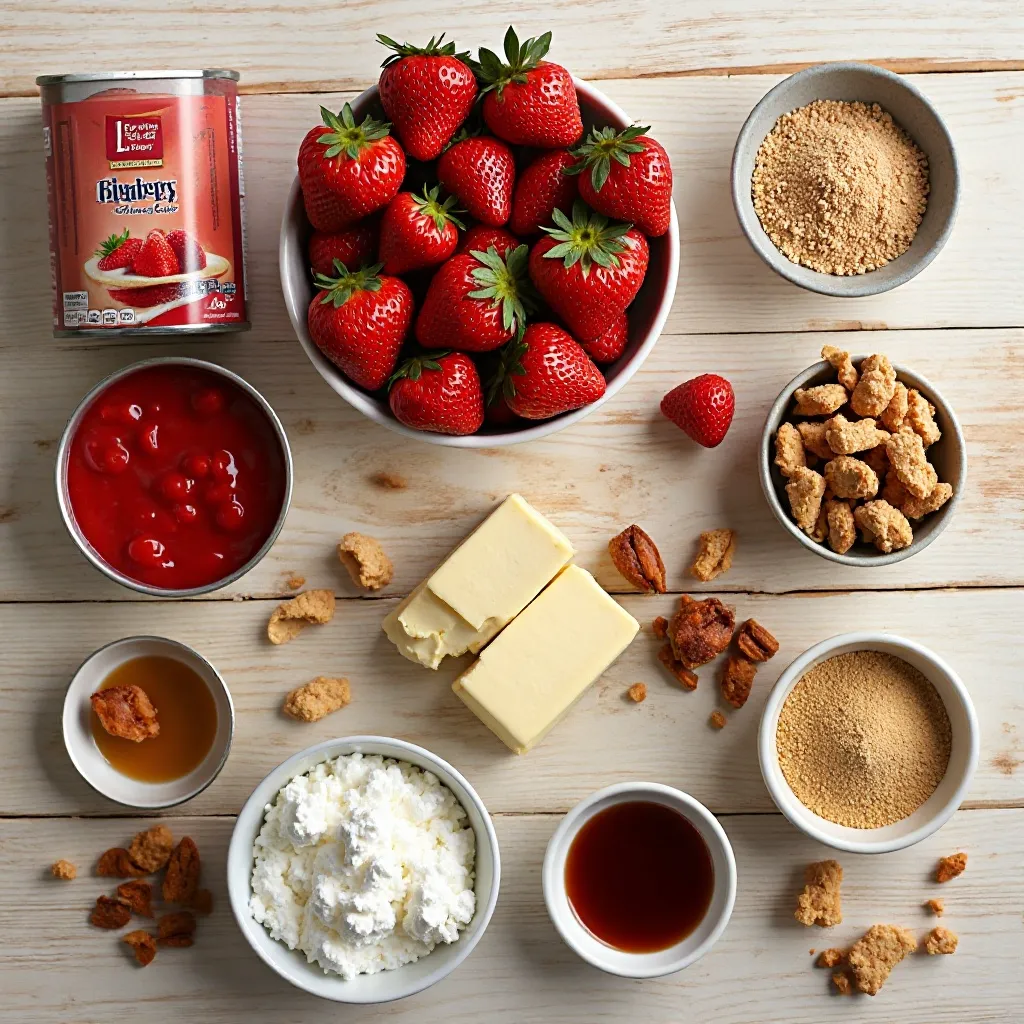
Key Ingredients for Strawberry Cheesecake Dump Cake
For the Base:
- 2 cans (21 oz each) strawberry pie filling (or fresh strawberries with sugar)
- 8 oz cream cheese, softened and cut into small cubes
- 1 box (15.25 oz) yellow cake mix or white cake mix
- 1/2 cup (1 stick) unsalted butter, melted
- 1 teaspoon vanilla extract
Optional Toppings:
- Whipped cream or Cool Whip
- Fresh strawberries for garnish
- Powdered sugar for dusting
- Graham cracker crumbs
Step-by-Step Instructions
Step 1: Prepare Your Baking Dish
Preheat your oven to 350°F (175°C). Grab a 9×13-inch baking dish and give it a light spray with non-stick cooking spray. This prevents sticking and makes cleanup so much easier. I learned this the hard way after my first attempt stuck like glue to the pan!
Step 2: Create the Strawberry Layer
Open your cans of strawberry pie filling and spread them evenly across the bottom of your prepared dish. If you’re using fresh strawberries, slice about 4 cups of berries, toss them with 1/2 cup sugar and let them sit for 10 minutes to release their juices. The strawberries form the fruity foundation of this dessert, so spread them nice and even.
Step 3: Add the Cream Cheese
Here’s where the cheesecake magic begins! Take your softened cream cheese and cut it into small cubes—about 1/2-inch pieces work perfectly. Scatter these cubes evenly over the strawberry layer. Don’t worry about making it perfect; the cream cheese will melt and create creamy pockets throughout the dessert as it bakes. This is what gives you that authentic cheesecake flavor without all the complicated steps.
Step 4: Sprinkle the Cake Mix
Take your dry cake mix straight from the box and sprinkle it evenly over the cream cheese and strawberries. Use the entire box and make sure you cover all the fruit and cream cheese. The dry mix will absorb the moisture from the strawberries and butter, transforming into a delicious cake layer. No mixing required—seriously!
The dry mix will absorb the moisture from the strawberries and butter, transforming into a delicious cake layer. No mixing required—seriously!
Step 5: Drizzle with Butter
Melt your butter in the microwave or on the stovetop and stir in the vanilla extract. Pour the dry cake mix into the melted butter and stir until it resembles a crumbly, wet-sand texture. Sprinkle this mixture evenly over the strawberry filling, then scatter the cream cheese cubes on top
trying to cover as much of the surface as possible. The butter helps the cake mix turn into an actual cake and creates that irresistible crispy top. I like to use a spoon and drizzle in a zigzag pattern to ensure even coverage.
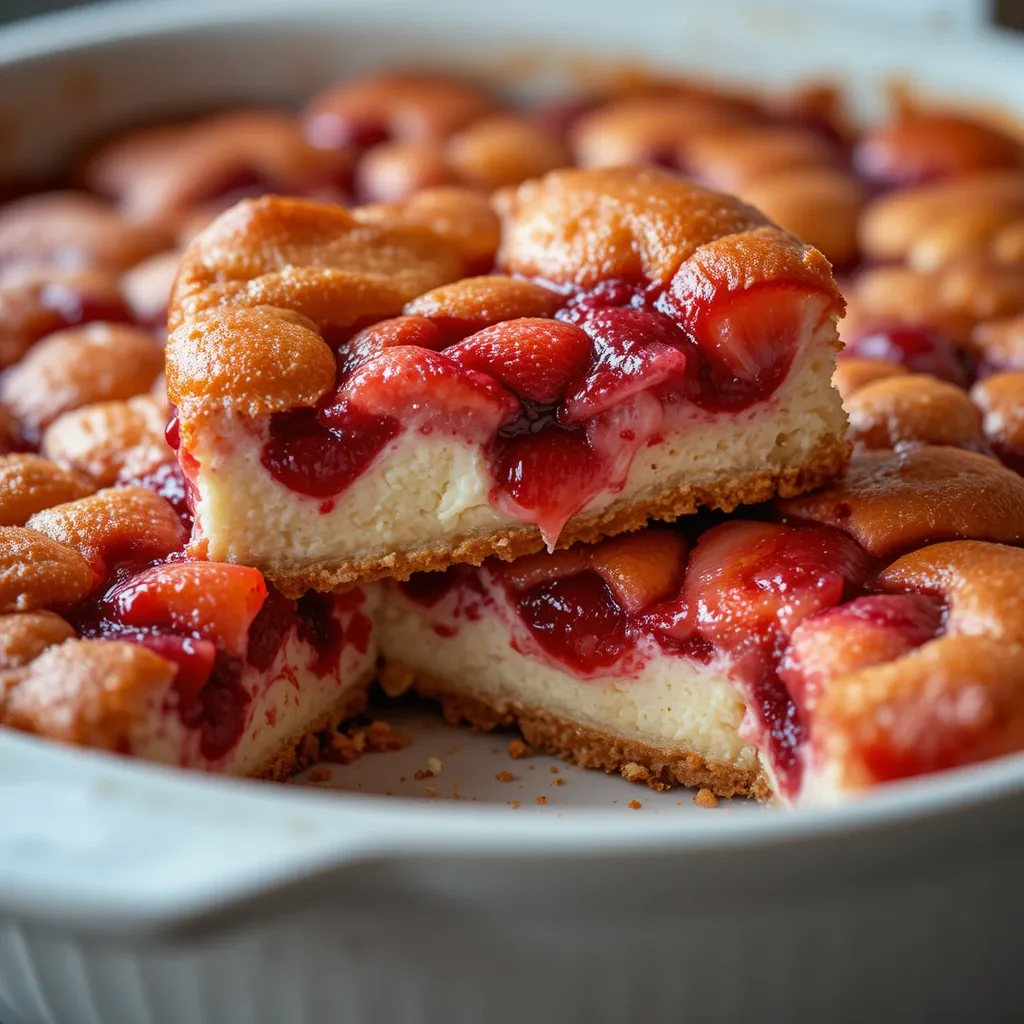
Step 6: Bake to Perfection
Slide your pan into the preheated oven and bake for 45-50 minutes. You’ll know it’s done when the top turns golden brown and you can see the strawberry filling bubbling around the edges. The aroma filling your kitchen will be absolutely mouthwatering—sweet strawberries, vanilla, and butter all mingling together.
Step 7: Cool and Serve
This is the hardest part—waiting! Let the dump cake cool for at least 15 minutes before serving. This allows the layers to set up a bit, though it’s still deliciously gooey and warm. Serve it in bowls or on plates with a generous dollop of whipped cream or a scoop of vanilla ice cream.
What to Serve Strawberry Cheesecake Dump Cake With
This dessert is incredibly versatile and pairs beautifully with several accompaniments:
Cold Toppings: Vanilla ice cream is the classic choice—the cold, creamy ice cream against the warm cake is pure heaven. Whipped cream adds a light, airy contrast, or try frozen yogurt for a tangy twist.
Hot Beverages: Serve alongside freshly brewed coffee or hot tea. The dessert’s sweetness balances perfectly with a slightly bitter espresso or a smooth Earl Grey tea.
Fresh Fruit: Add extra fresh strawberries on the side, or try sliced peaches or blueberries for color and freshness.
Breakfast Twist: Believe it or not, leftover dump cake makes an indulgent breakfast treat with Greek yogurt and granola. I won’t judge—I’ve definitely done this!
Top Tips for Perfecting Strawberry Cheesecake Dump Cake
Use Room Temperature Cream Cheese
This is crucial! Cold cream cheese won’t distribute well and will leave you with hard chunks. Take your cream cheese out of the fridge 30-45 minutes before baking, or soften it in the microwave for 10-15 seconds.
Don’t Skip the Butter Drizzle
Every dry spot of cake mix needs butter love. Those unbutttered areas will stay powdery and dry, so take your time with this step. If needed, use up to 3/4 cup of butter for extra richness.
Customize Your Fruit
Feel free to swap strawberries for other fruits! Cherry pie filling creates a classic combo, mixed berries add complexity, or try peach pie filling for a summery twist. You can even mix strawberry and blueberry for a patriotic version.
Check for Doneness
The edges should be bubbly and the top golden brown. If the top browns too quickly but the filling isn’t bubbling, tent the pan with aluminum foil for the last 10-15 minutes.
Let It Set
I know it’s tempting to dive in immediately, but giving it time to cool helps the layers come together. The cream cheese needs time to set up a bit, and the filling thickens as it cools.
Add Texture with Mix-Ins
For extra crunch, sprinkle chopped pecans or sliced almonds over the cake mix before adding butter. Graham cracker crumbs mixed into the cake layer enhance the cheesecake vibe.
Size Matters
Using a different pan size? A 9×13 gives you thinner layers, while an 8×8 creates a thicker dessert. Just adjust baking time accordingly—smaller, thicker pans need 10-15 minutes longer.
Storing and Reheating Tips
Refrigerator Storage: Once your dump cake has cooled completely, cover the baking dish tightly with plastic wrap or aluminum foil. It will stay fresh in the refrigerator for up to 5 days. The dessert actually tastes even better the next day as the flavors meld together beautifully.
Freezing Instructions: Yes, you can freeze this! Cut the cooled dump cake into individual portions and wrap each piece tightly in plastic wrap, then place in a freezer-safe container or bag. Freeze for up to 3 months. This is perfect for having dessert on hand whenever cravings strike.
Reheating Methods: For best results, reheat individual portions in the microwave for 30-45 seconds until warmed through. The microwave brings back that fresh-from-the-oven texture. Alternatively, reheat larger portions in a 350°F oven for 10-15 minutes covered with foil. Avoid overheating, as it can dry out the cake layer.
Serving from Frozen: Thaw frozen portions in the refrigerator overnight, then reheat as directed above. Or, if you’re impatient like me, microwave from frozen for 1-2 minutes, checking every 30 seconds.
Pro Tip: Store any whipped cream or ice cream separately and add fresh when serving. These toppings don’t store well with the dessert.
Tips for Avoiding Common Baking Mistakes
Mistake: Dry Cake Topping
Solution: Make sure every bit of cake mix gets coated with butter. Use melted butter (not softened) and drizzle slowly and thoroughly. If your cake mix looks dry in spots before baking, add a bit more melted butter.
Mistake: Soupy Bottom Layer
Solution: Don’t over-fill with strawberries or add extra liquid. Stick to the recipe amounts. If using fresh strawberries, let excess juice drain before adding to the pan. Also, make sure you bake long enough for the juices to thicken—those bubbling edges are your sign!
Mistake: Cream Cheese Clumps
Solution: Cut cream cheese into small, uniform cubes and ensure it’s fully softened. Large chunks won’t melt properly and will create uneven texture. If your cream cheese is too cold, pop it in the microwave for 10 seconds.
Mistake: Burnt Top, Raw Middle
Solution: If your oven runs hot, reduce temperature to 325°F and bake longer. Use an oven thermometer to verify temperature accuracy. Cover with foil if the top browns too quickly.
Mistake: Cake Mix Clumping
Solution: Break up any clumps in the dry cake mix before sprinkling. Old cake mix can form lumps, so give the box a shake or use a fork to break up chunks before adding to your pan.
Mistake: Uneven Baking
Solution: Place your baking dish in the center of the oven for even heat distribution. Rotate the pan halfway through baking if your oven has hot spots.
Mistake: Sticking to Pan
Solution: Don’t skip greasing the pan! Use butter, cooking spray, or line with parchment paper. This makes serving so much easier and prevents the first piece from falling apart.
Frequently Asked Questions
Can I use fresh strawberries instead of pie filling?
Absolutely! Use about 4 cups of sliced fresh strawberries tossed with 1/2 cup sugar and 2 tablespoons cornstarch. Let them macerate for 10 minutes before spreading in the pan. Fresh berries create a less sweet, more natural flavor.
What’s the best cake mix flavor to use?
Yellow cake mix is traditional and creates a rich, buttery flavor. White cake mix works great too and gives a lighter taste. Vanilla cake mix adds extra vanilla notes. Avoid chocolate cake mix as it clashes with the strawberry-cheesecake combination.
Can I make this dairy-free?
You can substitute dairy-free cream cheese and use vegan butter. The texture will be slightly different but still delicious. Make sure your cake mix is also dairy-free by checking the ingredients.
How do I know when it’s fully baked?
Look for three signs: golden brown top, bubbling fruit around the edges, and a toothpick inserted in the cake layer (not the fruit) comes out with just a few moist crumbs. The center should be set but still slightly jiggly.
Can I halve this recipe?
Yes! Use an 8×8 or 9×9 baking dish and cut all ingredients in half. Baking time will be slightly less, around 35-40 minutes. This is perfect for smaller families.
Why is my dump cake gummy?
This usually happens if you don’t use enough butter or if you add liquid to the cake mix. Remember, the cake mix stays completely dry until you drizzle with butter. Also, make sure your strawberries aren’t releasing too much liquid.
Can I prepare this ahead of time?
You can assemble the layers (except butter) up to 4 hours ahead and refrigerate. Add the butter and bake just before serving for the best texture. Baking ahead and reheating works too, though the top loses some crispness.
What other cream cheese flavors work?
Plain cream cheese is best, but strawberry cream cheese intensifies the berry flavor. Avoid herb or savory flavored cream cheeses. You could try vanilla-flavored cream cheese for extra sweetness.
Is this dessert kid-friendly?
Very! Kids love the sweet, fruity flavor and the fun name. It’s also a great recipe for kids to help make since there’s no complicated mixing or measuring. Just supervise the oven work.
Can I add chocolate to this recipe?
Sure! Sprinkle chocolate chips over the strawberry layer or use chocolate cake mix. White chocolate chips complement strawberries beautifully. Add about 1/2 to 1 cup of chips.
Nutrition Information
| Nutrient | Per Serving (1/12 of recipe) |
|---|---|
| Calories | 450–500 |
| Total Fat | 16g |
| Saturated Fat | 9g |
| Cholesterol | 40mg |
| Sodium | 340mg |
| Total Carbohydrates | 58g |
| Dietary Fiber | 1g |
| Sugars | 42g |
| Protein | 4g |
Note: Nutritional values are approximate and may vary based on specific ingredients used. Values do not include optional toppings like ice cream or whipped cream.
There you have it—the easiest, most crowd-pleasing strawberry cheesecake dump cake you’ll ever make! This recipe has saved me countless times when I needed a impressive dessert without the stress. The combination of creamy cheesecake, sweet strawberries, and buttery cake creates a dessert that tastes like you spent hours in the kitchen, but you and I will know the delicious truth.
Whether you’re bringing dessert to a potluck, celebrating a special occasion, or just treating yourself on a random Tuesday, this dump cake delivers every single time. So grab those simple ingredients, preheat that oven, and get ready to become everyone’s favorite dessert hero. Happy baking!