Easy Thanksgiving Cookies Cutters Recipe Decoration Ideas
Thanksgiving cookies cutters transform ordinary sugar cookies into delightful edible masterpieces that capture the spirit of gratitude and harvest. These charming tools bring joy to both bakers and eaters alike, creating turkey-shaped treats, pumpkin perfection, and autumn leaf wonders.
Did you know that decorated Thanksgiving cookies have become just as popular as pumpkin pie at modern holiday gatherings? Making festive cookies with themed cutters is incredibly simple, requires minimal baking experience, and creates memorable moments for the whole family.
Similar to our popular cookies cutters guide, this collection will inspire your holiday baking adventures. Get ready to fill your kitchen with the warm aromas of cinnamon and vanilla while crafting beautiful cookies that’ll steal the show at your Thanksgiving table!
What are Thanksgiving Cookie Cutters?
Ever wonder why we get so excited about shaped metal or plastic tools? Thanksgiving cookies cutters are specialized baking tools designed with festive autumn and harvest motifs—think turkeys with fanned tail feathers, acorn shapes, pilgrim hats, cornucopias, and fall leaves in glorious detail.
They’re called “cookie cutters” because, well, they literally cut cookies into these adorable shapes! Here’s a fun fact: the way to a family’s heart during Thanksgiving is definitely through a platter of beautifully decorated turkey cookies. These magical tools turn simple dough into conversation starters and Instagram-worthy desserts. Ready to start your own Thanksgiving baking tradition?
Why You’ll Love Thanksgiving Cookies Cutters
Create Instagram-Worthy Thanksgiving Treats
The main highlight of using Thanksgiving cookies cutters is the instant wow-factor they bring to your dessert table. Imagine golden-brown turkey cookies with colorful royal icing feathers, or maple leaf shapes dusted with cinnamon sugar that literally smell like autumn heaven. Your guests won’t believe you made these professional-looking treats at home!
Save Money While Impressing Everyone
Buying decorated Thanksgiving cookies from bakeries can cost $3-5 per cookie, but making them at home with cookie cutters costs mere pennies each. A quality set of Thanksgiving cookies cutters ranges from $10-25 and can be reused for years. You’ll save substantial money while creating dozens of personalized cookies that taste fresher and more delicious than store-bought versions.
Endless Flavor and Decoration Possibilities
The beauty of Thanksgiving cookies cutters lies in their versatility. Use them with classic sugar cookie dough, spiced gingerbread, chocolate shortbread, or pumpkin-flavored recipes. Top them with royal icing, buttercream, fondant, or simple glaze in autumn colors—burnt orange, deep red, golden yellow, and rich brown. Add edible glitter, sprinkles, or hand-painted details for extra flair. Much like our popular fall baking guide, these cutters open up endless creative possibilities.
Make this Thanksgiving extra special by crafting cookies that reflect your family’s personality and taste preferences. Your kitchen will become the heart of holiday memories!
How to Make Perfect Thanksgiving Cookies with Cookie Cutters
Quick Overview
Making Thanksgiving cookies with themed cutters is wonderfully straightforward and beginner-friendly. The process involves mixing a simple dough, rolling it out, cutting festive shapes, and decorating with your choice of icing or glaze. The result? Buttery, slightly crispy cookies with tender centers that melt in your mouth. What makes this especially satisfying is watching simple ingredients transform into beautiful autumn-themed treats that taste as amazing as they look.
Time Breakdown:
- Prep Time: 20 minutes
- Chill Time: 1-2 hours
- Baking Time: 10-12 minutes per batch
- Decorating Time: 30-60 minutes (depending on detail)
- Total Time: 2.5-3.5 hours
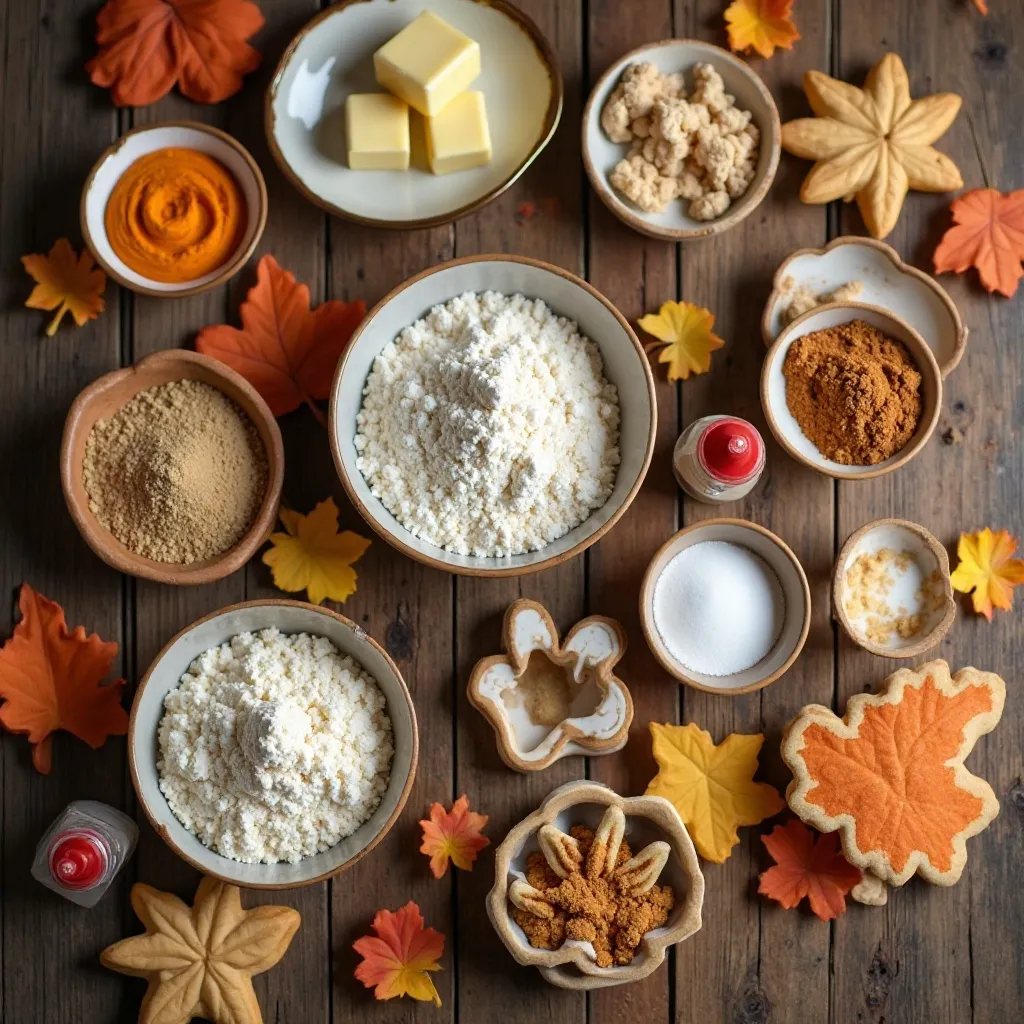
Key Ingredients for Thanksgiving Sugar Cookies
For the Cookie Dough:
- 3 cups all-purpose flour (spooned and leveled)
- 1 teaspoon baking powder
- ½ teaspoon salt
- 1 cup (2 sticks) unsalted butter, softened to room temperature
- 1 cup granulated sugar
- 1 large egg, at room temperature
- 2 teaspoons pure vanilla extract
- ½ teaspoon almond extract (optional but recommended)
For Royal Icing Decoration:
- 4 cups powdered sugar, sifted
- 3 tablespoons meringue powder
- 6-7 tablespoons warm water
- Gel food coloring (orange, red, yellow, brown, green)
Essential Tools:
- Thanksgiving Cookies cutter set (turkey, pumpkin, leaves, acorn, pilgrim hat)
- Rolling pin
- Parchment paper
- Cooling racks
- Piping bags and decorating tips
Step-by-Step Instructions
Step 1: Prepare the Cookie Dough
In a medium bowl, whisk together the flour, baking powder, and salt until well combined. Set this dry mixture aside. This aeration step ensures your cookies bake evenly without any flour clumps.
Step 2: Cream Butter and Sugar
Using an electric mixer on medium-high speed, beat the softened butter and granulated sugar together for 3-4 minutes until the mixture becomes light, fluffy, and pale in color. This creaming process incorporates air, giving your cookies a tender texture. Scrape down the sides of the bowl halfway through to ensure even mixing.
Step 3: Add Eggs and Extracts
Add the egg, vanilla extract, and almond extract (if using) to the butter mixture. Beat on medium speed for about 1 minute until everything is fully incorporated and the mixture looks smooth. The almond extract adds a subtle depth that complements the vanilla beautifully.
Step 4: Combine Wet and Dry Ingredients
Reduce mixer speed to low. Gradually add the flour mixture to the wet ingredients in three additions, mixing just until the flour disappears after each addition. Don’t overmix—stop as soon as you no longer see dry flour streaks. Overmixing develops gluten, which makes cookies tough instead of tender.
Step 5: Chill the Dough
Divide the dough in half and shape each portion into a flat disc about 1 inch thick. Wrap each disc tightly in plastic wrap. Refrigerate for at least 1 hour or up to 2 days. Chilled dough is much easier to roll and cut, and it prevents the cookies from spreading too much during baking.
Step 6: Preheat and Prepare
When ready to bake, preheat your oven to 350°F (175°C). Line two large baking sheets with parchment paper or silicone baking mats. Never skip this step—it prevents sticking and ensures easy cleanup.
Step 7: Roll Out the Dough
Remove one dough disc from the refrigerator. Let it sit at room temperature for 5-10 minutes to soften slightly. On a lightly floured surface, roll the dough to about ¼-inch thickness. Use a ruler to check if needed—consistent thickness ensures even baking. If the dough becomes too soft or sticky while rolling, pop it back in the fridge for 10 minutes.
Step 8: Cut the Shapes
Dip your Thanksgiving Cookies cutters in flour before each cut to prevent sticking. Press firmly straight down through the dough, then lift straight up. Cut shapes as close together as possible to minimize dough scraps. Use a thin spatula to carefully transfer cut cookies to your prepared baking sheets, spacing them about 2 inches apart.
Step 9: Re-roll Scraps
Gather dough scraps, press them together gently, re-roll, and cut more shapes. You can re-roll scraps 2-3 times, though the first roll produces the most tender cookies. If the dough becomes too warm and sticky, chill it for 15 minutes before continuing.
Step 10: Bake to Perfection
Bake cookies for 10-12 minutes, until the edges are just barely golden. The centers may look slightly underdone—that’s perfect! They’ll continue cooking on the hot pan after you remove them from the oven. Let cookies cool on the baking sheet for 5 minutes, then transfer to wire racks to cool completely before decorating.
Step 11: Prepare Royal Icing
While cookies cool, make your royal icing. In a large bowl, combine powdered sugar and meringue powder. Add 6 tablespoons of warm water and beat with an electric mixer on low speed for 7-10 minutes until the icing forms stiff, glossy peaks. The consistency should hold its shape when you lift the beaters.
Step 12: Color Your Icing
Divide the royal icing into separate bowls—one for each color you plan to use. Add gel food coloring drop by drop, mixing thoroughly after each addition, until you reach your desired shades. For Thanksgiving, create burnt orange, deep red, golden yellow, chocolate brown, and forest green.
Step 13: Adjust Icing Consistency
For outlining cookies, use thick icing straight from the bowl. For flooding (filling in large areas), thin the icing with water, adding ½ teaspoon at a time, until it reaches the consistency of honey. When you drizzle it, it should settle back into itself within 10-15 seconds.
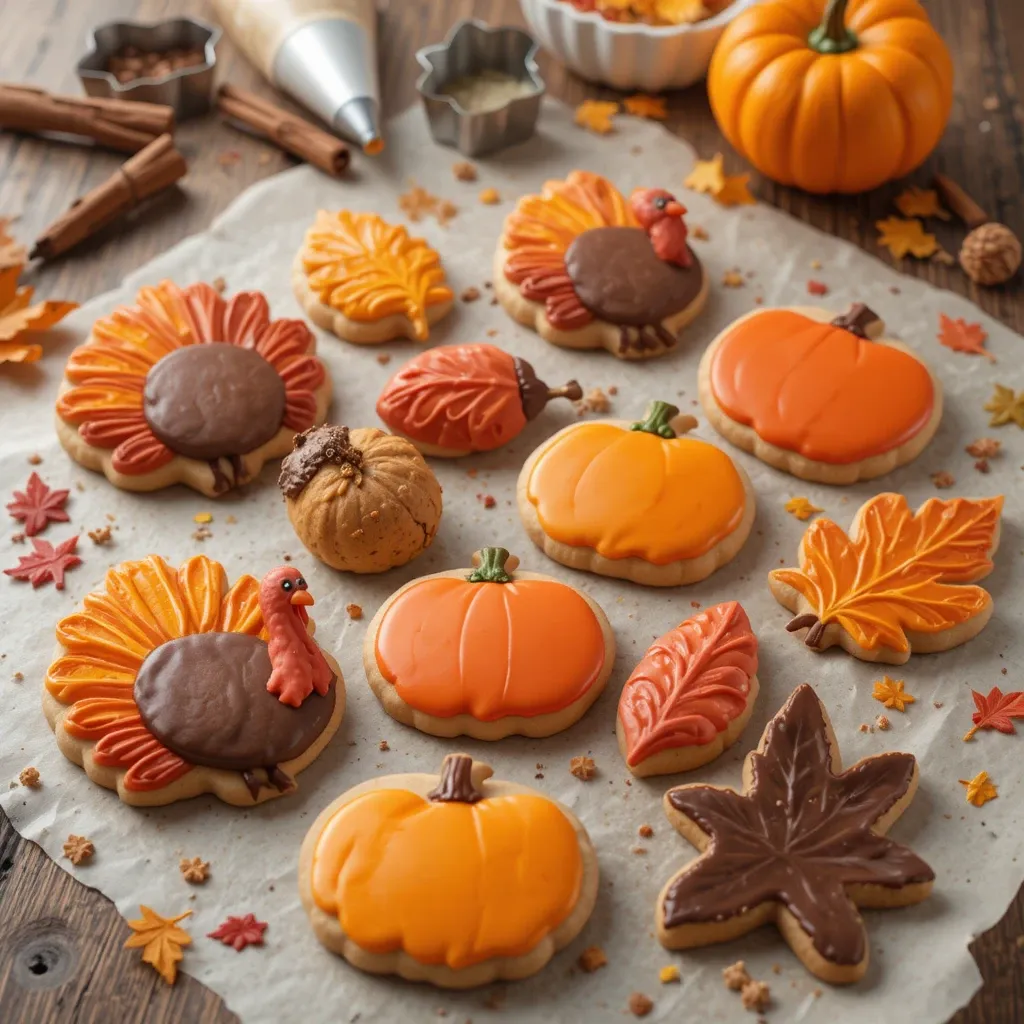
Step 14: Decorate Your Cookies
Transfer icing to piping bags fitted with small round tips. First, outline each cookie with thick icing and let it set for 5-10 minutes. Then, fill in the outlined area with thinned icing, using a toothpick to spread it evenly and pop any air bubbles. Let the base coat dry for at least 1 hour before adding details like turkey feathers, leaf veins, or facial features.
Step 15: Add Final Details
Once the base icing is completely dry to the touch, add intricate details using thick icing in contrasting colors. Pipe turkey feathers in rainbow layers, add faces to pumpkins, or create realistic leaf veins. Sprinkle with edible glitter or sanding sugar while the details are still wet. Let cookies dry completely—4 to 6 hours or overnight—before stacking or packaging.
What to Serve Thanksgiving Cookies Cutters With
Perfect Beverage Pairings
Serve your Thanksgiving cookies. pumpkin spice lattes, or hot chocolate topped with whipped cream. For adults, pair them with spiced chai tea, Irish coffee. The spices in these drinks complement the buttery sweetness of the cookies perfectly.
Complementary Desserts
Create a stunning dessert table by serving Thanksgiving cookies with mini pumpkin pies, apple crisp, pecan tarts, or cranberry bars. The variety of textures and flavors gives guests options while keeping the autumn theme consistent. Arrange cookies on tiered stands for visual impact.
Savory Balance Options
Balance the sweetness by offering a cheese board with sharp cheddar, creamy brie, and aged gouda alongside dried fruits and nuts. Or serve cookies after the main Thanksgiving meal with coffee as guests relax and enjoy conversation. They also pair beautifully with vanilla ice cream for an indulgent treat.
Top Tips for Perfecting Thanksgiving Cookies
Temperature Control is Everything
Always work with cold dough when rolling and cutting shapes. If your kitchen is warm, chill the rolled dough for 10 minutes before cutting shapes. This prevents spreading during baking and keeps edges sharp and defined. Also, ensure your butter is softened (not melted) when making dough—it should leave a slight indent when pressed but not be greasy.
Invest in Quality Cookie Cutters
Metal cookie cutters with sharp edges create cleaner shapes than plastic versions. Look for sets with comfortable grips or handles for easier cutting. Stainless steel cutters are dishwasher-safe and last forever. Sets typically range from 6-12 pieces and include essential Thanksgiving shapes like turkeys, pumpkins, and autumn leaves.
Master the Art of Royal Icing Consistency
The key to professional-looking decorated cookies is nailing your icing consistency. Outlining requires thick icing that holds its shape (toothpaste consistency). Flooding requires thinner icing that flows smoothly (honey consistency). Test on a plate before decorating your actual cookies. Add water literally by drops—it’s easier to thin than to thicken icing.
Plan Your Color Palette
Use gel food coloring instead of liquid—it’s more concentrated and won’t thin your icing. Create a cohesive look by choosing 3-5 colors that complement each other. For Thanksgiving, classic combinations include orange/brown/yellow or red/gold/burgundy. Mix custom shades by combining colors—orange + brown creates burnt sienna, yellow + red makes deep orange.
Prevent Common Baking Mistakes
Don’t skip chilling the dough—it’s the most important step for maintaining shape. Don’t overbake—slightly underdone cookies are perfect since they continue cooking on the hot pan. Don’t decorate warm cookies—icing will melt and slide off. Don’t stack decorated cookies until icing is completely dry (overnight is safest).
Smart Ingredient Substitutions
Can’t find meringue powder? Substitute with 2 large egg whites for royal icing, though it won’t keep as long. Need dairy-free cookies? Use vegan butter sticks (not margarine) at a 1:1 ratio. Want gluten-free? Use a gluten-free baking flour blend designed for cookies—regular gluten-free flour won’t work. For egg-free dough, use ¼ cup unsweetened applesauce instead of the egg.
Time-Saving Strategies
Make dough up to 3 days ahead and keep refrigerated. Bake cookies up to 1 week ahead and store undecorated in airtight containers. Freeze unbaked cut shapes on baking sheets, then transfer to freezer bags—bake from frozen, adding 2 minutes to baking time. Decorate cookies assembly-line style, doing one color or one step at a time across all cookies.
Storing and Reheating Tips
Short-Term Storage for Undecorated Cookies
Store completely cooled, undecorated cookies in an airtight container at room temperature for up to 1 week. Place parchment paper between layers to prevent sticking. Keep containers in a cool, dry place away from direct sunlight. Undecorated cookies actually taste better after a day—the flavors meld and develop.
Storing Decorated Cookies
Once royal icing is completely dry (overnight), store decorated cookies in a single layer in airtight containers. Place sheets of wax paper or parchment between layers if you must stack them. Store at room temperature for up to 2 weeks. Keep away from humidity, which can make icing weep or colors bleed. Never refrigerate decorated cookies—condensation ruins the icing.
Freezing Cookies for Long-Term Storage
Undecorated baked cookies freeze beautifully for up to 3 months. Let them cool completely, then freeze in a single layer on baking sheets for 1 hour. Transfer frozen cookies to freezer-safe bags or containers, removing as much air as possible. Thaw at room temperature for 30 minutes before decorating. You can also freeze cookie dough (wrapped tightly) for up to 3 months.
Reheating and Refreshing Tips
If cookies become slightly stale, restore their texture by placing them on a baking sheet in a 300°F oven for 3-5 minutes. This refreshes the buttery flavor and crisp edges. Let them cool completely before eating or decorating. For cookies that absorbed humidity and became soft, the brief oven treatment also helps restore some crispness.
Packaging for Gifting
Package decorated cookies in cellophane bags tied with ribbon for gorgeous gifts. Place cookies in small bakery boxes lined with tissue paper for a professional presentation. Include a “best by” date (2 weeks from decoration) on gift tags. Keep gifted cookies at room temperature and away from heat sources.
Frequently Asked Questions About Thanksgiving Cookie Cutters
What are the best shapes for Thanksgiving cookie cutters?
The most popular Thanksgiving cookie cutter shapes include turkeys (with fanned tails), pumpkins, autumn leaves (maple and oak), acorns, pilgrim hats, cornucopias, and sunflowers. A basic 6-8 piece set covers all these essentials. Look for sets that include multiple sizes of the same shape for variety.
Can I use Thanksgiving cookie cutters for other desserts besides cookies?
Absolutely! Use Thanksgiving cookie cutters to cut shapes from brownies, Rice Krispies treats, fudge, sandwich bread (for themed sandwiches), pancakes, cheese slices, pie crust decorations, fondant cake toppers, and even soft fruits like watermelon. They’re incredibly versatile kitchen tools.
How do I prevent cookie dough from sticking to my cutters?
Dip your cookie cutters in flour before each cut, tapping off excess. This creates a non-stick barrier between the cutter and dough. Alternatively, use powdered sugar instead of flour for a slightly sweeter edge. Make sure your dough is properly chilled—warm, sticky dough always causes problems.
What’s the difference between metal and plastic cookie cutters?
Metal cookie cutters (especially stainless steel) have sharper edges that create cleaner cuts with more defined details. They’re dishwasher-safe, durable, and last for years. Plastic cutters are less expensive, lighter, and safer for kids to use, but they may not cut as cleanly and can warp over time. Copper cutters are beautiful but require hand-washing and can tarnish.
How thick should I roll cookie dough for using cookie cutters?
Roll dough to ¼-inch thickness for best results. This creates cookies that are sturdy enough to decorate but still tender to bite. Thinner cookies (⅛-inch) become crispy and fragile. Thicker cookies (½-inch) stay very soft but may not bake evenly. Use rolling pin rings or guide sticks to maintain consistent thickness.
Can I make Thanksgiving cookies without special cookie cutters?
Yes! Use a sharp knife to hand-cut shapes freehand, use the rim of a glass for round cookies that you decorate with Thanksgiving themes, or use regular shaped cutters (hearts, circles, squares) and decorate them with Thanksgiving colors and designs. You can also create templates from cardboard and cut around them
How far in advance can I make Thanksgiving cookies?
Bake undecorated cookies up to 1 week ahead and store in airtight containers. Decorate them up to 5 days before serving—royal icing-decorated cookies stay fresh for 2 weeks when properly stored. Freeze baked, undecorated cookies for up to 3 months, or freeze cookie dough for up to 3 months. This makes Thanksgiving prep much easier!
Why did my cookies spread and lose their shape?
Cookie spreading happens when dough is too warm, butter was melted instead of softened, you didn’t chill the dough long enough, or your oven temperature is too low. Always chill dough for at least 1 hour, work quickly when cutting shapes, and consider chilling cut shapes for 10 minutes before baking. Use an oven thermometer to verify temperature accuracy.
What’s the best way to get intricate details with royal icing?
Use piping bags with small round tips (#2 or #3) for fine details. Practice pressure control on parchment paper first. Work with thick-consistency icing for details—it holds its shape better. Let base colors dry completely before adding details on top. Use a toothpick to fix mistakes immediately. Watch YouTube tutorials for specific techniques like feather designs or leaf veining.
Can I use butter-flavored sprinkles or edible glitter on royal icing?
Yes! Add sprinkles, sanding sugar, edible glitter, edible gold dust, or pearl dragées while royal icing is still wet—they’ll stick as the icing dries. For best adhesion, add decorations within 5 minutes of flooding or piping. Once icing dries completely, you’ll need edible glue to attach additional decorations.
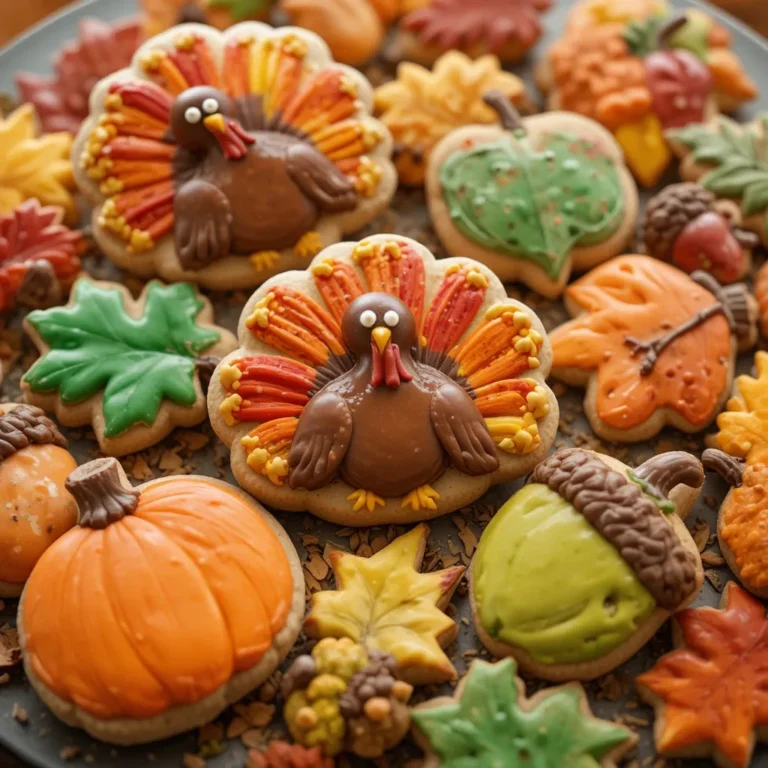
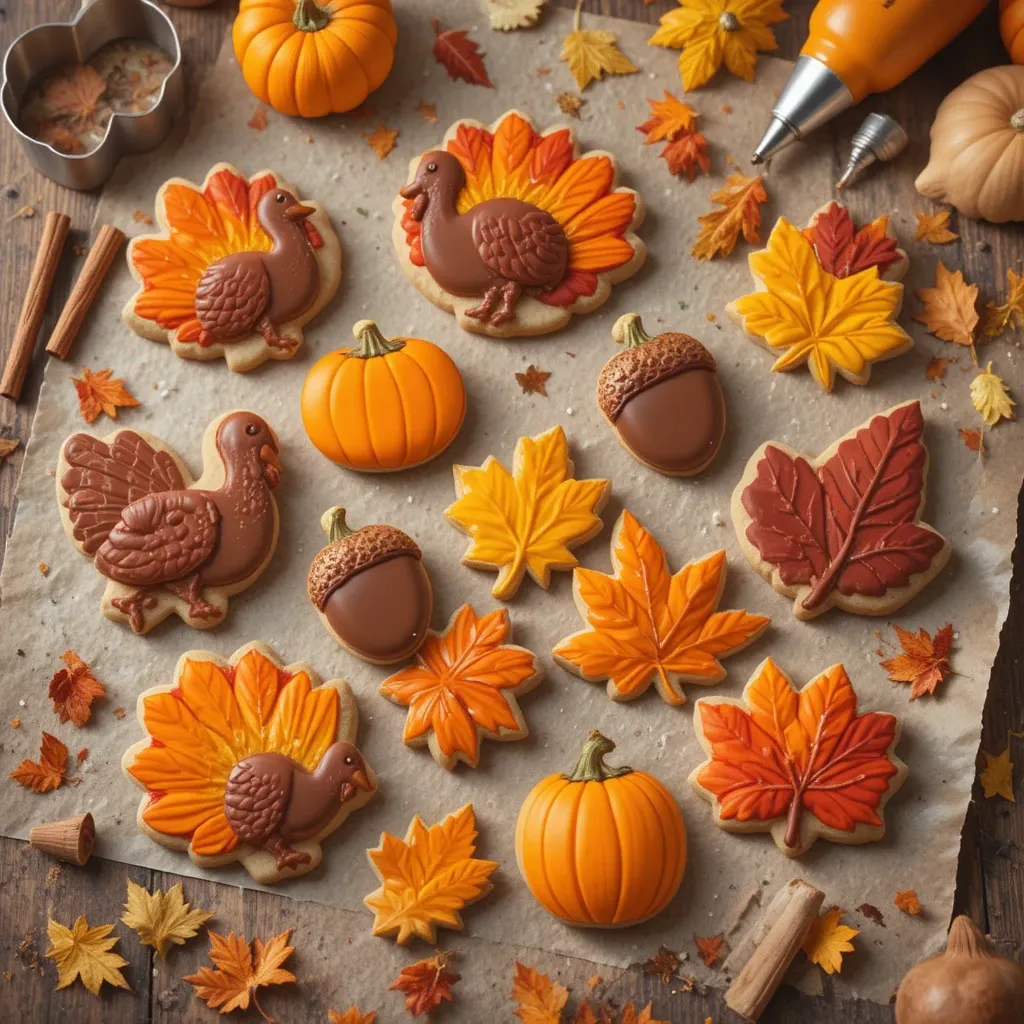
Creative Thanksgiving Cookie Decoration Ideas
Turkey Cookie Design Inspiration
Create show-stopping turkey cookies by using brown icing for the body and vibrant rainbow feathers in red, orange, yellow, and green. Add a white face with an orange beak and red wattle. Use edible markers to draw eyes and add personality. For 3D effect, pipe thick dots of icing to create textured feathers. Kid-friendly version: trace handprints for simple turkey shapes.
Autumn Leaf Variations
Make realistic leaves by using multiple shades of the same color—start with yellow base, add orange drips, finish with red edges to create natural gradient effects. Add vein details with thin brown or dark green icing. Dust with edible gold shimmer for elegant presentation. Mix maple leaf, oak leaf, and simple oval leaf shapes for variety.
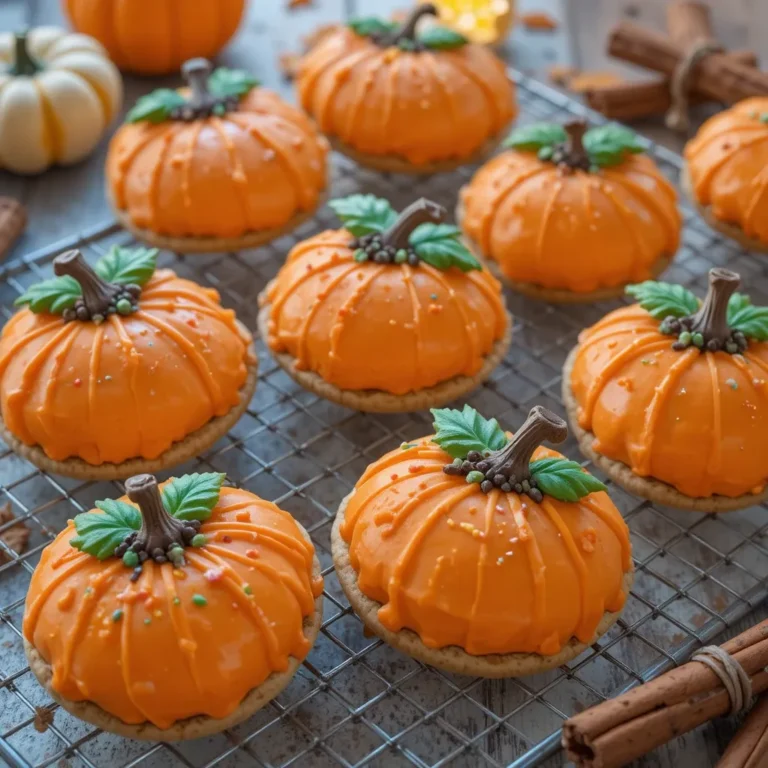
Elegant Pumpkin Designs
Go beyond basic orange pumpkins. Try white ghost pumpkins, green and white striped heirloom varieties, or metallic gold pumpkins. Add dimensional texture by piping vertical ridges. Create pumpkin patch scenes by decorating multiple small pumpkin cookies together. Add curling vine details with green icing for botanical accuracy.
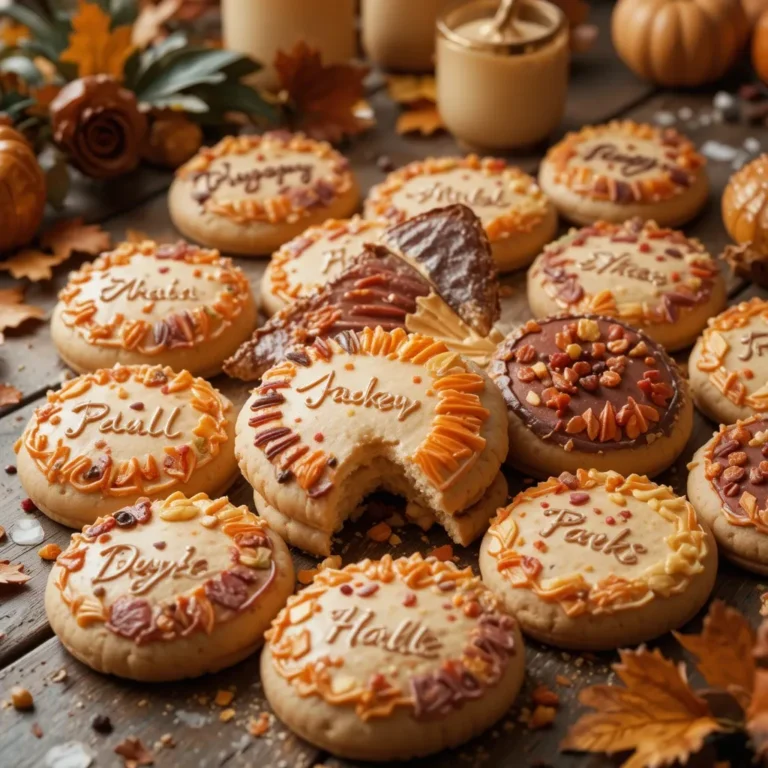
Gratitude Message Cookies
Use round or square cookies as canvases for thankful messages. Write words like “Grateful,” “Blessed,” “Thankful,” “Gather,” or “Feast” in elegant script using edible markers or piped icing. Surround words with small fall leaf or acorn designs. These make beautiful place cards at your Thanksgiving table.
Nutrition Information
| Nutrient | Per Cookie (undecorated) |
|---|---|
| Calories | 95 |
| Total Fat | 4.5g |
| Saturated Fat | 2.5g |
| Cholesterol | 20mg |
| Sodium | 45mg |
| Total Carbohydrates | 13g |
| Dietary Fiber | 0g |
| Sugars | 6g |
| Protein | 1g |
Note: Nutrition values are approximate and will vary based on size and decoration. Royal icing adds approximately 30-40 additional calories per cookie.
Make This Thanksgiving Unforgettable
Using Thanksgiving cookie cutters transforms ordinary baking into a cherished holiday tradition. Whether you’re crafting turkey cookies with your children, preparing elegant leaf-shaped treats for dinner guests, or packaging decorated cookies as heartfelt gifts, these tools make creating memorable moments deliciously simple.
The beauty of Thanksgiving cookie cutters lies in their ability to bring families together in the kitchen. Kids love choosing shapes, rolling dough, and decorating with colorful icing. Adults appreciate the creative outlet and the ability to customize flavors and designs to match their Thanksgiving aesthetic.
Start your new tradition this year by investing in a quality Thanksgiving cookie cutter set. With the techniques, tips, and recipes shared in this guide, you’ll create bakery-worthy cookies that taste even better than they look. Your Thanksgiving table deserves these special touches, and your family will remember these sweet moments for years to come.
Happy baking, and happy Thanksgiving from our kitchen to yours!