Thanksgiving Cookies Funny Step by Step Recipe
Turkey in the oven, the sweet potato casserole is bubbling away, and suddenly you remember dessert. Enter these thanksgiving cookies funny – the most adorable, giggle-inducing treats that’ll steal the show from your pumpkin pie!
These buttery, melt-in-your-mouth cookies decorated with playful Thanksgiving designs are easier than making your morning coffee. They’re the perfect combination of festive charm and belly laughs, whether you’re creating googly-eyed turkeys, grumpy pilgrim faces, or cornucopias overflowing with candy.
Much like my famous Pumpkin Spice Blondies that readers can’t stop raving about, these cookies are quick to whip up and guaranteed crowd-pleasers. Trust me, once you see Aunt Martha’s face light up at a cookie shaped like a turkey wearing sunglasses, you’ll be hooked!
What Are Thanksgiving Cookies Funny?
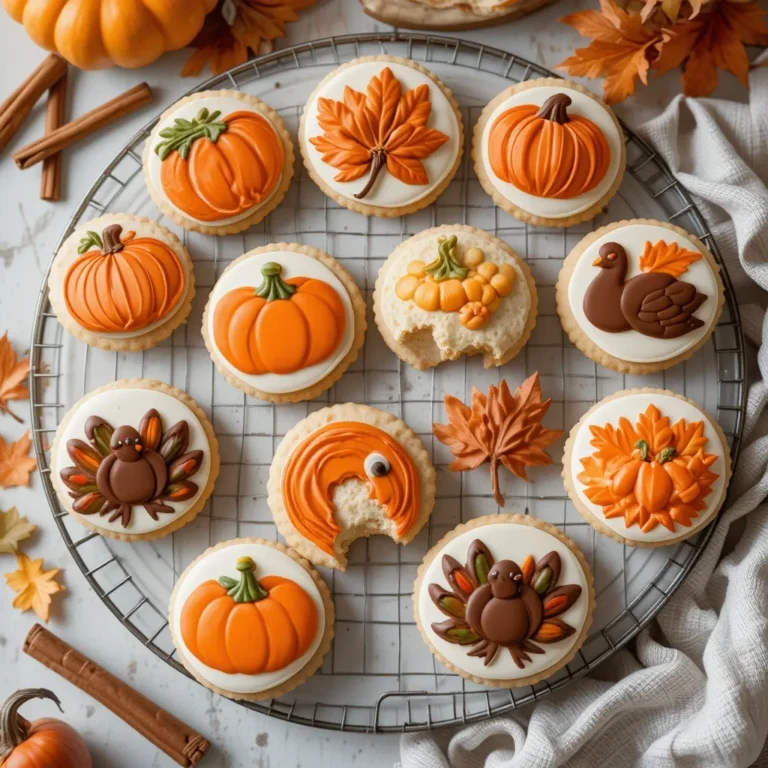
Let’s be real – what makes a cookie “funny” anyway? Is it the wobbly turkey that looks more like a blob with legs? The pilgrim hat that’s leaning like the Tower of Pisa? Absolutely! These thanksgiving cookies funny are your regular sugar or butter cookies transformed into hilarious holiday characters that celebrate the quirky side of Turkey Day.
Maybe you’ll pipe “I’m Stuffed” on a turkey belly or create a potato that says “I Yam What I Yam.” After all, they say the way to anyone’s heart is through their stomach, but the way to their funny bone is through cookies with personality! So grab your apron, channel your inner comedian, and let’s bake some memories that taste as good as they look ridiculous.
Why You’ll Love This Thanksgiving Cookies Funny Recipe
They’re Conversation Starters with Serious Deliciousness
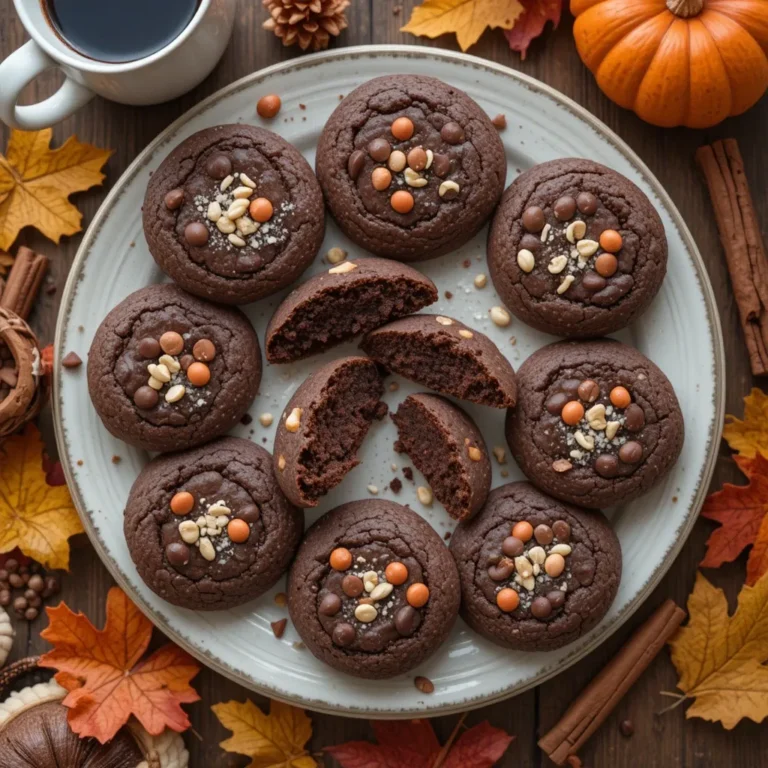
These aren’t just cookies – they’re edible entertainment! While everyone else is serving the same old pumpkin pie, you’ll be serving up smiles with cookies that feature turkeys doing yoga, pilgrims with mustaches, or cornucopias spilling jelly beans. The soft, buttery base recipe is foolproof and tastes incredible even before you add the decorations. Each bite melts in your mouth with hints of vanilla and butter that’ll make you close your eyes in pure bliss.
Save Money While Making Memories
Forget spending $40 on a fancy bakery platter that looks too perfect to touch. Making these thanksgiving cookies funny at home costs a fraction of the price – we’re talking under $15 for enough cookies to feed a small army. Plus, you can customize them to match your family’s inside jokes and traditions. Remember Uncle Bob’s legendary turkey-carving mishap of 2019? Make a cookie about it! Store-bought can’t compete with that personal touch.
Endless Decoration Possibilities
The real magic happens with the toppings and decorations. Royal icing in autumn colors, candy eyes that wobble, pretzel antlers, chocolate chip “stuffing,” M&M feathers, and sprinkles in every fall shade imaginable. You can go elegant with hand-painted leaves or hilariously chaotic with mismatched googly eyes and crooked smiles.
If you loved decorating my Christmas Sugar Cookie Cutouts last winter, you’ll absolutely adore the creative freedom these thanksgiving cookies funny offer. The best part? Kids can help, and their “imperfect” decorations often turn out to be the funniest and most beloved cookies on the plate!
How to Make Thanksgiving Cookies Funny
Quick Overview
These thanksgiving cookies funny are surprisingly simple to create, even for baking beginners. You’ll start with a classic butter cookie base that’s soft, flavorful, and holds its shape beautifully – no spreading into unrecognizable blobs here! The dough comes together in about 15 minutes, chills for an hour, then bakes to golden perfection in just 10-12 minutes.
The real fun begins with decorating, where you can spend as much or as little time as you want creating your funny Thanksgiving characters. From start to finish, you’re looking at approximately 2-3 hours including chill time, but most of that is hands-off.
The actual active time is around 45 minutes for mixing, rolling, cutting, and baking. Then set aside another 30-60 minutes for decorating, depending on how elaborate you want to get. Trust me, once you start, you won’t want to stop!
Key Ingredients for Thanksgiving Cookies Funny
For the Cookie Base:
- 3 cups all-purpose flour
- 1 teaspoon baking powder
- ½ teaspoon salt
- 1 cup (2 sticks) unsalted butter, softened to room temperature
- 1 cup granulated sugar
- 1 large egg
- 2 teaspoons pure vanilla extract
- 1 teaspoon almond extract (optional, but adds amazing depth)
For the Royal Icing:
- 4 cups powdered sugar, sifted
- 3 tablespoons meringue powder
- 5-6 tablespoons warm water
- Food coloring (orange, red, yellow, brown, black)
For Funny Decorations:
- Candy eyes in various sizes
- Mini chocolate chips
- Orange candy melts or M&Ms (for turkey beaks and feet)
- Pretzel sticks (for antlers or turkey legs)
- Red fruit leather or Red Hots (for turkey wattles)
- Fall-colored sprinkles and sanding sugar
- Black edible marker for drawing faces and details
- Candy corn (classic Thanksgiving vibes)
Step-by-Step Instructions
Step 1: Prepare the Cookie Dough
In a medium bowl, whisk together flour, baking powder, and salt until well combined. Set this aside for now. In a large mixing bowl or stand mixer, beat the softened butter and sugar together on medium-high speed for about 3-4 minutes until the mixture is light, fluffy, and pale in color. This step is crucial for creating that perfect tender texture!
Step 2: Add Wet Ingredients
Reduce the mixer speed to low and add the egg, vanilla extract, and almond extract if using. Beat until everything is fully incorporated and the mixture looks smooth and creamy. Don’t worry if it looks slightly curdled – that’s normal at this stage.
Step 3: Combine Wet and Dry
Gradually add the flour mixture to the butter mixture, about one cup at a time, mixing on low speed. Beat just until the dough comes together and no flour streaks remain. Be careful not to overmix, as this can make your cookies tough instead of tender. The dough should be soft but not sticky.
Step 4: Chill the Dough
Divide the dough into two equal portions and flatten each into a disc about 1 inch thick. Wrap each disc tightly in plastic wrap and refrigerate for at least 1 hour or up to 3 days. This chilling step is essential for cookies that hold their shape and don’t spread during baking. It also makes the dough much easier to roll out.
Step 5: Roll and Cut
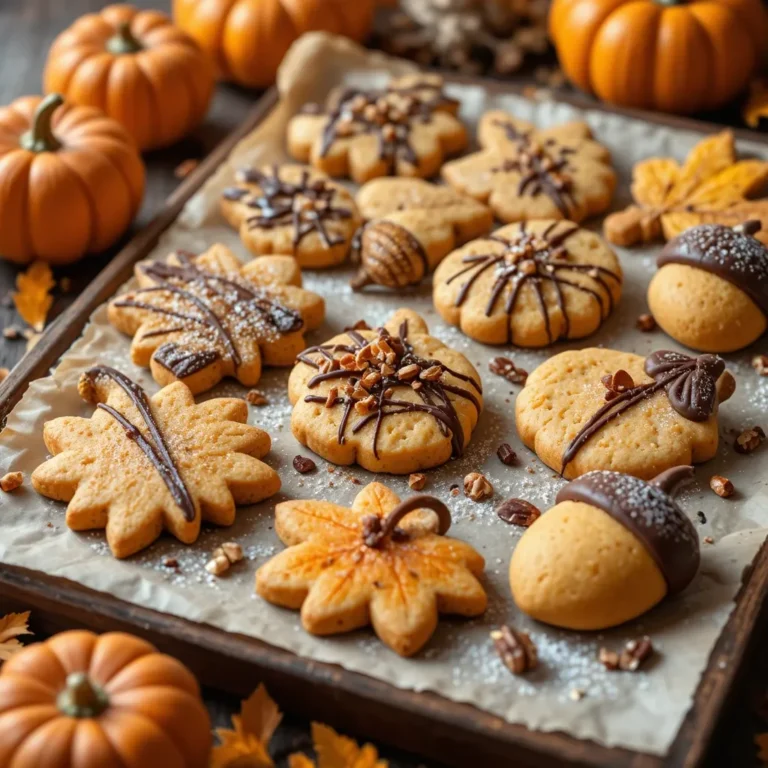
Preheat your oven to 350°F (175°C) and line baking sheets with parchment paper. Remove one disc of dough from the refrigerator and let it sit at room temperature for about 5 minutes to soften slightly. On a lightly floured surface, roll the dough to about ¼ inch thickness. Use Thanksgiving-themed cookie cutters like turkeys, pilgrim hats, pumpkins, leaves, or acorns to cut out shapes. Re-roll scraps and continue cutting until all dough is used.
Step 6: Bake to Perfection
Place cookies on prepared baking sheets, leaving about 2 inches between each cookie. Bake for 10-12 minutes, or until the edges are just barely starting to turn light golden brown. The centers might look slightly underdone, but they’ll continue cooking as they cool. Let cookies cool on the baking sheet for 5 minutes, then transfer to a wire rack to cool completely before decorating.
Step 7: Make Royal Icing
While cookies cool, prepare your royal icing. In a large bowl, combine powdered sugar and meringue powder. Add 5 tablespoons of warm water and beat with an electric mixer on low speed for about 7-10 minutes until the icing is thick, glossy, and holds stiff peaks. If it’s too thick, add water one teaspoon at a time. If too thin, add more powdered sugar.
Step 8: Color Your Icing
Divide the icing into separate bowls and add food coloring to create your desired colors. For thanksgiving cookies funny, you’ll want orange, brown, red, yellow, and black. For “flooding” or covering large areas, thin some icing with a few drops of water until it’s the consistency of honey. For piping details and outlines, keep the icing thick.
Step 9: Decorate with Humor
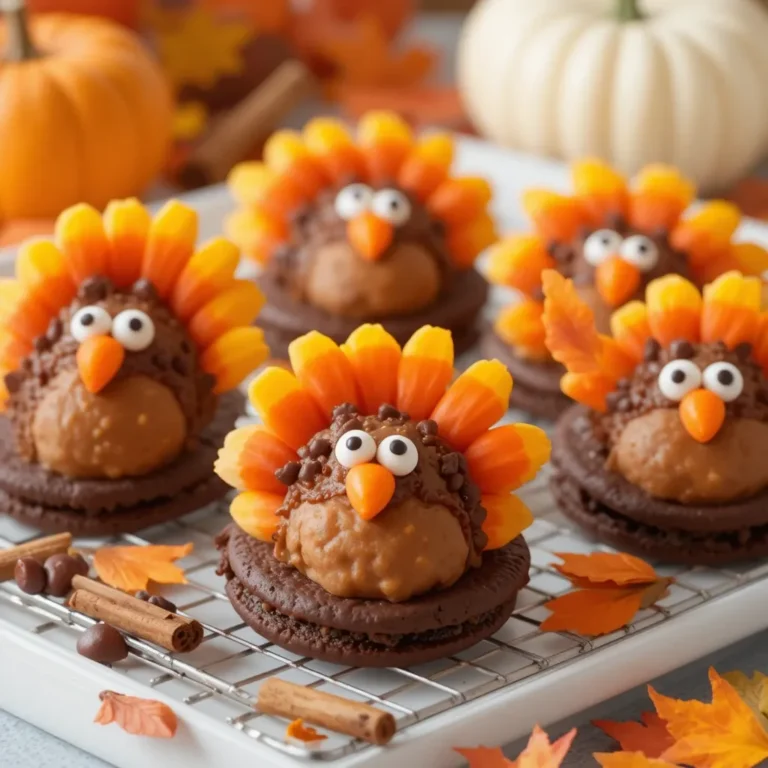
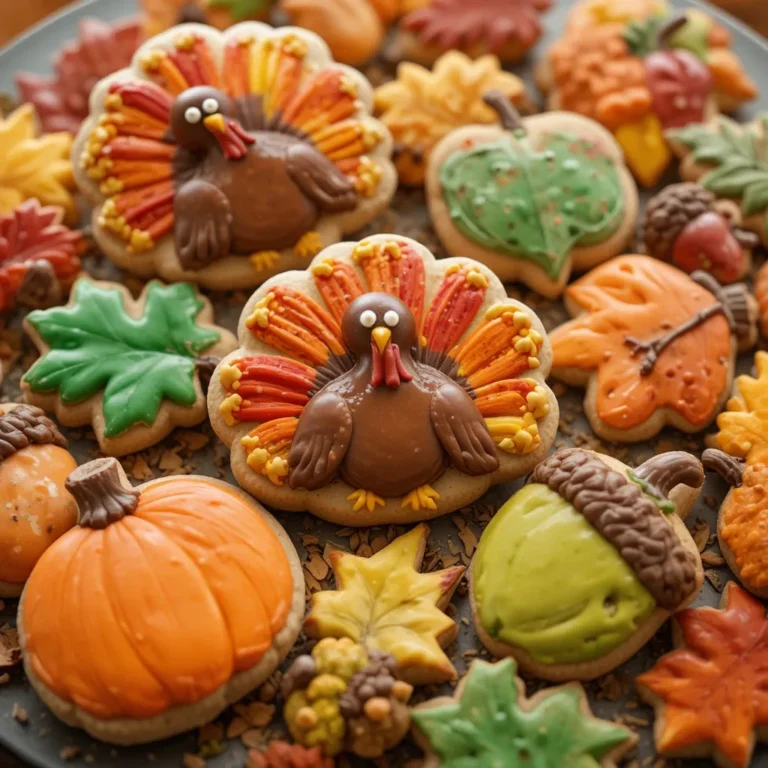
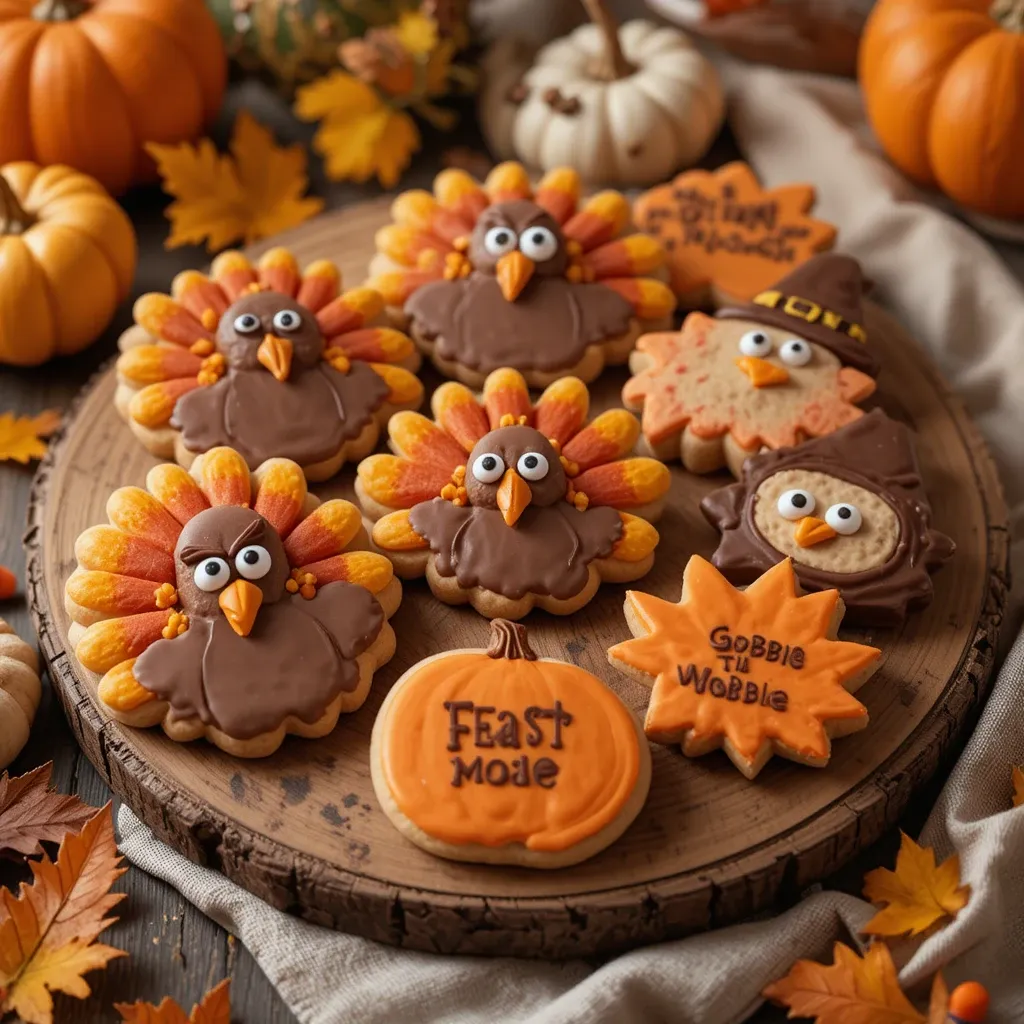
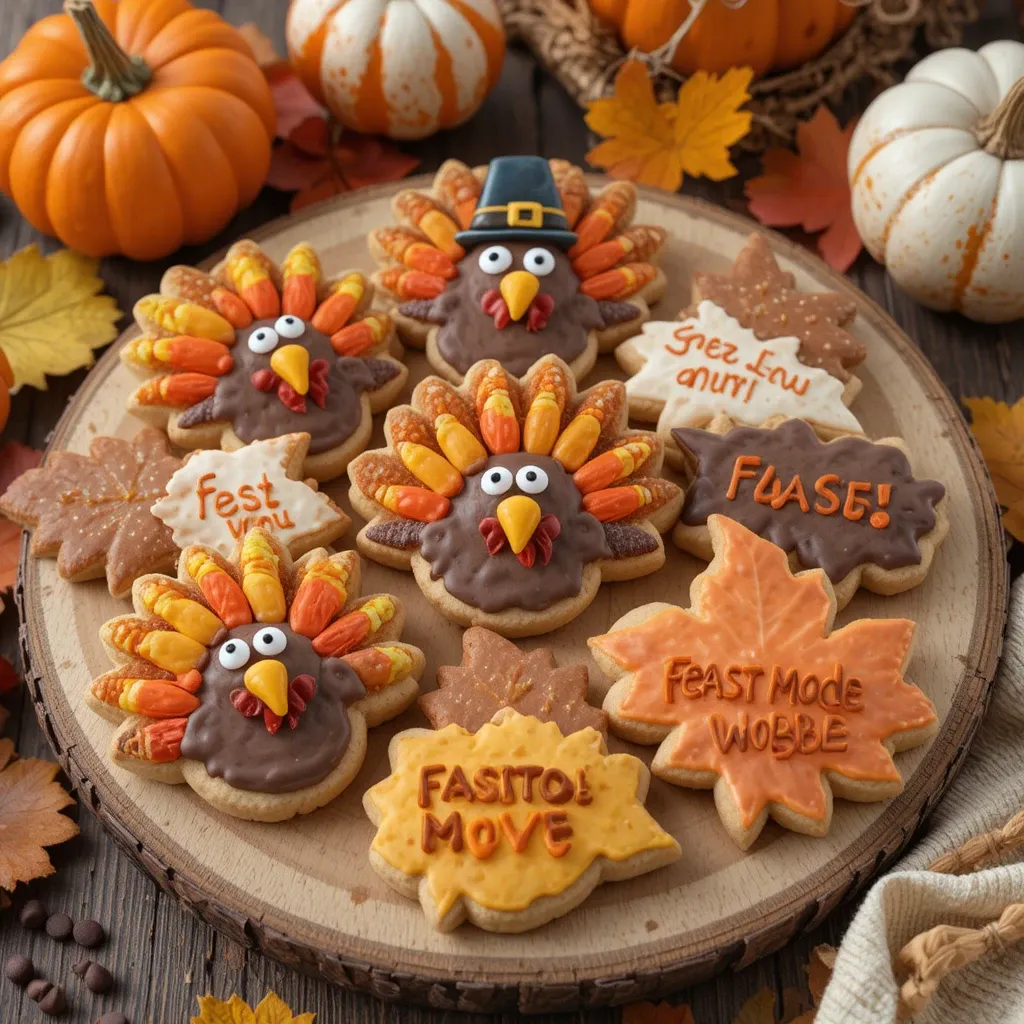
Now the fun part! Use piping bags fitted with small round tips to outline and fill your cookies. Let each color dry for about 15 minutes before adding the next layer to prevent bleeding. Here’s where you get creative with your funny designs: Add googly candy eyes in silly positions, pipe wobbly turkey feathers in rainbow colors, create grumpy pilgrim expressions with black icing, add candy corn feathers, or write funny phrases like “Feast Mode” or “Talk Turkey to Me.” Use the edible marker for final details like eyebrows, smiles, or drawing tiny pilgrim buckles.
Step 10: Let Them Set
Allow decorated cookies to dry completely for at least 2-4 hours or overnight before stacking or packaging. The icing needs time to harden so your beautiful (and hilarious) designs don’t smudge. Store in an airtight container with parchment paper between layers.
What to Serve Thanksgiving Cookies Funny With
These thanksgiving cookies funny are incredibly versatile and pair wonderfully with various beverages and desserts. Serve them alongside steaming mugs of hot apple cider or pumpkin spice lattes for the ultimate fall experience. They’re perfect on a dessert platter next to traditional Thanksgiving pies, offering a lighter, more playful option for guests who want something sweet but not too heavy.
Consider setting up a “cookie decorating station” before Thanksgiving dinner where kids (and playful adults) can decorate their own funny cookies while the turkey finishes roasting. Provide small bowls of different colored icings, candy eyes, and various decorations, and watch the hilarity unfold.
These cookies also make fantastic take-home party favors when wrapped in clear cellophane bags tied with orange ribbon. They pair beautifully with vanilla ice cream for a casual post-dinner treat, or serve them with a cheese plate for an unexpectedly delightful sweet and savory combination. Don’t forget to have plenty of cold milk on hand – these cookies practically beg to be dunked!
Top Tips for Perfecting Thanksgiving Cookies Funny
Don’t Skip the Chilling Step
I know you’re excited to get baking, but properly chilled dough is the secret to cookies that hold their shape. If your dough gets warm while rolling, pop it back in the fridge for 10 minutes. Warm dough equals fuzzy turkey shapes that look more like amoebas!
Invest in Quality Cookie Cutters
Sharp, sturdy metal cookie cutters create cleaner edges than cheap plastic ones. This makes decorating so much easier and your finished cookies look more professional. Look for cutters with fun Thanksgiving shapes beyond just basic turkeys – think acorns, cornucopias, and even tiny pie slices.
Master Two Icing Consistencies
For outlining, you want thick icing that holds its shape (toothpaste consistency). For flooding or filling in large areas, thin it with water until it’s like honey and smooths itself out. This two-icing technique is what separates amateur cookies from bakery-quality ones.
Embrace Imperfection for Maximum Humor
Remember, these are thanksgiving cookies funny, not thanksgiving cookies perfect! Wonky eyes, crooked smiles, and lopsided decorations often turn out to be the funniest and most charming cookies. Don’t stress if your turkey looks drunk or your pilgrim hat is sliding off – that’s the point!
Work in Stages
Don’t try to decorate all your cookies in one marathon session. Do the base layer on all cookies, let them dry completely, then come back for details. This prevents smudging and reduces stress. Put on your favorite holiday playlist,, and enjoy the process.
Use Flood Icing Wisely
When flooding cookies with icing, use a toothpick to gently guide the icing into corners and along edges. This prevents air bubbles and creates a smooth, professional finish. Pop any bubbles that appear with a clean toothpick immediately.
Let Kids Be Creative Directors
If decorating with children, give them pre-outlined cookies with dried icing so they can focus on the fun details without the mess of flooding. Their creative interpretations often result in the funniest cookies that everyone fights over at the dessert table.
Storing and Reheating Tips
Room Temperature Storage
Once your thanksgiving cookies funny are completely decorated and the icing has fully hardened (at least 4-6 hours), store them in an airtight container at room temperature. Layer cookies with parchment or wax paper between each layer to prevent sticking and preserve those adorable decorations. Properly stored, these cookies stay fresh and delicious for up to 2 weeks. Keep them away from humid areas like near the sink or dishwasher, as moisture can make the icing weep or become sticky.
Freezing for Future Festivities
These cookies freeze beautifully, both before and after decorating! For undecorated cookies, let them cool completely, then freeze in a single layer on a baking sheet for 1 hour. Transfer to freezer bags or airtight containers with parchment between layers. They’ll keep for up to 3 months. Thaw at room temperature for about 30 minutes before decorating.
For decorated cookies, freeze the same way but be extra careful with packaging to protect your artistic masterpieces. I like using rigid plastic containers to prevent crushing. When ready to serve, let them thaw in the container at room temperature for 2-3 hours. Never thaw in the microwave or refrigerator as this can cause condensation and ruin the icing.
Gifting and Transportation
If you’re traveling to a Thanksgiving celebration with these cookies, wait until the icing is completely hard (overnight is best). Package them in a sturdy container with plenty of parchment paper between layers. For extra protection during transport, you can even place paper towels between layers to cushion them. Keep the container flat in your car – no stacking bags on top!
No Reheating Necessary
These cookies are meant to be enjoyed at room temperature and should never be reheated. Their tender, buttery texture is perfect as-is. However, if you’ve frozen them and want to serve them slightly warm, you can let them come to room temperature, then place them in a warm (not hot) oven at 200°F for just 3-4 minutes. This is completely optional but can give them a fresh-baked aroma.
Frequently Asked Questions
Can I make the cookie dough ahead of time?
Absolutely! The dough actually improves with age. Make it up to 5 days ahead and keep it wrapped tightly in the refrigerator, or freeze it for up to 3 months. Just remember to let it soften slightly at room temperature before rolling so it’s not rock-hard and cracking.
What if I don’t have cookie cutters?
No problem! You can print Thanksgiving shapes online, place them on rolled dough, and cut around them with a sharp knife. You can also free-hand simple shapes like leaves and pumpkins. Some people even use drinking glasses to cut circles and create their own unique designs on round cookies.
How do I prevent my icing colors from bleeding together?
The key is patience! Always let one color dry completely (about 15-20 minutes) before piping another color directly next to it. You can speed up drying time by placing cookies in front of a fan. If you’re in a hurry, use a hairdryer on the cool setting to set the icing faster.
Can I use regular frosting instead of royal icing?
You can, but royal icing works best for decorating because it dries hard and smooth, allowing you to stack cookies without smudging. Regular buttercream stays soft and can get messy. However, if you’re decorating with kids and want to eat them immediately, buttercream is more forgiving and tastes richer.
What’s the best way to write funny sayings on cookies?
Use a food-safe edible marker after the base icing has completely dried, or use thick royal icing in a small piping bag with a tiny round tip. Practice your sayings on parchment paper first! Popular funny phrases include “Gobble Til You Wobble,” “I’m Just Here for the Pie,” “Netflix and Pilgrim,” and “Feast Mode Activated.”
Can I make these cookies gluten-free?
Yes! Substitute the all-purpose flour with a 1:1 gluten-free baking flour blend. Bob’s Red Mill and King Arthur both make excellent blends. The cookies might be slightly more delicate, so handle them gently and consider chilling them for an extra 30 minutes before baking.
Why did my cookies spread during baking?
This usually happens when the dough wasn’t chilled long enough or the butter was too warm when mixing. Always use room temperature butter (not melted!), chill the dough properly, and work quickly when rolling and cutting. If your kitchen is very warm, chill the cut shapes on the baking sheet for 10 minutes before baking.
How do I make candy eyes stick to cookies?
Apply them while the icing is still wet, and they’ll stick as the icing dries. If your icing has already hardened, use a tiny dab of fresh icing as “glue” to attach candy eyes or other decorations. They should stay put once the glue icing dries.
Can I use store-bought cookie dough?
Sure! To save time, use sugar cookie dough from the refrigerated section of your grocery store. It won’t taste quite as homemade or buttery, but it’ll still work for creating your funny Thanksgiving designs. Just make sure to chill it well before rolling and cutting.
How far in advance can I decorate these cookies?
You can decorate thanksgiving cookies funny up to 1 week before your celebration if stored properly in an airtight container at room temperature. In fact, some decorators say the flavor improves after a day or two as everything melds together. Just ensure the icing is completely hardened before stacking or storing.
Nutrition Information
| Nutrient | Per Cookie (Undecorated) |
|---|---|
| Calories | 110 |
| Total Fat | 5g |
| Saturated Fat | 3g |
| Cholesterol | 20mg |
| Sodium | 65mg |
| Total Carbohydrates | 15g |
| Dietary Fiber | 0g |
| Sugars | 7g |
| Protein | 1g |
Note: Nutrition values are approximate and will vary based on cookie size and decoration choices. Heavily decorated cookies may contain 150-180 calories per cookie.
Additional Creative Decoration Ideas
Personality-Packed Turkey Cookies
Transform basic turkey shapes into characters with attitudes! Create “Fitness Turkey” with a tiny headband and weights made from pretzels. Make “Hipster Turkey” with black icing glasses and a tiny man-bun. Design “Exhausted Host Turkey” with bags under the eyes and a coffee cup made from chocolate chips. These character turkeys become conversation starters and everyone will want to photograph them for social media.
Interactive Game Cookies
Turn your cookies into Thanksgiving-themed games! Make “Pin the Wattle on the Turkey” cookies where each person gets an undecorated turkey and has to add the red wattle while blindfolded. Create “Thanksgiving Bingo” cookies with different holiday icons piped on square cookies. Kids especially love cookies that double as activities before becoming dessert.
Grateful Turkey Feathers
This idea combines sentimentality with humor. Make large turkey cookies and use different colored icings to create feather sections. Before your Thanksgiving meal, have each family member write something they’re grateful for on a feather using edible markers. Some will be heartfelt (“my family”), others will be hilarious (“stretchy pants”). It’s a beautiful tradition that ends in eating the evidence!
Mash-Up Cookies
Combine Thanksgiving with pop culture for maximum laughs. Create “Turkey Wars” cookies with turkeys as Jedi knights, “Game of Scones” pilgrim cookies with tiny throne details, or “The Walking Bread” zombie turkey cookies. These mash-up concepts are perfect for families who love puns and contemporary humor.
Secret Message Cookies
Use white icing to write “secret messages” on cookies that only appear when you bite into them or hold them up to the light. Write silly fortunes like “You will eat too much pie” or “Second helpings are in your future.” It adds an element of surprise and delight to dessert time.
Troubleshooting Common Cookie Disasters
My Cookies Are Too Crispy
You probably overbaked them slightly. Remember, they continue cooking on the hot baking sheet after you remove them from the oven. Pull them when the edges are just barely golden and the centers still look slightly underdone. Next time, reduce baking time by 1-2 minutes.
The Icing Is Too Runny
Add more powdered sugar, a tablespoon at a time, mixing well after each addition. If it’s slightly runny, it’ll work for flooding but not for piping details. Always make extra icing and keep it in different consistencies for different decorating needs.
My Cookie Shapes Warped During Baking
This happens when dough is too warm. After cutting shapes, place the entire baking sheet in the refrigerator for 10 minutes before baking. The cold dough holds its shape much better in the hot oven.
Help! My Icing Won’t Dry
High humidity is usually the culprit. Place cookies near a dehumidifier or in front of a fan. You can also put them in an oven that’s turned OFF with just the light on – the gentle warmth helps icing set faster. Make sure you’re using meringue powder in your royal icing recipe, not just powdered sugar and water.
Making It a Family Tradition
These thanksgiving cookies funny aren’t just a recipe – they’re memory-makers. Every year, you can pull out the cookie cutters and remember the time little Timmy gave his turkey six legs because “it needed to run faster from the dinner table.” Start a family album of your best (and worst) cookie creations over the years.
Consider assigning each family member their own signature cookie character. Dad might always make turkeys with mustaches. Mom creates the elegant pumpkins. Grandma does the grumpy pilgrims. Kids can let their creativity run wild with rainbow-colored cornucopias and turkeys wearing superhero capes.
The beauty of thanksgiving cookies funny is that perfection isn’t the goal – laughter is. These cookies give you permission to be silly, make mistakes, and create something together that’s uniquely yours. Years from now, you won’t remember if the turkey’s feathers were perfectly symmetrical, but you’ll remember the giggles and the time spent together.
So preheat that oven, gather your loved ones, and get ready to make some memories that taste like butter, sugar, and pure joy. These cookies prove that sometimes the funniest things are also the sweetest!