Easy Thanksgiving Gnome Cookies – Perfect Holiday Baking
Get ready to fall in love with these absolutely adorable Thanksgiving gnome cookies! These whimsical treats combine buttery shortbread with creative decorating that transforms simple cookies into charming little gnomes dressed for autumn.
Perfect for holiday gatherings, these cookies are surprisingly easy to make and require no fancy piping skills. Kids and adults alike will be delighted by these festive characters sporting tiny pilgrim hats and fluffy beards.
If you loved our [Pumpkin Spice Sugar Cookies], you’ll be obsessed with these Thanksgiving gnome cookies that bring the same cozy fall flavors with an extra dose of cuteness that’ll make your dessert table Instagram-worthy!
This recipe was generated entirely by AI and has not been personally cooked or tested by us. Our readers are at the heart of this site, and many share good feedback about other recipes here.
What Are Thanksgiving Gnome Cookies?
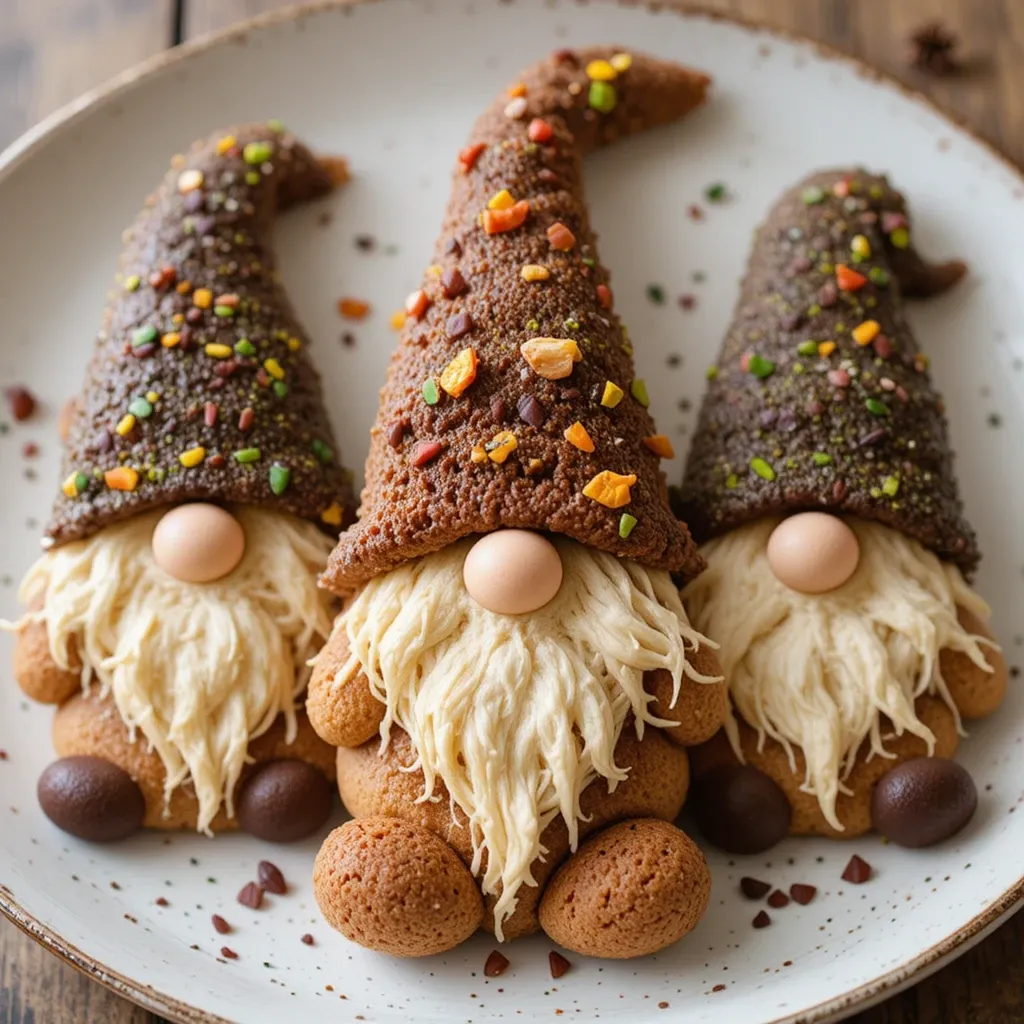
Ever wondered why these little cookie characters have captured everyone’s hearts? Thanksgiving gnome cookies are decorated sugar or shortbread cookies shaped and decorated to look like adorable gnomes celebrating the harvest season.
With their pointy hats, fluffy beards, and rosy noses, they’re basically the cutest thing you’ll bake this fall. They say the way to a man’s heart is through his stomach, but these charming cookies win everyone over before they even take a bite! Ready to create your own gnome army?
Why You’ll Love This Thanksgiving Gnome Cookie Recipe
Adorably Simple Decorating
These Thanksgiving gnome cookies prove you don’t need professional cake decorating skills to create showstopping treats. The beauty lies in their rustic, whimsical nature where imperfections actually add to their charm.
Using basic decorating techniques like simple royal icing, fondant, or even pre-made decorations, you’ll create cookies that look like they came from a boutique bakery. The gnome design is forgiving and fun, making it perfect for baking with children who want to help create their own gnome personalities.
Budget-Friendly Holiday Baking
Store-bought decorated cookies can cost a fortune, especially during the holiday season. Making Thanksgiving gnome cookies at home saves you money while giving you triple the quantity and infinitely more satisfaction. With basic baking ingredients you likely have in your pantry and affordable decorating supplies from your local craft store, you’ll create dozens of cookies for a fraction of the retail price. Plus, homemade cookies taste fresher and more delicious than anything you’d buy pre-packaged.
Customizable and Creative
The real magic of these cookies is how customizable they are. Add cinnamon and nutmeg for warm spice flavors, use chocolate shortbread for the base, or keep it classic with vanilla. Decorate with autumn colors like orange, brown, burgundy, and gold to match your Thanksgiving theme.
Create girl gnomes with long beards or boy gnomes with shorter ones, add tiny leaves or acorns as accessories, and let your creativity run wild. Similar to our [Decorated Fall Leaf Cookies], these gnome cookies offer endless possibilities for personalization. Why not gather the family this weekend and start your own gnome cookie tradition?
How to Make Thanksgiving Gnome Cookies
Quick Overview
These Thanksgiving gnome cookies are easier than you think! The recipe breaks down into three simple stages: baking the cookie base, preparing your decorations, and assembling your gnome characters.
Time Requirements:
- Prep Time: 30 minutes
- Chill Time: 2 hours
- Baking Time: 12-15 minutes
- Decorating Time: 45-60 minutes
- Total Time: 4 hours 15 minutes
- Yield: 24 cookies
Key Ingredients for Thanksgiving Gnome Cookie
For the Cookie Base:
- 2¾ cups all-purpose flour
- 1 cup unsalted butter, softened
- ¾ cup granulated sugar
- 1 large egg
- 2 teaspoons vanilla extract
- ½ teaspoon almond extract (optional)
- ½ teaspoon salt
- ½ teaspoon baking powder
For Decorating:
- 3 cups powdered sugar
- 2 tablespoons meringue powder
- 5-6 tablespoons water
- Food coloring (orange, brown, red, yellow, black)
- Orange or tan fondant for noses
- Shredded coconut or white royal icing for beards
- Mini chocolate chips for eyes
- Brown or black fondant for hats (or use chocolate cookies)
Step-by-Step Instructions
Prepare the Cookie Dough
Start by creaming together your softened butter and sugar in a large mixing bowl using an electric mixer on medium speed. Beat for about 3-4 minutes until the mixture becomes light and fluffy with a pale color. This step incorporates air into the dough, creating tender cookies. Add the egg, vanilla extract, and almond extract, then beat again for another minute until everything is fully combined and smooth.
Combine Dry Ingredients
In a separate medium bowl, whisk together the flour, salt, and baking powder. This ensures the leavening agent distributes evenly throughout your dough. Gradually add the flour mixture to the butter mixture, about one cup at a time, mixing on low speed just until incorporated. Be careful not to overmix as this can make your cookies tough. The dough should come together into a soft, slightly sticky ball.
Chill the Dough
Divide your dough in half and shape each portion into a flat disc about 1 inch thick. Wrap each disc tightly in plastic wrap and refrigerate for at least 2 hours or up to 3 days. Chilling is crucial because it prevents the cookies from spreading too much during baking and makes the dough much easier to roll and cut. Cold dough also results in cookies that hold their shape better.
Roll and Cut Cookies
Preheat your oven to 350°F (175°C) and line two baking sheets with parchment paper. Remove one dough disc from the refrigerator and let it sit for 5 minutes to soften slightly. On a lightly floured surface, roll the dough to about ¼ inch thickness. For gnome cookies, cut circles using a 3-inch round cookie cutter. You can also cut triangle shapes for the bodies if you want full gnome figures. Re-roll scraps only once to avoid tough cookies.
Bake to Perfection
Place cookies on prepared baking sheets, spacing them about 2 inches apart. Bake for 12-15 minutes, rotating the pans halfway through for even baking. The cookies are done when the edges are just barely golden but the centers still look slightly underdone. They’ll continue cooking on the hot pan after you remove them from the oven. Let cookies cool on the baking sheet for 5 minutes, then transfer to a wire rack to cool completely before decorating.
Prepare Royal Icing
While cookies cool, make your royal icing by combining powdered sugar and meringue powder in a large bowl. Add water one tablespoon at a time, beating with an electric mixer on low speed until the icing forms stiff peaks. Divide the icing into separate bowls and add food coloring to create your gnome color palette: orange for hats, tan or peach for noses, white for beards, and any other colors you desire. Adjust consistency by adding more water for flooding consistency or more powdered sugar for details.
Create Gnome Faces
Using tan or peach icing, pipe a small circular nose in the center of each cookie. You can also use a small ball of fondant for a 3D effect. Let the nose dry for 15 minutes. Add two mini chocolate chips above the nose for eyes, securing them with a tiny dab of icing. For extra personality, add a small dot of white icing on each chocolate chip to create a gleam in the eyes.
Add the Beard
For fluffy beards, you have several options. The easiest method is piping thick white royal icing from below the nose downward in a teardrop or cloud shape, then using a toothpick to create texture. For a fluffier look, pipe the beard area with white icing and immediately press sweetened shredded coconut into it before it dries. You can also use a grass piping tip to create hair-like texture. Make the beard generous and whimsical!
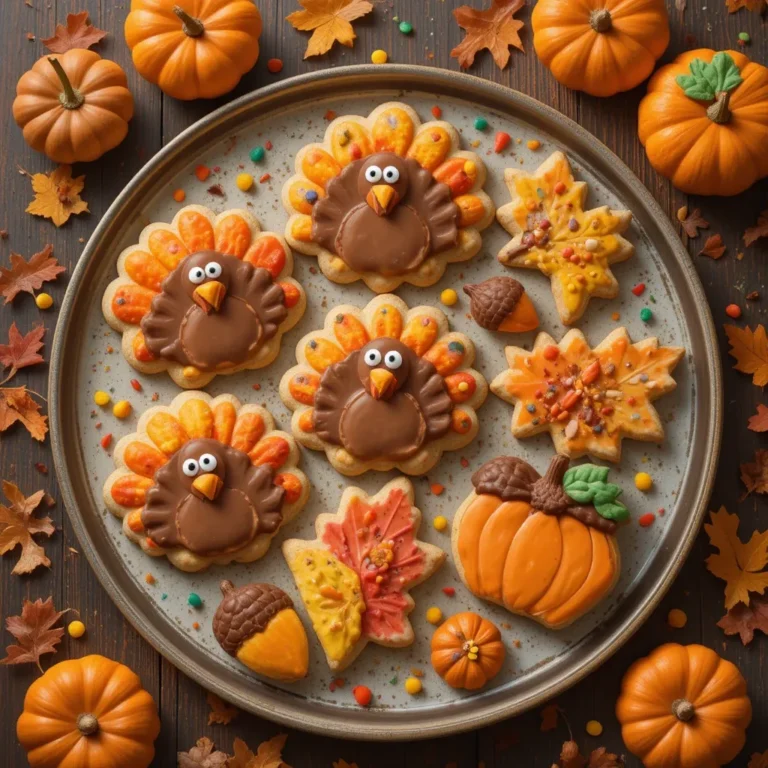
Top with Hat
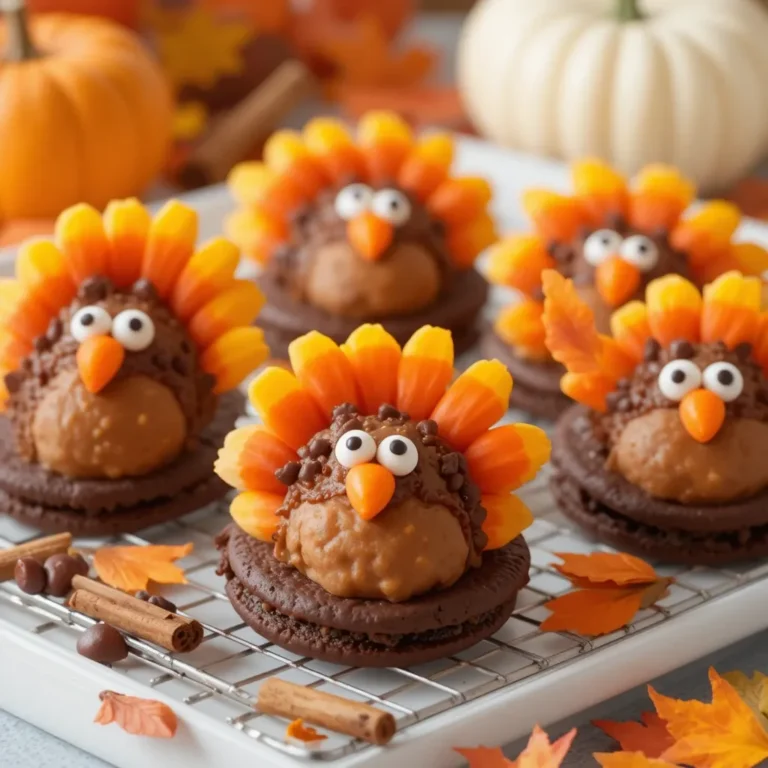
The gnome isn’t complete without his signature pointy hat! Pipe an orange or brown triangle above the eyes and beard using thick royal icing, or cut triangles from colored fondant and attach them with a dab of water or icing. For variety, create pilgrim-style hats by adding a small black rectangle as a hatband and a tiny square for a buckle using black and yellow icing. You can also use chocolate wafer cookies broken into triangles for an edible, dimensional hat.
Add Final Details
Once the base decorations are dry, add any final touches like rosy cheeks using pink food coloring dusted on with a small brush, tiny autumn leaves made from fondant, or little hands peeking out from the beard. Get creative with accessories like mini pretzel arms, candy corn decorations, or tiny turkey feathers. Let all decorations dry completely for at least 2 hours before stacking or packaging.
What to Serve Thanksgiving Gnome Cookies With
These adorable cookies deserve an equally delightful beverage pairing!. Warm chai tea lattes complement the vanilla notes beautifully, while hot chocolate creates a cozy treat station kids will love.
For an elegant Thanksgiving dessert table, arrange your gnome cookies on a wooden serving board surrounded by fresh fall foliage, mini pumpkins, and cinnamon sticks. Pair them with other autumn desserts like pumpkin pie bars, apple crisp, or pecan tassies for variety.
If you’re hosting a cookie decorating party, serve alongside sugar cookies in autumn shapes like leaves and turkeys so guests can create an entire Thanksgiving scene. Add a cheese and fruit platter for those who want something savory between decorating sessions.
For adults, pair these cookies with spiced rum coffee, bourbon hot chocolate.
Top Tips for Perfecting Thanksgiving Gnome Cookies
Use Room Temperature Ingredients
Butter and eggs at room temperature mix more easily and create a smoother, more uniform dough. Take your butter out 60 minutes before baking, or cut it into small cubes to speed up softening. Cold eggs can cause butter to seize up and create lumpy dough.
Don’t Skip the Chilling Step
Even if you’re short on time, chilling is essential for cookies that hold their shape. Warm dough spreads too much in the oven, ruining your gnome shapes. If you’re really pressed for time, chill for at least 30 minutes in the freezer rather than skipping it entirely.
Control Your Icing Consistency
Royal icing consistency makes or breaks decorated cookies. For outlining, you want stiff peaks that hold their shape. For flooding areas, thin it with water until it’s like thick honey that settles smooth within 10 seconds. Test on a plate before piping on cookies.
Work in Stages
Don’t rush the decorating process. Let each layer dry 15-30 minutes before adding the next to prevent colors from bleeding together. Base coat and noses first, then add eyes and beards, and finish with hats and details.
Embrace Imperfection
Gnomes are naturally whimsical characters, so wonky noses and asymmetrical beards add character rather than detract from your cookies. Don’t stress about making them identical—variety makes them more charming and interesting.
Use Quality Vanilla Extract
Since these are simple sugar cookies, the vanilla flavor really shines through. Use pure vanilla extract rather than imitation for the best flavor. The almond extract is optional but adds a subtle bakery-style taste that elevates the cookies.
Rotate Your Pans
Ovens have hot spots that cause uneven baking. Rotate your cookie sheets 180 degrees halfway through baking time to ensure even browning and prevent some cookies from over-baking while others stay pale.
Store Undecorated Cookies Separately
Bake your cookie bases 1-2 days ahead and store them in an airtight container at room temperature. Decorate closer to your event for the freshest look. This also makes the process less overwhelming by breaking it into manageable steps.
Storing and Reheating Tips
Short-Term Storage
Once fully decorated and dried, store your Thanksgiving gnome cookies in an airtight container at room temperature for up to 5 days. Place parchment or wax paper between layers to prevent decorations from smudging or sticking together. Keep them away from direct sunlight and humidity, which can cause royal icing to soften or colors to fade.
Long-Term Storage
These cookies freeze beautifully! For undecorated cookies, stack them with parchment paper between layers in a freezer-safe container or bag. They’ll keep frozen for up to 3 months. Thaw at room temperature for 30 minutes before decorating.
For decorated cookies, freeze them in a single layer on a baking sheet for 2 hours until solid, then transfer to an airtight container with paper between layers. Frozen decorated cookies stay fresh for up to 2 months. Thaw in the container at room temperature to prevent condensation from ruining decorations.
Reheating
These cookies are best enjoyed at room temperature, so reheating isn’t recommended. However, if you prefer a softer texture, you can place them in a 300°F oven for 3-4 minutes just to warm them slightly. This brings back that fresh-baked taste without re-baking them.
Gifting and Transport
For gifting, place cooled cookies in clear cellophane bags tied with autumn ribbon, or arrange them in decorative tins. If shipping, use sturdy boxes and plenty of bubble wrap or packing paper. Place cookies in a rigid container first, then surround with cushioning material to prevent shifting during transit.
Avoiding Common Baking Mistakes for Thanksgiving Gnome Cookies
Mistake: Dough Too Sticky to Roll
If your dough sticks to the rolling pin and counter, it’s too warm. Pop it back in the refrigerator for 15 minutes. Always work with one disc at a time, keeping the other refrigerated. Use minimal flour when rolling—too much makes cookies dry and tough.
Mistake: Cookies Spreading Too Much
This happens when butter is too warm, dough isn’t chilled enough, or your oven temperature is too low. Use an oven thermometer to verify temperature, chill dough thoroughly, and make sure your butter is softened but still cool to the touch, not melted or greasy.
Mistake: Royal Icing Not Hardening
Humidity is royal icing’s enemy. If your icing stays tacky after several hours, it’s too humid in your kitchen. Run a dehumidifier, turn on the air conditioning, or add more powdered sugar to stiffen the icing. Using meringue powder instead of egg whites also creates more stable icing.
Mistake: Colors Bleeding Together
Always let each layer dry completely before adding the next color. Wet icing on wet icing will bleed and blur. If you’re impatient, use a small fan to speed drying time, or work on multiple cookies in rotation so the first ones have time to dry while you decorate others.
Mistake: Decorations Falling Off
Use royal icing as “glue” for all decorations. A tiny dab under each chocolate chip eye, coconut flake, or fondant piece ensures everything stays put. Press gently and let dry before moving cookies.
Mistake: Over-Mixing Dough
Once you add flour to butter mixture, mix only until just combined. Over-mixing develops gluten, creating tough, dense cookies instead of tender, buttery ones. It’s okay if there are a few flour streaks—they’ll incorporate as you shape the dough.
Mistake: Uneven Cookie Thickness
Use rolling pin rings or guide sticks to ensure uniform thickness. Uneven cookies bake unevenly, with thin areas burning while thick areas stay underdone. Aim for consistent ¼-inch thickness throughout.
Mistake: Decorating Warm Cookies
Never decorate warm cookies! The heat will melt royal icing and create a soupy mess. Always let cookies cool completely on a wire rack for at least 30 minutes before decorating. Touch the bottom—if it’s cool, you’re ready to go.
Frequently Asked Questions
Can I use store-bought cookie dough for Thanksgiving gnome cookies?
Absolutely! Refrigerated sugar cookie dough works perfectly for this recipe. Roll it to ¼-inch thickness and cut your shapes. The homemade recipe provides better flavor and texture, but store-bought saves time and still creates adorable gnomes. Look for quality brands that don’t spread too much during baking.
What can I use instead of royal icing for decorating?
Buttercream frosting works as an alternative, though it won’t dry as hard or crisp as royal icing. Store-bought decorating icing in tubes is convenient for beginners. You can also use melted candy melts or chocolate for simpler designs. Each option has different textures and drying times.
How far in advance can I make Thanksgiving gnome cookies?
Bake undecorated cookies up to 5 days ahead and store airtight at room temperature. Decorate them 2-3 days before your event for the freshest appearance. Fully decorated cookies stay fresh for 5 days when stored properly in airtight containers at room temperature.
Can kids help decorate these cookies?
These are perfect for kids! The forgiving gnome design makes imperfections charming. Set up a decorating station with piping bags, sprinkles, candies, and let them create their own gnome personalities. Younger children can add coconut beards and place chocolate chip eyes while adults handle detailed piping.
Do I need special decorating tools?
You don’t need fancy equipment! A ziplock bag with the corner snipped off works as a piping bag. Toothpicks help spread icing and add texture. A butter knife smooths larger areas. Of course, proper piping bags and tips make the job easier, but they’re not essential for beginners.
Can I make these cookies gluten-free?
Yes! Substitute a 1:1 gluten-free baking flour blend for regular flour. The cookies may be slightly more delicate, so handle gently. Chill the dough thoroughly and consider rolling between two sheets of parchment paper to prevent sticking without adding excess flour.
Why did my cookies turn out hard instead of tender?
Hard cookies result from over-mixing the dough, using too much flour, or over-baking. Measure flour correctly by spooning into measuring cups rather than scooping. Mix dough only until ingredients combine, and remove cookies when edges are barely golden with soft-looking centers.
What’s the best way to color royal icing?
Gel food coloring provides the most vibrant colors without thinning your icing. Add color gradually with a toothpick, mixing thoroughly between additions until you achieve your desired shade. Liquid food coloring works but requires more and can make icing too thin.
Can I freeze decorated Thanksgiving gnome cookies?
Yes, but freeze them carefully. Flash freeze decorated cookies on a baking sheet for 2 hours until solid, then transfer to an airtight container with parchment between layers. They’ll keep frozen for 2 months. Thaw in the sealed container at room temperature to prevent moisture damage.
How do I transport decorated cookies without ruining them?
Once royal icing is completely dry (at least 6 hours), cookies are fairly sturdy. Transport in rigid containers with parchment between layers. For extra protection, place the container in a larger box with crumpled paper around it to prevent sliding. Keep them cool and out of direct sunlight.
What if I don’t have meringue powder for royal icing?
You can substitute pasteurized egg whites, using 3 tablespoons in place of 2 tablespoons meringue powder and the water. Beat egg whites until frothy, then gradually add powdered sugar. The icing won’t be quite as stable but works fine for decorating.
Can I add flavoring to the cookie dough?
Definitely! Add ½ teaspoon of cinnamon, nutmeg, or pumpkin pie spice for autumn flavor. Lemon or orange zest adds brightness. Replace vanilla extract with maple, rum, or coconut extract for variety. Just keep total extract to 2 teaspoons to avoid overpowering the cookies.
Nutrition Information
| Nutrient | Per Cookie (1 cookie) |
|---|---|
| Calories | 185 |
| Total Fat | 8g |
| Saturated Fat | 5g |
| Cholesterol | 28mg |
| Sodium | 65mg |
| Total Carbohydrates | 27g |
| Dietary Fiber | 0.5g |
| Sugars | 18g |
| Protein | 2g |
Nutritional values are approximate and based on standard cookie base without extensive decorations
Final Thoughts
These Thanksgiving gnome cookies combine creativity, flavor, and fun into one irresistible package. Whether you’re baking with children, creating gifts for friends, or simply want to add whimsy to your holiday table, these adorable characters deliver smiles along with delicious buttery sweetness.
The beauty of this recipe lies in its flexibility—make them as simple or elaborate as you like. Stick with basic decorations for a quick project, or go all out with detailed faces and accessories for showstopping results.
Remember, the most important ingredient is having fun! These cookies are meant to be enjoyed during the process, not just the eating. So gather your loved ones, put on some festive music, and create your own gnome village this Thanksgiving.