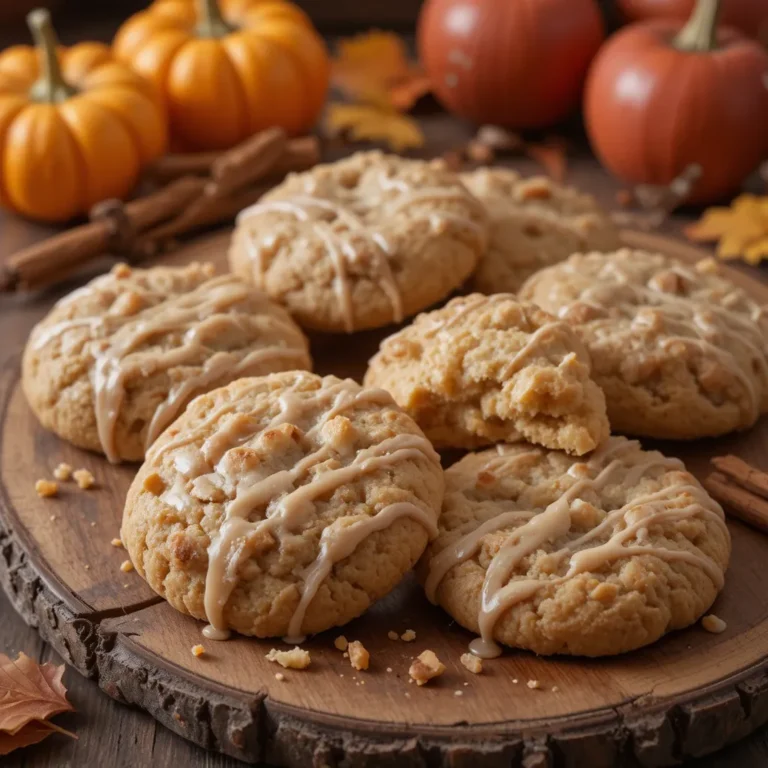
Thanksgiving Cookies Leaves Easy Fall Cookie Recipe Step-by-Step
There’s something magical about baking Thanksgiving cookies leaves that capture autumn’s beauty right in your kitchen. These buttery, spiced cookies shaped like colorful fall foliage are not just desserts—they’re edible art that brings joy to every holiday gathering.
I still remember the first time my grandmother let me help cut out leaf shapes, dusting flour everywhere and laughing as we created our own “cookie forest.”
Whether you’re planning a festive dessert spread or searching for a fun activity with the kids, these thanksgiving cookies leaves deliver on flavor, simplicity, and that warm, cozy feeling we all crave during the holidays. Much like my popular [pumpkin spice sugar cookies], these treats come together quickly and taste absolutely divine!
This recipe was produced entirely by AI and has not been personally made by us. Our site is built around our readers, and feedback from those who tried other recipes has been positive.
What Are Thanksgiving Cookies Leaves?
Ever wonder why we’re so obsessed with turning our favorite fall symbols into cookies? Thanksgiving cookies leaves are sugar or spice cookies cut into beautiful leaf shapes and decorated with autumn-inspired colors like orange, red, yellow, and brown.
They’re called “leaves” because, well, they look exactly like the gorgeous foliage falling from the trees outside! There’s truth to that old saying: “the way to a man’s heart is through his stomach”—and these cookies work their magic on everyone. The best part? You don’t need to be a professional baker to create these stunning treats. Trust me, grab your cookie cutters and let’s make some edible autumn magic together!
Why You’ll Love This Thanksgiving Cookies Leaves Recipe
The Perfect Balance of Flavor and Beauty
These thanksgiving cookies leaves combine the warm spices of cinnamon, nutmeg, and ginger with a buttery, melt-in-your-mouth texture that’s absolutely irresistible. Each bite delivers that perfect autumn flavor—not too sweet, wonderfully spiced, and with just the right amount of crunch around the edges while staying tender in the middle. The beautiful leaf shapes make them Instagram-worthy without requiring professional decorating skills.
Save Money While Impressing Your Guests
Forget spending $30-40 on fancy bakery cookies that disappear in minutes. Making thanksgiving cookies leaves at home costs a fraction of the price—usually under $10 for a batch of 36 cookies! You probably already have most ingredients in your pantry. Plus, homemade cookies taste infinitely better than store-bought versions that often taste like cardboard with frosting.
Customizable with Delicious Toppings
The real fun begins with decorating! Use royal icing in vibrant fall colors, dust them with colored sugar, drizzle with melted chocolate, or keep them simple with a light glaze. Add edible glitter for sparkle, create intricate vein patterns with food-safe markers, or let kids unleash their creativity with sprinkles galore. If you loved my [decorated Halloween cookies], you’ll adore the artistic freedom these thanksgiving cookies leaves offer. Ready to fill your kitchen with the scent of fall spices? Let’s get baking!
How to Make Thanksgiving Cookies Leaves
Quick Overview
These thanksgiving cookies leaves are surprisingly easy to make, even for beginner bakers. The dough comes together in about 15 minutes and chills while you prep your decorating station. The cookies themselves bake in just 10-12 minutes, filling your home with incredible autumn aromas.
Time Breakdown:
- Prep Time: 20 minutes
- Chill Time: 2 hours (or 30 minutes in freezer)
- Baking Time: 10-12 minutes per batch
- Decorating Time: 30-45 minutes
- Total Time: About 3 hours (mostly hands-off)
- Yield: 36 cookies
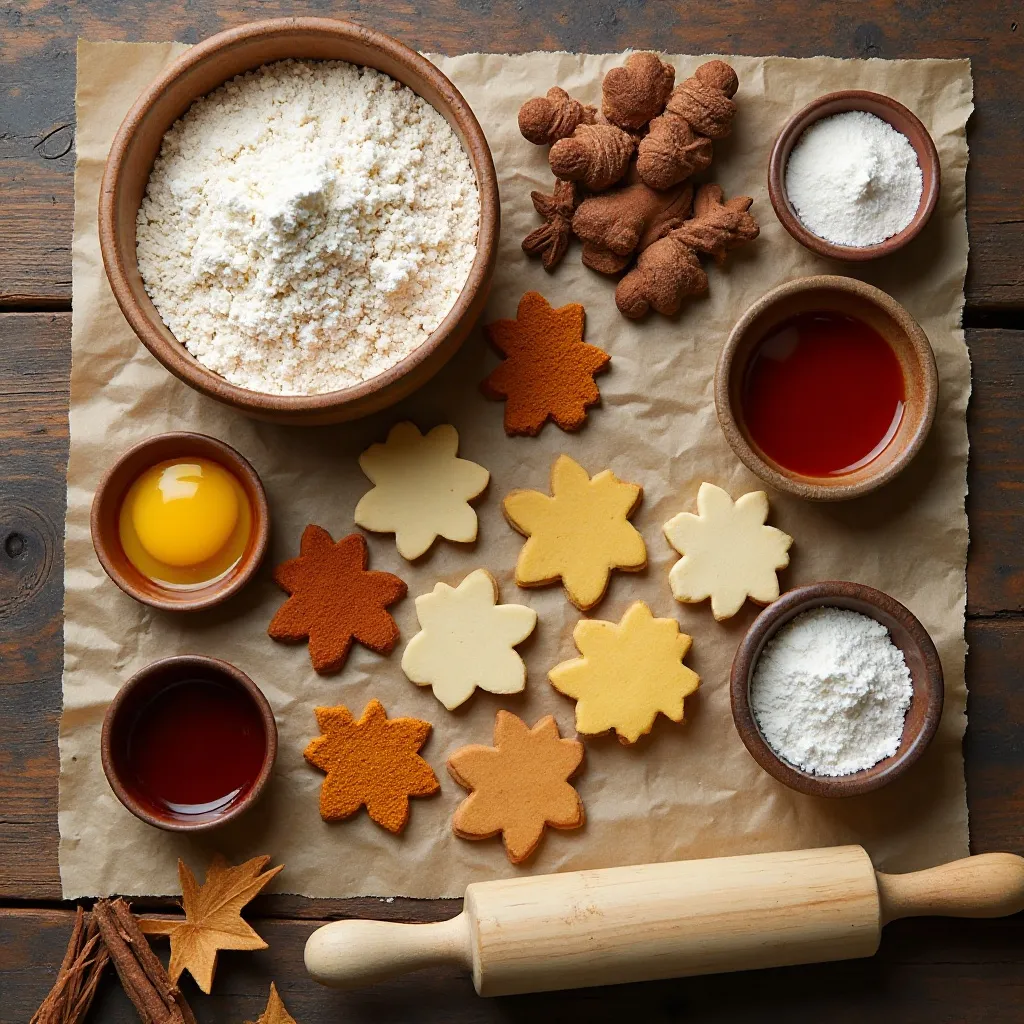
Key Ingredients for Thanksgiving Cookies Leaves
For the Cookie Dough:
- 3 cups all-purpose flour (plus extra for rolling)
- 1 teaspoon baking powder
- 1/2 teaspoon salt
- 1 1/2 teaspoons ground cinnamon
- 1/2 teaspoon ground nutmeg
- 1/4 teaspoon ground ginger
- 1 cup (2 sticks) unsalted butter, softened
- 1 cup granulated sugar
- 1 large egg
- 2 teaspoons vanilla extract
- 1 tablespoon maple syrup (optional but adds lovely flavor)
For the Royal Icing Decoration:
- 3 cups powdered sugar
- 2 tablespoons meringue powder
- 5-6 tablespoons warm water
- Gel food coloring (orange, red, yellow, brown, burgundy)
Special Tools:
- Leaf-shaped cookie cutters (various sizes)
- Rolling pin
- Parchment paper
- Piping bags or squeeze bottles
- Toothpicks for detail work
Step-by-Step Instructions
Step 1: Prepare the Dry Ingredients
In a medium mixing bowl, whisk together the flour, baking powder, salt, cinnamon, nutmeg, and ginger until well combined. The spices should be evenly distributed throughout the flour—no clumps! This ensures every cookie has that perfect autumn flavor. Set this bowl aside while you prepare the wet ingredients.
Step 2: Cream the Butter and Sugar
In a large bowl or stand mixer, beat the softened butter and granulated sugar together on medium-high speed for 3-4 minutes. The mixture should become light, fluffy, and pale in color. This step is crucial for creating tender cookies with the right texture. Don’t rush it—proper creaming makes all the difference!
Step 3: Add Wet Ingredients
Beat in the egg, vanilla extract, and maple syrup (if using) until fully incorporated. Scrape down the sides of the bowl with a rubber spatula to ensure everything is mixed evenly. The mixture might look slightly curdled—that’s perfectly normal and will come together once you add the flour.
Step 4: Combine Wet and Dry
With your mixer on low speed, gradually add the flour mixture to the butter mixture, about one cup at a time. Mix just until the dough comes together and no flour streaks remain. Avoid overmixing, which can make your cookies tough. The dough should be soft but not sticky.
Step 5: Chill the Dough
Divide the dough into two equal portions and shape each into a flat disc about 1 inch thick. Wrap each disc tightly in plastic wrap and refrigerate for at least 2 hours, or freeze for 30 minutes if you’re short on time. Chilled dough is essential for clean edges when cutting out shapes and prevents cookies from spreading too much during baking.
Step 6: Preheat and Prep
About 15 minutes before rolling out your dough, preheat your oven to 350°F (175°C). Line two baking sheets with parchment paper or silicone baking mats. Having your workspace ready makes the process so much smoother!
Step 7: Roll Out the Dough
Remove one disc of dough from the refrigerator. On a lightly floured surface, roll the dough to about 1/4 inch thickness. If the dough gets too soft to work with, pop it back in the fridge for 10 minutes. Consistent thickness is key to evenly baked cookies.
Step 8: Cut Out Leaf Shapes
Use your leaf-shaped cookie cutters to cut out as many shapes as possible. Press the cutter straight down firmly, then lift straight up—wiggling can distort the edges. Carefully transfer each leaf to your prepared baking sheets, spacing them about 1 inch apart. They don’t spread much, so you can fit quite a few on each pan.
Step 9: Re-roll Scraps
Gather the dough scraps, gently press them together (don’t knead), and roll out again. Continue cutting shapes until all the dough is used. You may need to chill the dough again if it becomes too soft.
Step 10: Bake to Perfection
Bake for 10-12 minutes, or until the edges are just barely starting to turn golden. The centers should still look slightly soft—they’ll firm up as they cool. Don’t overbake! These cookies are best when slightly soft, not crispy. Let them cool on the baking sheet for 5 minutes before transferring to a wire rack to cool completely.
Step 11: Prepare the Royal Icing
While cookies cool, make your icing. In a large bowl, combine powdered sugar and meringue powder. Add warm water one tablespoon at a time, mixing with an electric mixer on low speed. Beat for 7-10 minutes until the icing forms stiff peaks. For flooding consistency (thinner icing for covering the whole cookie), add extra water a few drops at a time until it slowly flows off a spoon and smooths within 10 seconds.
Step 12: Color Your Icing
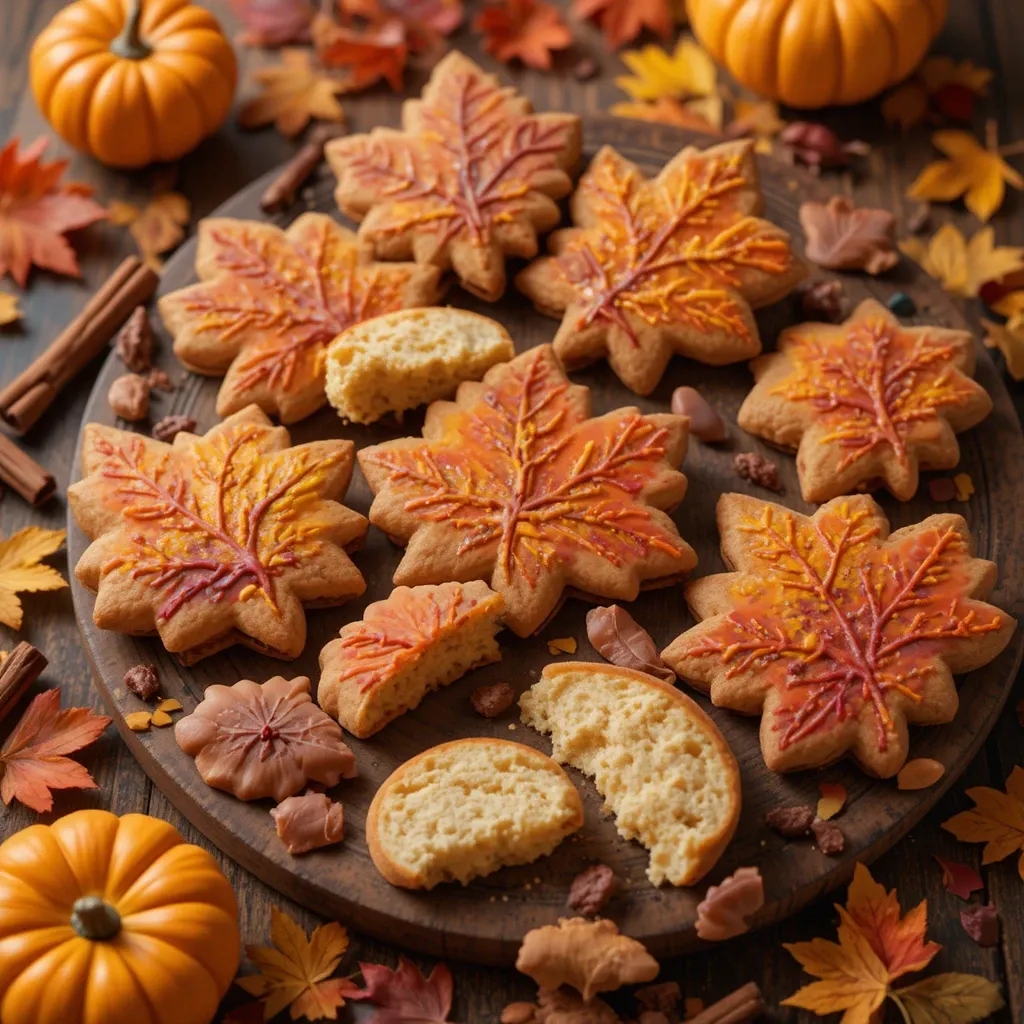
Divide the icing into separate bowls—one for each color you want to use. Add gel food coloring drop by drop, stirring until you achieve your desired autumn shades. I love using burnt orange, deep red, golden yellow, chocolate brown, and burgundy. Keep bowls covered with damp towels to prevent crusting.
Step 13: Decorate Your Leaves
Transfer icing colors to piping bags or squeeze bottles. Start by outlining each leaf with a thicker consistency icing, then fill in with flood icing. Use toothpicks to spread icing evenly and pop any air bubbles. While still wet, you can add details like leaf veins using a darker color, or blend colors together for an ombre effect. Let icing dry completely, at least 4-6 hours or overnight.
What to Serve Thanksgiving Cookies Leaves With
These beautiful cookies shine as part of a dessert display, but they also pair wonderfully with other treats and beverages.
Perfect Pairings:
- Hot apple cider or spiced chai tea for a cozy autumn beverage pairing
- Pumpkin pie or pecan pie for a complete Thanksgiving dessert table
- Vanilla ice cream or whipped cream for an indulgent sundae topping
- Coffee or hot chocolate for a morning treat or afternoon pick-me-up
- Cheese board with sharp cheddar and honey for sweet-savory contrast
- Caramel dip or cream cheese frosting for extra decadence
Create a stunning dessert table by arranging the cookies on a wooden board with fresh fall leaves, mini pumpkins, and scattered cinnamon sticks. Your guests will think you hired a professional caterer!
Top Tips for Perfecting Thanksgiving Cookies Leaves
Achieving the Perfect Texture
The secret to tender cookies is not overbaking. Remove them when edges are set but centers still look slightly underdone. They continue cooking on the hot pan after leaving the oven.
Crisp Edges vs. Soft Centers
For crispier cookies, roll dough slightly thinner (about 3/16 inch) and bake an extra minute. For softer cookies, keep them at 1/4 inch thickness and bake for 10 minutes exactly.
Preventing Spread and Distortion
Always chill your dough thoroughly. If cookies start spreading too much, the dough is too warm. Chill cut shapes on the baking sheet for 10 minutes before baking. Use parchment paper, not greased pans, to prevent excessive spreading.
Making Ahead Tips
Cookie dough freezes beautifully for up to 3 months. Freeze wrapped discs, then thaw overnight in the refrigerator before rolling. You can also freeze cut, unbaked shapes on a baking sheet, then transfer to freezer bags. Bake from frozen, adding 1-2 minutes to baking time.
Decorating Like a Pro
For clean lines, let your outline icing crust for 10-15 minutes before flooding. This creates a barrier that prevents colors from bleeding together. Use squeeze bottles for more control than piping bags. Add texture by dragging a toothpick through wet icing.
Ingredient Substitutions
Replace butter with equal parts vegetable shortening for cookies that hold their shape even better (but with slightly less flavor). Swap all-purpose flour with gluten-free 1:1 baking flour for celiac-friendly cookies. Use almond extract instead of vanilla for a nutty twist.
Color Mixing Guide
Achieve natural autumn colors by mixing gel colors: burgundy (red + tiny bit of brown), rust orange (orange + tiny bit of red), golden yellow (yellow + tiny bit of orange), and warm brown (chocolate brown + red).
Storing and Reheating Tips
Room Temperature Storage
Undecorated cookies stay fresh in an airtight container at room temperature for up to 1 week. Place parchment paper between layers to prevent sticking. Keep them away from heat and direct sunlight to maintain texture.
Decorated Cookie Storage
Once royal icing is completely dry (24 hours is safest), store decorated thanksgiving cookies leaves in a single layer in an airtight container for up to 2 weeks. If you must stack them, place wax paper between each layer to protect the icing. Don’t refrigerate royal icing cookies—moisture can make them sticky and dull the colors.
Freezing Instructions
Freeze undecorated baked cookies for up to 3 months. Let them cool completely, then arrange in freezer-safe containers with parchment between layers. Thaw at room temperature for about 30 minutes before decorating or serving. You can also freeze decorated cookies, but allow them to dry completely first (24 hours minimum), then freeze in rigid containers to protect decorations.
Reheating for Fresh-Baked Taste
While these cookies are delicious at room temperature, you can warm undecorated cookies in a 300°F oven for 3-5 minutes to recreate that fresh-baked experience. This works wonderfully for cookies that have been frozen—the gentle warmth brings back their just-baked softness.
Shipping These Cookies
Planning to mail thanksgiving cookies leaves to loved ones? Use rigid containers, wrap each cookie individually in plastic wrap, cushion with bubble wrap, and ship 2-day mail. Include a “This Side Up” sticker and fragile warning. The cookies ship well but avoid shipping decorated ones during hot weather as icing can melt.
Frequently Asked Questions
Can I make these thanksgiving cookies leaves without cookie cutters?
Absolutely! Use a sharp knife to hand-cut leaf shapes freehand, or create a paper template and trace around it. You can also use drinking glasses for round cookies and hand-pipe leaf veins afterward. While cookie cutters make the job faster and more uniform, homemade shapes have their own rustic charm.
Why did my cookies spread too much during baking?
Cookie spreading usually happens when dough is too warm or butter is overly softened. Always chill dough thoroughly—at least 2 hours. If your kitchen is warm, chill cut shapes on baking sheets for 10 minutes before baking. Using softened (not melted) butter and measuring flour correctly also prevents spreading.
How do I keep my royal icing from cracking?
Cracking occurs when icing dries too quickly or is too thick. Add a tiny bit more water to your icing—it should flow smoothly but not be watery. Work in a room with moderate humidity (not too dry), and let cookies dry naturally at room temperature rather than using fans. Adding a drop of glycerin to royal icing also helps keep it flexible.
Can I use this recipe for other holiday shapes?
Definitely! This is a versatile cutout cookie recipe perfect for any holiday. Use Christmas trees, snowflakes, or ornaments for winter holidays, hearts for Valentine’s Day, or flowers for spring. The spices work for autumn, but you can omit them for a plain vanilla sugar cookie that suits any occasion.
What’s the best way to get vibrant icing colors?
Always use gel food coloring, not liquid. Gel colors are concentrated and won’t thin your icing. Start with small amounts—gel color is very powerful! For bright, true colors, start with stark white icing (pure white powdered sugar, not off-white). Let colors “develop” for 10 minutes as they often deepen slightly.
How far in advance can I bake these for Thanksgiving?
Bake undecorated cookies up to 1 week ahead and store in airtight containers. Decorate them 2-3 days before Thanksgiving for best results—this gives icing time to fully harden while keeping cookies fresh. If freezing, bake and freeze undecorated cookies up to 3 months ahead, then thaw and decorate a few days before serving.
My dough is too sticky to roll—what do I do?
Sticky dough needs more chilling time. Wrap it and refrigerate for another 30 minutes to an hour. When rolling, use plenty of flour on your surface and rolling pin. Work with small portions, keeping the rest refrigerated. If dough remains sticky despite chilling, gently knead in 1-2 tablespoons of flour.
Can I make these cookies vegan or dairy-free?
Yes! Replace butter with vegan butter or vegetable shortening (use brands that cream well, like Earth Balance). Use a flax egg (1 tablespoon ground flaxseed + 3 tablespoons water, let sit 5 minutes) instead of regular egg. For icing, use aquafaba (chickpea water) instead of meringue powder—3 tablespoons whipped aquafaba replaces meringue powder and water.
Why are my cookies hard instead of soft?
Hard cookies result from overbaking, too much flour, or dough rolled too thin. Bake just until edges start to set—centers should look slightly underbaked. Measure flour by spooning into measuring cup and leveling (don’t pack or scoop directly). Roll dough to full 1/4 inch thickness for softer cookies.
How do I prevent air bubbles in royal icing?
Mix icing on low speed to minimize air incorporation. After mixing, let icing rest for 5-10 minutes so bubbles rise to surface, then gently stir. When flooding cookies, use a toothpick to pop any visible bubbles immediately—they’re easy to fix when icing is wet but permanent once dry.
Common Baking Mistakes to Avoid
Using Warm Butter
Butter should be softened (about 65°F), not melted or too warm. If you can deeply indent it with your finger but it still holds its shape, that’s perfect. Too-warm butter makes cookies spread excessively and lose their shape.
Skipping the Chilling Step
I know it’s tempting to rush, but chilling is non-negotiable. Warm dough spreads too much and results in distorted shapes with blurry edges. Plan ahead and use your chill time to prepare icing or clean up.
Overmixing the Dough
Once flour hits the butter mixture, mix only until just combined. Overmixing develops gluten, making cookies tough instead of tender. It’s okay if you see a few flour streaks—they’ll incorporate as you shape the dough.
Incorrect Oven Temperature
Invest in an oven thermometer! Many ovens run hot or cold. If cookies bake too fast or brown too quickly, your oven is too hot. If they take forever and spread too much, it’s too cool. Accurate temperature is critical for perfect cookies.
Rolling Dough Too Thin or Thick
Inconsistent thickness leads to uneven baking—some cookies burn while others stay raw. Use rolling pin rings or rubber bands spaced 1/4 inch from each end to maintain even thickness. Measure in a few spots to verify.
Not Rotating Baking Sheets
Most ovens have hot spots. Rotate your baking sheet 180 degrees halfway through baking for even browning. Better yet, bake one sheet at a time in the center of your oven for most consistent results.
Decorating Cookies Before They’re Completely Cool
Warm cookies make icing melt and slide right off. Let cookies cool completely—they should feel room temperature to touch. Rush this step and you’ll create a frustrating mess instead of beautiful artwork.
Adding Too Much Water to Royal Icing
Start conservative with water—you can always add more, but you can’t remove it. Too-thin icing runs off cookies and takes forever to dry. Add water drops at a time, testing consistency after each addition.
Not Letting Icing Dry Completely
Royal icing needs patience. While it crusts over in an hour, full hardening takes 6-8 hours (sometimes overnight for thick applications). Stack or package cookies before icing is fully dry and you’ll destroy your hard work. When in doubt, wait longer!
Nutrition Information
| Nutrient | Per Cookie (1 cookie) |
|---|---|
| Calories | 125 |
| Total Fat | 5g |
| Saturated Fat | 3g |
| Cholesterol | 20mg |
| Sodium | 45mg |
| Total Carbohydrates | 19g |
| Dietary Fiber | 0g |
| Sugars | 11g |
| Protein | 1g |
Note: Nutrition information is approximate and includes decorated cookie with royal icing. Values may vary based on exact ingredients and decorating choices.
There’s something deeply satisfying about creating thanksgiving cookies leaves from scratch. The process of mixing, rolling, cutting, and decorating is therapeutic—a delicious break from the holiday chaos. These cookies have become my go-to contribution for Thanksgiving gatherings because they’re stunning enough to impress but forgiving enough that even imperfect decorating looks charming.
The best part? Watching kids’ (and adults’!) faces light up when they see these beautiful edible leaves. They taste incredible and look like they came from an expensive bakery, but only you need to know how easy they actually are to make.
So grab your cookie cutters, embrace the floury mess, and create some autumn magic in your kitchen. These thanksgiving cookies leaves might just become your new fall tradition. Happy baking! 🍂