Easy Thanksgiving Treats for School Kid Approved Festive Snacks
Looking for thanksgiving treats for school that kids will actually eat? These festive snacks are colorful, fun, and surprisingly simple to make! Here’s a little secret: the best classroom treats don’t require culinary expertise. Whether you’re a baking novice or a seasoned kitchen pro, these delightful goodies come together in under 30 minutes.
They’re perfect for classroom parties, lunch box surprises, or after-school snacks. Much like our popular Halloween Cookie Bars, these thanksgiving treats for school strike the perfect balance between festive fun and practical preparation. Get ready to become the classroom hero with these crowd-pleasing creations!
What Are Thanksgiving Treats for School?
Ever wondered why thanksgiving treats for school have become such a big deal? Well, they’re basically any festive snack that celebrates the harvest season while being classroom-friendly! Think turkey-shaped cookies, pumpkin parfaits, and corn-themed cupcakes that make kids smile.
These aren’t your grandma’s complicated Thanksgiving recipes requiring hours of prep. They’re fun, portable, and nut-free options that teachers actually appreciate. After all, they say the way to a child’s heart is through their stomach, right?
So why not whip up a batch and watch those little faces light up? Trust me, you’ll be the talk of the PTA!
Why You’ll Love These Thanksgiving Treats for School
Perfect for Classroom Celebrations
These thanksgiving treats for school are designed with real classrooms in mind. No melting frosting disasters, no crumbly messes, and definitely no common allergens to worry about. Each treat is individually portioned, making distribution a breeze during hectic party times.
The vibrant autumn colors—deep oranges, rich browns, and golden yellows—instantly transform any classroom into a festive celebration space. Kids get excited just looking at them!
Budget-Friendly and Time-Saving
Making thanksgiving treats for school at home saves you serious money compared to ordering from bakeries. You’re looking at spending $10-15 for treats for an entire classroom versus $40-50 at specialty shops.
Most recipes use pantry staples you probably already have. Flour, sugar, butter, and a few seasonal touches like candy corn or pretzel sticks are all you need.
Plus, you can make these treats the night before without sacrificing freshness. They actually taste better after the flavors meld overnight!
Customizable and Allergy-Conscious
One of the best features? You control every ingredient. Swap regular flour for gluten-free alternatives, use dairy-free butter, or skip nuts entirely.
The decorating possibilities are endless. Let your kids help design their turkey faces or paint autumn leaves with edible markers. It becomes a fun family activity rather than just another chore.
If you loved our Easy Apple Crisp recipe, you’ll appreciate this same make-ahead convenience with even more creative freedom. Ready to start creating memories? Let’s dive into the recipes!
How to Make Thanksgiving Treats for School
Quick Overview
These thanksgiving treats for school are incredibly beginner-friendly and require minimal baking skills. Most recipes come together in 20-30 minutes of active prep time, with some requiring an additional 15-20 minutes for baking or chilling.
The beauty lies in their versatility—you can make everything from no-bake turkey cookies to simple pumpkin rice crispy treats. Each recipe yields enough for 24-30 students, perfect for standard classroom sizes.
Time Breakdown:
- Prep Time: 20-30 minutes
- Baking/Setting Time: 15-20 minutes
- Decoration Time: 10-15 minutes
- Total Time: 45-65 minutes
Key Ingredients for Thanksgiving Treats for School
Here’s what you’ll need for a variety of thanksgiving treats for school:
For Turkey Cookie Treats:
- 1 package (16 oz) Oreo cookies
- 24 candy corn pieces
- 24 Reese’s Pieces or M&Ms (orange/brown/yellow)
- 1 cup chocolate chips
- Pretzel sticks
- Candy eyes (or white frosting dots)
For Pumpkin Rice Crispy Treats:
- 6 cups Rice Crispy cereal
- 1 package (10 oz) marshmallows
- 3 tablespoons butter
- Orange food coloring
- Green fruit leather or Tootsie Rolls
- Lollipop sticks
For Cornucopia Snack Cones:
- 24 sugar cones
- 2 cups chocolate chips (melted)
- Mini pretzels
- Candy corn
- Small candies or dried fruit
- Goldfish crackers
For Pilgrim Hat Cookies:
- 24 chocolate striped cookies (like Keebler Fudge Stripes)
- 24 Reese’s Peanut Butter Cups (or sunbutter cups for nut-free)
- 1 cup vanilla frosting
- Yellow decorating gel
General Supplies:
- Parchment paper
- Microwave-safe bowls
- Plastic bags for storing
- Wax paper for decorating
Step-by-Step Instructions
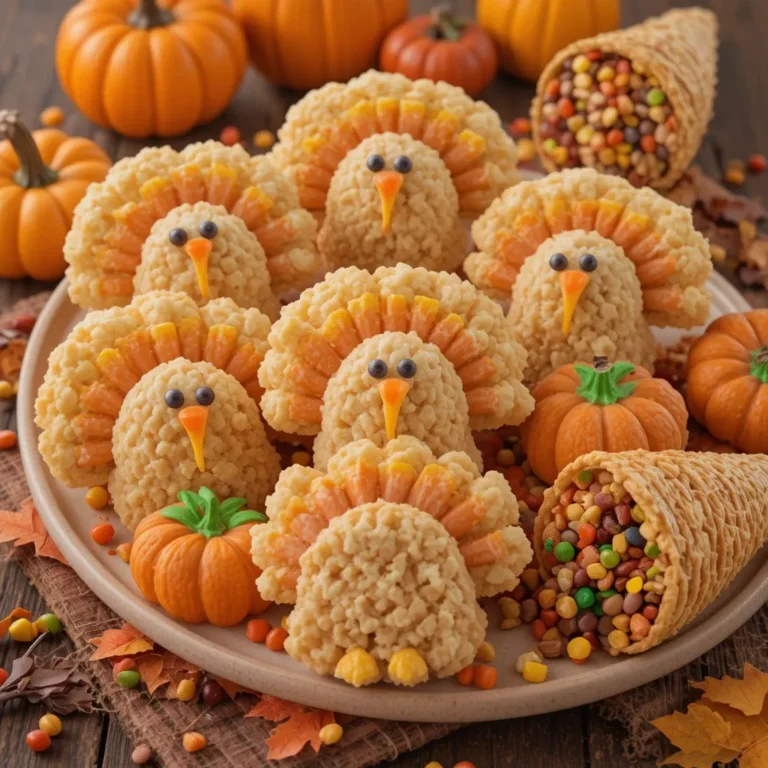
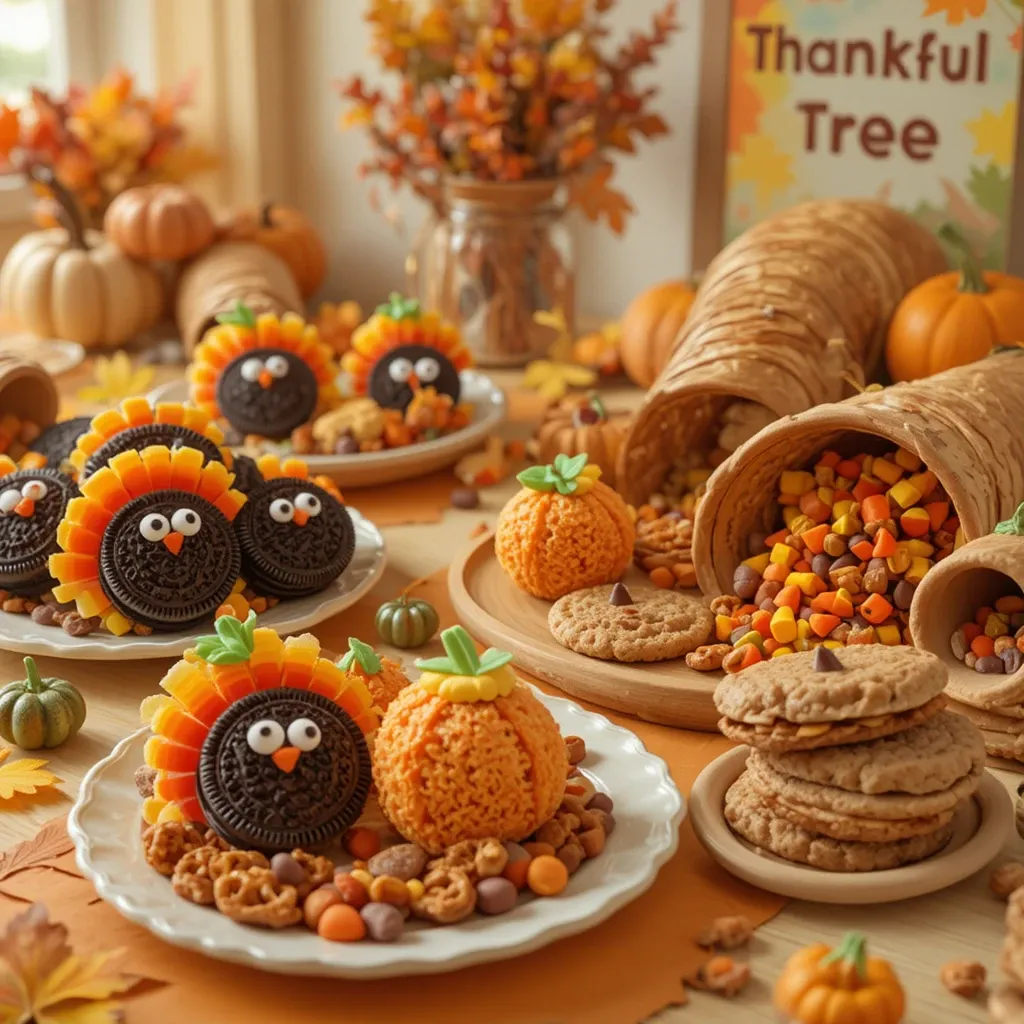
Turkey Cookie Treats
Step 1: Prepare Your Workspace
Clear a large, clean surface and lay out parchment paper. This prevents sticking and makes cleanup easier. Arrange all your ingredients within reach so you’re not scrambling mid-decoration. Keep paper towels handy for sticky fingers!
Step 2: Melt the Chocolate
Place chocolate chips in a microwave-safe bowl. Heat in 30-second intervals, stirring between each round, until completely smooth and glossy. This takes about 90 seconds total. Don’t overheat or the chocolate will seize up and become grainy.
Step 3: Create the Turkey Face
Separate your Oreos carefully, keeping the cream side intact. This becomes your turkey’s body. Use a tiny dab of melted chocolate as “glue” to attach one candy eye (or pipe a white frosting dot with a chocolate chip center). Place a candy corn pointing downward as the beak.
Step 4: Add the Tail Feathers
Break pretzel sticks into 2-inch pieces. You’ll need 5-6 pieces per turkey. Using melted chocolate, attach pretzels to the back of the Oreo in a fan pattern. Let each one set for 30 seconds before adding the next to prevent sliding.
Step 5: Attach Colorful Details
While chocolate is still slightly tacky, press Reese’s Pieces or M&Ms onto the pretzel tips to create colorful tail feathers. Use autumn colors—orange, yellow, brown, and red. Allow everything to set completely at room temperature for 15 minutes.
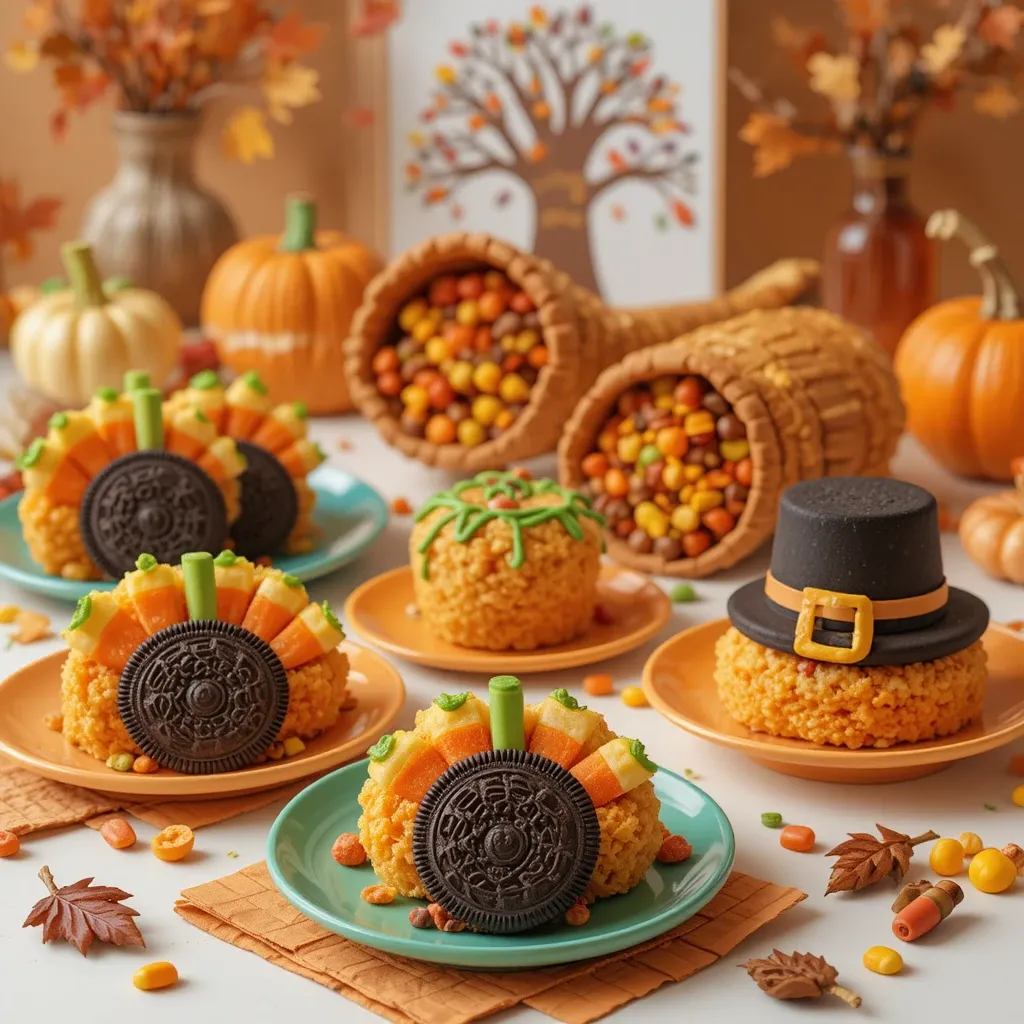
Pumpkin Rice Crispy Treats
Step 1: Melt Butter and Marshmallows
In a large pot over low heat, melt butter completely. Add marshmallows and stir constantly until fully melted and smooth. This takes about 3-4 minutes. Remove from heat immediately to prevent burning.
Step 2: Add Food Coloring
While the marshmallow mixture is still hot, add 8-10 drops of orange food coloring. Stir vigorously until the color is evenly distributed. You want a bright pumpkin orange, so don’t be shy with the coloring!
Step 3: Mix in Cereal
Pour Rice Crispy cereal into the marshmallow mixture. Working quickly (the mixture hardens fast), fold everything together using a greased spatula until every piece of cereal is coated. The mixture will be very sticky—this is normal!
Step 4: Shape into Pumpkins
Grease your hands with butter or cooking spray. Grab a handful of the mixture (about 1/2 cup) and squeeze it into a ball. Flatten slightly to create a pumpkin shape. Work fast while the mixture is still warm and pliable.
Step 5: Add Stems
For stems, unwrap green Tootsie Rolls and microwave for 3-5 seconds until soft. Roll between your palms to create stem shapes. Press into the top of each pumpkin. Alternatively, cut green fruit leather into leaf shapes. Insert a lollipop stick into the bottom if making pumpkin pops.
Cornucopia Snack Cones
Step 1: Dip the Cones
Melt chocolate chips until smooth. Hold each sugar cone by the tip and dip the opening end into chocolate, coating about 1 inch of the rim. Shake off excess chocolate gently. This creates a “seal” that holds the goodies inside.
Step 2: Let Chocolate Set
Place dipped cones on parchment paper, opening side up. Let chocolate harden completely at room temperature for 10 minutes. You can speed this up by placing them in the fridge for 5 minutes.
Step 3: Fill with Treats
Now for the fun part! Fill each cone with a mix of autumn treats. Start with mini pretzels at the bottom, then add candy corn, small candies, and dried fruit. Let treats spill out slightly from the opening to create that cornucopia overflow effect.
Step 4: Arrange for Display
Lay cones on their sides on a serving platter. The treats will naturally cascade out, creating a beautiful presentation. You can also tie a small ribbon around each cone for an extra festive touch.
Pilgrim Hat Cookies
Step 1: Prepare Cookie Base
Lay out all your chocolate striped cookies on a flat surface. These become the hat brims. Make sure they’re at room temperature so the frosting sticks properly.
Step 2: Apply Frosting
Put a generous dollop (about 1 tablespoon) of vanilla frosting in the center of each cookie. This acts as both glue and the decorative hat band.
Step 3: Attach Peanut Butter Cups
Unwrap peanut butter cups carefully to avoid fingerprints. Place one upside-down on the frosting circle, pressing gently to secure. The peanut butter cup becomes the hat’s crown.
Step 4: Add the Buckle
Using yellow decorating gel, pipe a small square on the front of each hat. You can make it as simple or detailed as you like. Let everything set for 30 minutes before packaging.
What to Serve Thanksgiving Treats for School With
These thanksgiving treats for school pair wonderfully with simple classroom-friendly beverages and sides:
Beverage Pairings:
- Apple cider (served warm or cold in small cups)
- Chocolate milk boxes
- Orange juice pouches
- Hot cocoa with mini marshmallows
Complementary Snacks:
- Fresh apple slices with caramel dip
- Mini cheese cubes with whole grain crackers
- Trail mix with dried cranberries
- Popcorn seasoned with cinnamon sugar
Complete Party Spread Ideas: Create a balanced celebration by combining sweet treats with savory options. Offer turkey-shaped sandwiches, veggie cups with ranch dip, and fruit kabobs alongside your thanksgiving treats for school. This ensures kids get variety and nutrition while still enjoying festive fun.
For classroom parties, set up a “Thankful Tree” station where kids can write what they’re grateful for while munching on treats. It combines learning with celebration!
Top Tips for Perfecting Thanksgiving Treats for School
Check Allergy Lists First
Always contact your child’s teacher before making treats. Get a complete list of allergies and dietary restrictions. Many schools are now nut-free zones, so avoid peanut butter and tree nuts entirely unless specifically approved.
Consider making a separate allergy-friendly batch using sunbutter instead of peanut butter, dairy-free chocolate, and certified gluten-free ingredients. Label everything clearly so teachers can identify safe options quickly.
Make Treats Extra Sturdy
Classroom treats get jostled, dropped, and handled by many little hands. Reinforce decorations with extra chocolate “glue” and let everything set completely before packing.
Double-bag treats in plastic bags, then place in rigid containers. This prevents crushing during transport. Individual packaging also helps with portion control and hygiene.
Prepare Assembly-Line Style
Don’t make treats one at a time—that’s inefficient! Set up stations: one for bases, one for chocolate work, one for decorating. Complete each step for all treats before moving to the next step.
Get your kids involved! Assign age-appropriate tasks like unwrapping candies, sorting colors, or adding final touches. It makes the process faster and creates wonderful family memories.
Use Quality Ingredients
Cheap chocolate chips often don’t melt smoothly and can taste waxy. Invest in good quality chocolate or candy melts for better results. The taste and texture difference is noticeable.
Fresh marshmallows make a huge difference in rice crispy treats. Stale marshmallows won’t melt properly and create tough, hard treats instead of soft, chewy ones.
Time Your Preparation Right
Make treats 1-2 days before the party for optimal freshness. Anything earlier and they might get stale; anything later and you’re rushing the night before.
Set realistic expectations. Don’t attempt elaborate designs if you’re short on time. Simple, clean presentations often look more professional than over-decorated disasters.
Keep It Classroom Appropriate
Avoid treats that are too messy, too crumbly, or require utensils. Everything should be finger-food friendly. Skip the powdered sugar coatings that create dust clouds!
Size matters too. Make treats small enough for little mouths but substantial enough that kids feel satisfied. Golf-ball sized is usually perfect.
Storing and Reheating Tips
Short-Term Storage
Store thanksgiving treats for school in airtight containers at room temperature for up to 3 days. Layer treats between sheets of parchment paper to prevent sticking.
Keep chocolate-covered treats away from heat sources. Chocolate can bloom (develop white spots) if exposed to temperature fluctuations, though it’s still safe to eat.
Rice crispy treats stay freshest when wrapped individually in plastic wrap, then stored together in a container. This prevents them from drying out or becoming sticky.
Refrigerator Storage
Most thanksgiving treats for school don’t require refrigeration unless your kitchen is very warm (above 75°F). However, refrigerating can extend freshness to 5-7 days.
Before serving refrigerated treats, let them sit at room temperature for 15-20 minutes. This prevents condensation and brings out the best flavors and textures.
Never refrigerate sugar cones or cookies, as they’ll become soggy. These are strictly room-temperature storage items.
Freezing for Later
Rice crispy treats freeze beautifully for up to 6 weeks. Wrap individually in plastic wrap, then place in freezer bags. Label with the date so you remember when you made them.
Thaw frozen treats overnight in the refrigerator, then bring to room temperature before serving. They’ll taste freshly made!
Cookie-based treats can be frozen, but may lose some crispness. If you’re making treats far in advance, prepare components separately and assemble closer to party time.
Transport Tips
Use shallow, wide containers rather than deep ones. This prevents treats from getting crushed under their own weight during transport.
Place a paper towel in the bottom of containers to absorb any moisture. Secure the lid with tape if you’re traveling a distance.
Keep treats in the coolest part of your car—never in direct sunlight. Even short exposure to heat can melt chocolate and ruin your hard work!
Frequently Asked Questions
Can I make thanksgiving treats for school the night before?
Absolutely! In fact, making treats the night before often improves their flavor and texture. Store them in airtight containers at room temperature, and they’ll be perfect for school the next day. Just avoid refrigerating cookies or sugar cones, as they can become soggy.
What are the best nut-free thanksgiving treats for school?
Turkey Oreo cookies, pumpkin rice crispy treats, and cornucopia snack cones are all naturally nut-free. For pilgrim hat cookies, substitute peanut butter cups with sunbutter cups or chocolate coins. Always check ingredient labels for “may contain” warnings if dealing with severe allergies
How many treats should I make for a classroom?
Most elementary classrooms have 20-25 students. Make 30 treats to account for the teacher, classroom aide, and a few extras in case of breakage. It’s better to have a couple extra than to run short!
What if my chocolate seizes up while melting?
If chocolate becomes grainy or clumpy, it’s “seized” from contact with water or overheating. Try whisking in 1 teaspoon of vegetable oil or shortening to smooth it out. Prevention is key: use completely dry bowls and melt in short intervals.
Are these treats suitable for toddlers?
Most of these treats contain small pieces that could be choking hazards for children under 3. For toddler-safe versions, skip small candies and use larger decorations. Rice crispy treats without added candy pieces are generally safe for younger children.
Can I make these treats gluten-free?
Yes! Use gluten-free Rice Krispies for crispy treats, gluten-free Oreos for turkey cookies, and certified gluten-free sugar cones. Most candy corn and chocolate chips are naturally gluten-free, but always verify labels.
How do I prevent rice crispy treats from being too hard?
Hard rice crispy treats usually result from old marshmallows or overcooking. Use fresh marshmallows, melt over low heat, and work quickly once mixed. Press gently when shaping—over-compressing makes them dense and hard.
What’s the best way to transport frosted treats?
Let frosting dry completely (at least 1 hour) before packing. Use containers with dividers or place treats in cupcake liners to prevent touching. Keep containers level during transport and avoid stacking.
Can I substitute candy decorations with healthier options?
Definitely! Use dried cranberries instead of candy corn, dark chocolate instead of milk chocolate, and fresh grapes or berries for added color. Date pieces can replace candies in cornucopia cones for natural sweetness.
How do I make treats look professional?
Consistency is key! Make all treats the same size, use uniform decorations, and take your time. Clean edges with a damp paper towel, let chocolate set completely, and arrange on nice platters. Simple and neat always looks better than messy and over-decorated.
Nutrition Information
| Nutrient | Turkey Cookie Treat | Pumpkin Rice Crispy | Cornucopia Cone | Pilgrim Hat Cookie |
|---|---|---|---|---|
| Calories | 180 | 140 | 160 | 210 |
| Total Fat | 8g | 2g | 5g | 11g |
| Saturated Fat | 4g | 1g | 3g | 6g |
| Carbohydrates | 26g | 32g | 28g | 27g |
| Sugar | 18g | 20g | 22g | 19g |
| Protein | 2g | 1g | 2g | 4g |
| Sodium | 120mg | 180mg | 85mg | 150mg |
Nutritional values are approximate and based on standard ingredients. Values may vary based on specific brands used and portion sizes.
Bonus Ideas and Variations
Thanksgiving Popcorn Mix
Create a sweet and salty snack mix perfect for individual bags. Pop plain popcorn, then drizzle with melted white chocolate tinted orange. Mix in candy corn, dried cranberries, and mini pretzels. Package in clear cellophane bags tied with raffia ribbon.
Turkey Hand Print Cookies
Use your child’s handprint as a cookie cutter template! Trace their hand on cardstock, cut it out, and use it to cut sugar cookie dough. Each finger becomes a feather. Decorate with colored icing and add googly eyes. Kids love seeing their handprints turned into treats!
Mayflower Ship Crackers
Transform simple graham crackers into Mayflower ships using triangle cheese slices as sails (secured with pretzel stick masts). Add a small flag using paper and toothpicks. Educational and edible!
Acorn Donut Holes
Dip donut holes in chocolate, then roll in crushed graham crackers to look like acorns. Add a mini chocolate chip “stem” on top. Simple, adorable, and no special equipment needed.
Classroom Gratitude Cookies
Bake simple sugar cookies and use edible markers to let kids write what they’re thankful for. This doubles as an activity and a treat! Provide stencils of autumn shapes to trace.
Making It Educational
Turn treat-making into a learning experience:
Math Skills: Have kids count candies, measure ingredients, and divide treats into equal portions. This reinforces fractions and basic arithmetic.
History Lesson: Discuss the first Thanksgiving while making treats. Talk about harvest traditions and what Pilgrims and Native Americans might have eaten.
Science Exploration: Explain why chocolate melts (changing states of matter) and how marshmallows puff up when heated (air expansion). Kids love edible science!
Reading Practice: Let emerging readers follow simple picture recipes. This builds reading comprehension and following directions skills.
Final Thoughts
Creating thanksgiving treats for school doesn’t have to be stressful or time-consuming. With these simple recipes, you’ll have adorable, classroom-appropriate treats ready in under an hour.
The real magic happens when you involve your children in the process. They learn valuable skills, spend quality time with you, and feel proud bringing homemade treats to share with friends.
Remember, perfection isn’t the goal—creating memories is. Even if your turkey cookies look a little wonky or your pilgrim hats sit crooked, kids will love them because they were made with care.
These thanksgiving treats for school celebrate not just a holiday, but the spirit of gratitude, sharing, and community that makes this season special. So grab those ingredients, gather your little helpers, and start creating edible art!
Happy Thanksgiving, and happy treat-making!
Have you tried any of these thanksgiving treats for school? Share your creations in the comments below! Don’t forget to pin this post for easy reference next November. For more festive recipes, check out our Christmas Cookie Collection and Holiday Party Snacks guide!