10 Easy Thanksgiving Treats for Teachers Ready in 30 Minutes
Teachers pour their hearts into shaping young minds every single day, and Thanksgiving is the perfect time to show them how grateful we are. These 10 thanksgiving treats for teachers are not just delicious—they’re thoughtful, budget-friendly, and incredibly easy to make at home.
Whether you’re a busy parent juggling work and school schedules or simply want to express appreciation with a homemade touch, these treats will bring smiles to your favorite educators’ faces without requiring hours in the kitchen.
This recipe is AI-created and has not been made in our kitchen. We want our readers to feel supported, and people who tried other recipes from the site often share positive feedback.
What Are Thanksgiving Treats for Teachers?
Ever wonder what makes the perfect teacher gift during Thanksgiving? Thanksgiving treats for teachers are those special homemade goodies that say “thank you” in the most delicious way possible. They’re the cookies, candies, and snacks that combine holiday flavors with heartfelt appreciation.
After all, the way to a teacher’s heart is through thoughtful gestures—and sweet treats certainly help! These aren’t just random snacks; they’re carefully chosen recipes that travel well, stay fresh, and can be made in batches. Ready to become the parent whose gifts teachers actually remember? Let’s dive in!
Why You’ll Love These Thanksgiving Treats for Teachers
Perfect for Showing Appreciation
These treats strike the perfect balance between thoughtful and practical. Teachers receive countless gifts throughout the year, but homemade treats during Thanksgiving stand out because they show you took time from your own busy schedule to create something special. The warm spices of cinnamon, nutmeg, and pumpkin evoke the cozy feeling of the season, making these gifts truly memorable.
Budget-Friendly Without Sacrificing Quality
Making treats at home costs a fraction of store-bought gift baskets. With basic pantry staples like flour, sugar, butter, and seasonal ingredients, you can create impressive gifts for multiple teachers without breaking the bank. A batch of cookies might cost $5-8 in ingredients but yields enough treats for 3-4 teachers, whereas individual store-bought gifts easily run $15-20 each.
Customizable and Allergen-Friendly
One of the best parts about homemade treats is the ability to adapt recipes. You can easily swap ingredients to accommodate dietary restrictions, use gluten-free flour, dairy-free chocolate, or make nut-free versions. This thoughtfulness doesn’t go unnoticed by teachers who may have dietary limitations.
If you’re looking for more holiday baking inspiration, check out our Christmas cookie collection that features similar make-ahead recipes perfect for gift-giving season.
Make It a Family Activity
Getting kids involved in making treats for their teachers creates a meaningful learning experience. They’ll understand the value of gratitude while practicing kitchen skills. Plus, teachers absolutely cherish knowing their students helped create the gifts.
Ready to start baking? Let’s explore these crowd-pleasing recipes that’ll make you the MVP of parent appreciation!
How to Make 10 Thanksgiving Treats for Teachers
Quick Overview
These thanksgiving treats for teachers range from no-bake options perfect for busy weeknights to slightly more involved recipes for weekend baking sessions. Most recipes take between 20-45 minutes of active preparation time, with some requiring chilling or setting time. The beauty of these treats is that they’re designed to be made in advance, staying fresh for days or even weeks when stored properly.
Time Investment:
- Prep Time: 15-45 minutes per recipe
- Cooking/Setting Time: 10-60 minutes
- Total Time: 30 minutes to 2 hours
- Yield: Each recipe makes enough for 3-5 teachers
Recipe Collection Overview
Let me share 10 fantastic treat ideas that teachers will love, each with complete instructions, tips, and variations.
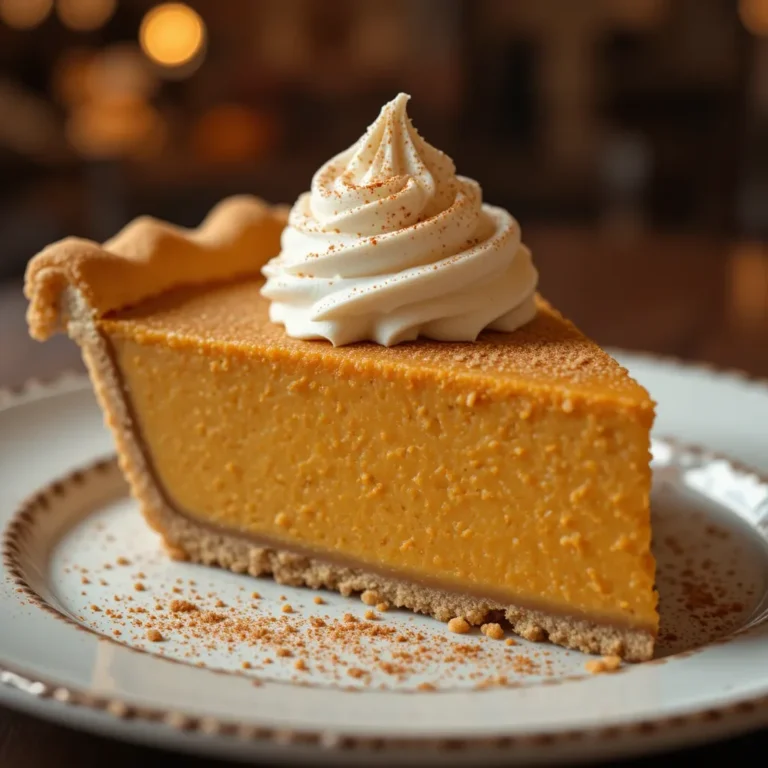
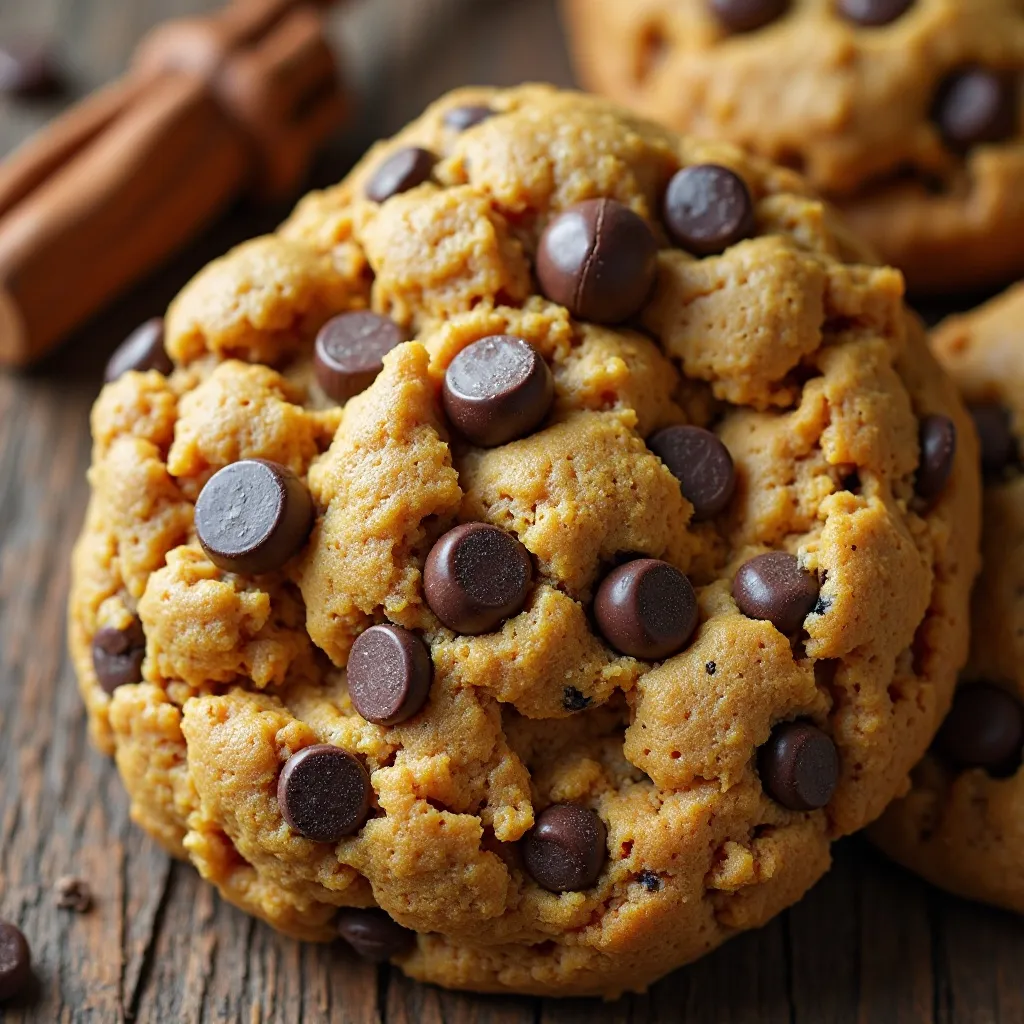
1. Pumpkin Spice Chocolate Chip Cookies
Key Ingredients for Pumpkin Spice Chocolate Chip Cookies
- 2 ¾ cups all-purpose flour
- 1 teaspoon baking soda
- ½ teaspoon salt
- 2 teaspoons pumpkin pie spice
- 1 cup (2 sticks) softened butter
- ¾ cup granulated sugar
- ¾ cup packed brown sugar
- 1 teaspoon vanilla extract
- ½ cup pumpkin puree (not pumpkin pie filling)
- 2 large eggs
- 2 cups semi-sweet chocolate chips
- 1 cup white chocolate chips (optional)
Step-by-Step Instructions
Prepare Your Workspace
Start by preheating your oven to 375°F (190°C). Line two large baking sheets with parchment paper or silicone baking mats. This prevents sticking and makes cleanup a breeze.
Mix Dry Ingredients
In a medium bowl, whisk together the flour, baking soda, salt, and pumpkin pie spice. Set this mixture aside—you’ll add it to the wet ingredients later.
Cream Butter and Sugars
Using a stand mixer or hand mixer, beat the softened butter with both sugars on medium speed for 2-3 minutes. The mixture should look light and fluffy. This step incorporates air, making your cookies tender.
Add Wet Ingredients
Beat in the pumpkin puree, vanilla extract, and eggs one at a time. Mix until just combined. Don’t overmix—you want everything incorporated but not overworked.
Combine and Add Mix-Ins
Gradually add the flour mixture to the wet ingredients, mixing on low speed until just combined. Fold in the chocolate chips using a spatula or wooden spoon.
Scoop and Bake
Using a cookie scoop or spoon, drop rounded tablespoons of dough onto prepared baking sheets, spacing them about 2 inches apart. Bake for 10-12 minutes until edges are lightly golden. The centers may look slightly underbaked—that’s perfect!
Cool Completely
Let cookies cool on the baking sheet for 5 minutes before transferring to a wire rack. This helps them set without breaking.
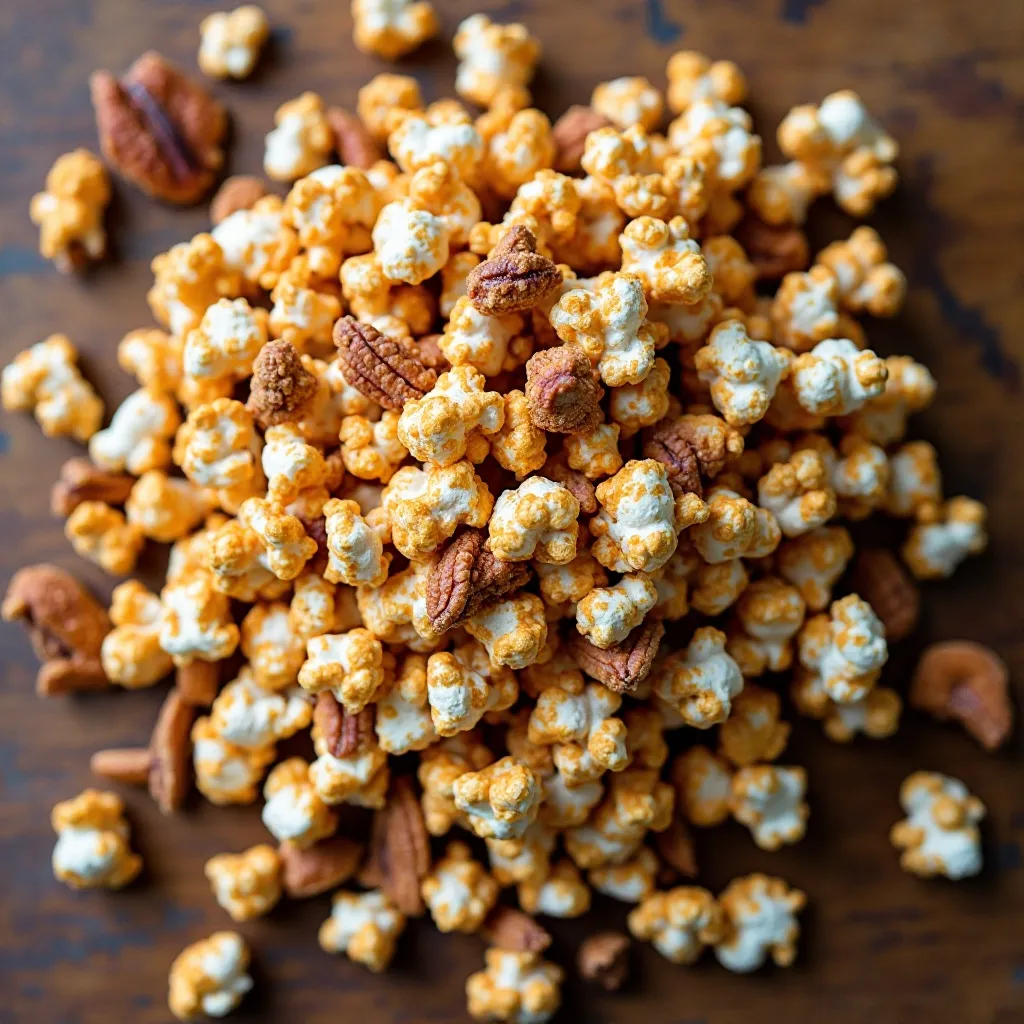
2. Caramel Apple Popcorn Mix
Key Ingredients for Caramel Apple Popcorn Mix
- 12 cups popped popcorn (remove unpopped kernels)
- 2 cups dried apple chips, broken into pieces
- 1 cup pecans or walnuts
- 1 cup packed brown sugar
- ½ cup butter
- ¼ cup light corn syrup
- ½ teaspoon salt
- ½ teaspoon vanilla extract
- ¼ teaspoon baking soda
- ½ teaspoon cinnamon
Step-by-Step Instructions
Prepare Popcorn Base
Spread popcorn, apple chips, and nuts on a large greased baking sheet. Preheat oven to 250°F (120°C).
Make Caramel Coating
In a medium saucepan, combine brown sugar, butter, corn syrup, and salt. Bring to a boil over medium heat, stirring constantly. Once boiling, stop stirring and let it boil for 4 minutes.
Add Finishing Touches
Remove from heat and quickly stir in vanilla, baking soda, and cinnamon. The mixture will bubble up—this is normal!
Coat and Bake
Pour caramel over popcorn mixture and stir gently to coat everything evenly. Bake for 45 minutes, stirring every 15 minutes.
Cool and Break Apart
Spread on parchment paper to cool completely. Break into clusters and package in cellophane bags tied with ribbon.
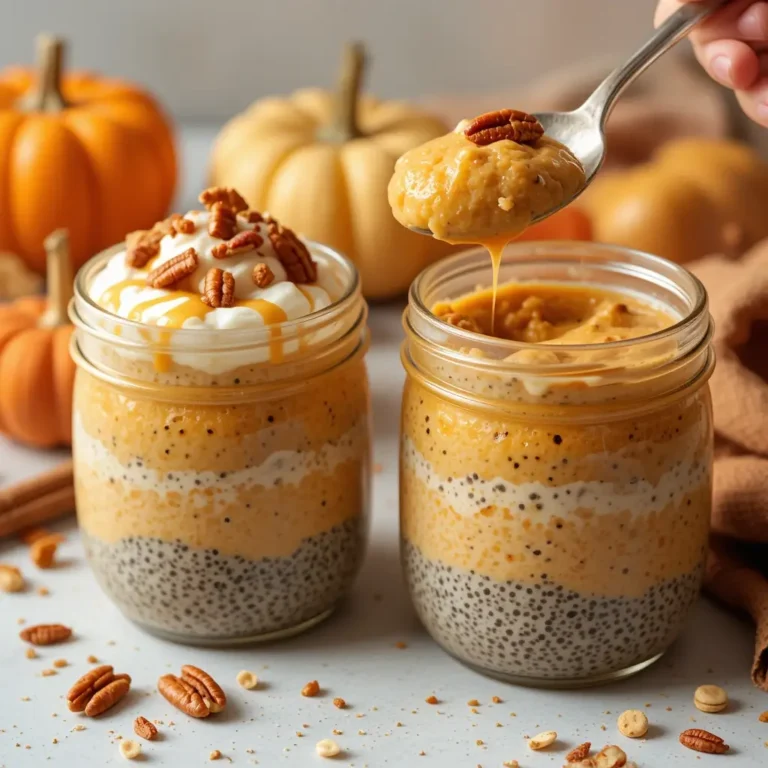
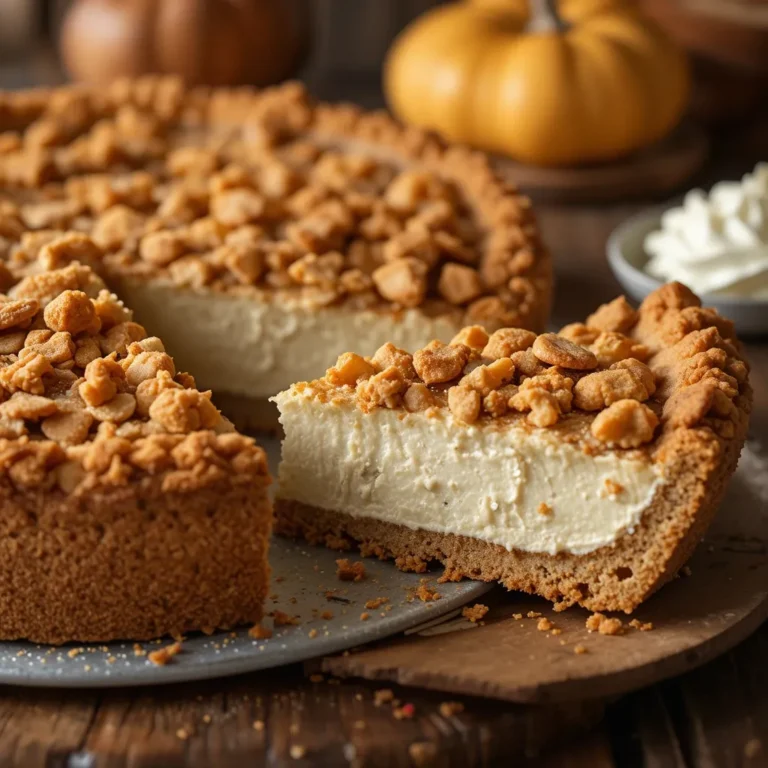
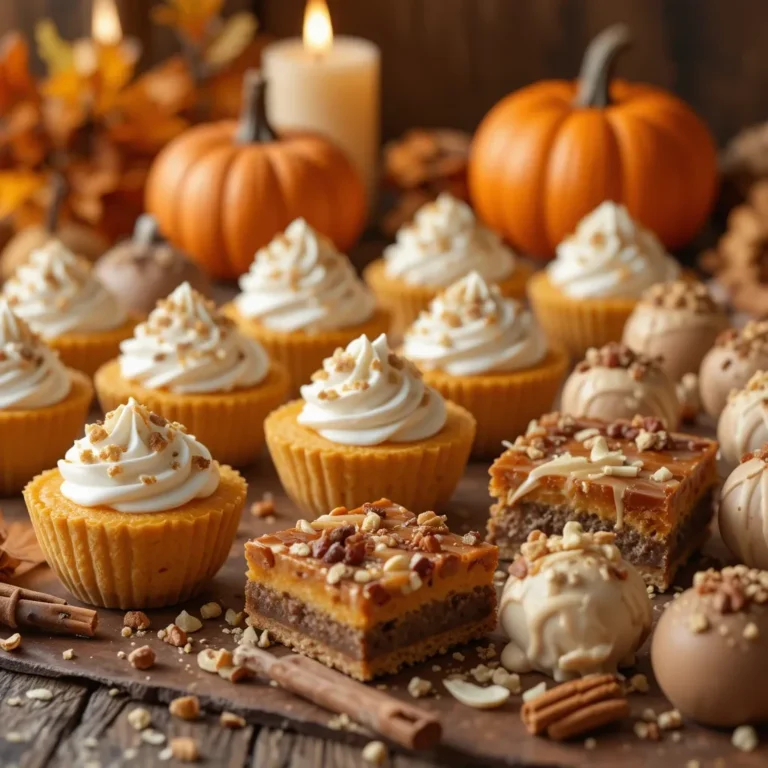
3. Mini Pumpkin Cheesecake Bites
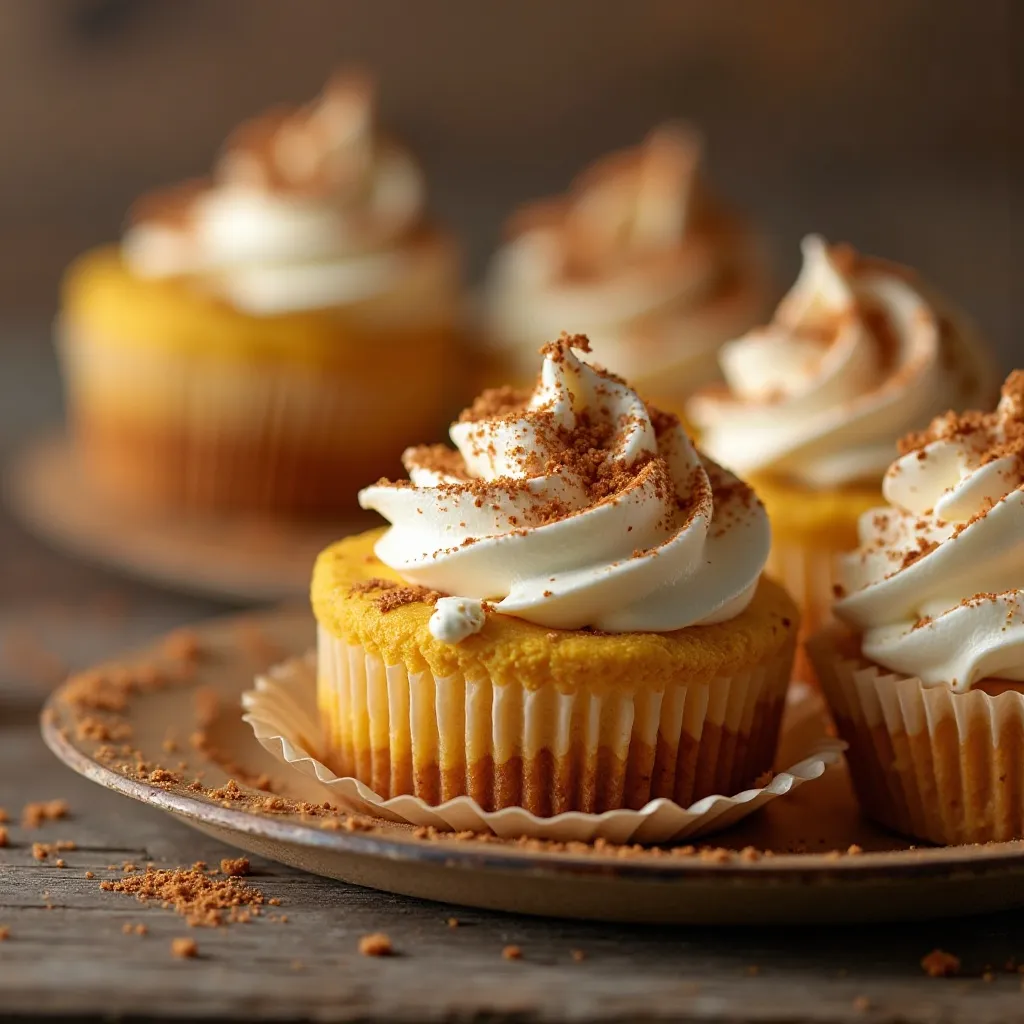
Key Ingredients for Mini Pumpkin Cheesecake Bites
- 12 vanilla wafer cookies
- 16 oz cream cheese, softened
- ½ cup granulated sugar
- 1 teaspoon vanilla extract
- ¾ cup pumpkin puree
- 2 large eggs
- 1 teaspoon pumpkin pie spice
- Whipped cream for topping
- Cinnamon for dusting
Step-by-Step Instructions
Prepare Muffin Tin
Line a 12-cup muffin tin with paper liners. Place one vanilla wafer cookie in the bottom of each cup—this creates a simple crust.
Make Cheesecake Filling
Beat cream cheese and sugar until smooth and creamy, about 2 minutes. Add vanilla extract, pumpkin puree, and pumpkin pie spice, mixing until combined.
Add Eggs
Beat in eggs one at a time on low speed, mixing just until incorporated. Overmixing can cause cracks.
Fill and Bake
Divide filling evenly among muffin cups, filling each about ¾ full. Bake at 325°F (160°C) for 20-22 minutes. Centers should be slightly jiggly—they’ll set as they cool.
Cool Properly
Let cheesecakes cool in the pan for 30 minutes, then refrigerate for at least 2 hours before serving. Top with whipped cream and a sprinkle of cinnamon.
4. Maple Pecan Fudge
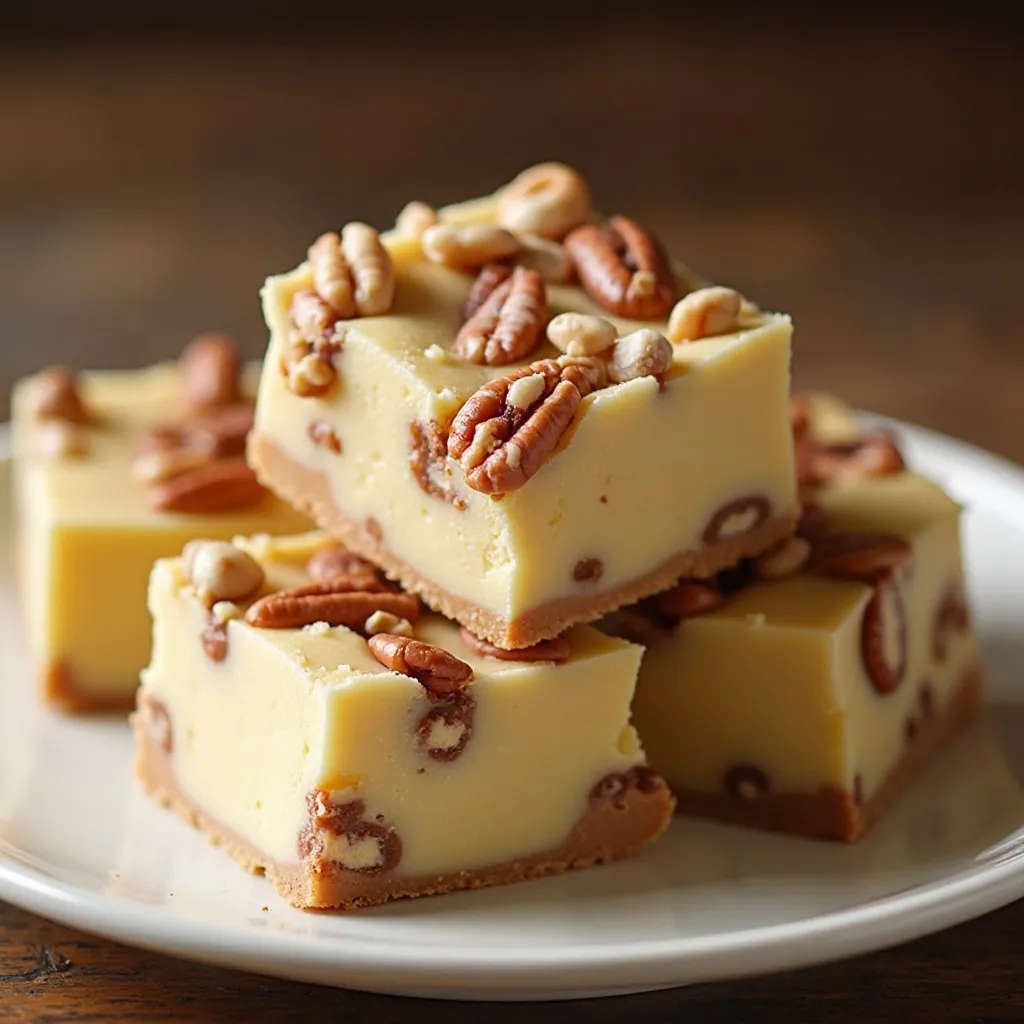
Key Ingredients for Maple Pecan Fudge
- 3 cups white chocolate chips
- 1 can (14 oz) sweetened condensed milk
- ⅓ cup pure maple syrup
- ¼ teaspoon salt
- 1 teaspoon maple extract
- 1 ½ cups chopped pecans, toasted
- Additional pecans for topping
Step-by-Step Instructions
Prepare Pan
Line an 8×8-inch square pan with parchment paper, leaving overhang on two sides for easy removal.
Melt Chocolate Base
In a medium saucepan over low heat, combine white chocolate chips, sweetened condensed milk, maple syrup, and salt. Stir constantly until chips are completely melted and mixture is smooth.
Add Flavor and Nuts
Remove from heat and stir in maple extract and chopped pecans. Mix thoroughly to distribute nuts evenly.
Set the Fudge
Pour mixture into prepared pan and spread evenly. Press additional pecan halves on top for decoration. Refrigerate for at least 2 hours until firm.
Cut and Serve
Use parchment overhang to lift fudge from pan. Cut into 1-inch squares using a sharp knife. Store in an airtight container.
5. Cranberry Orange Energy Bites
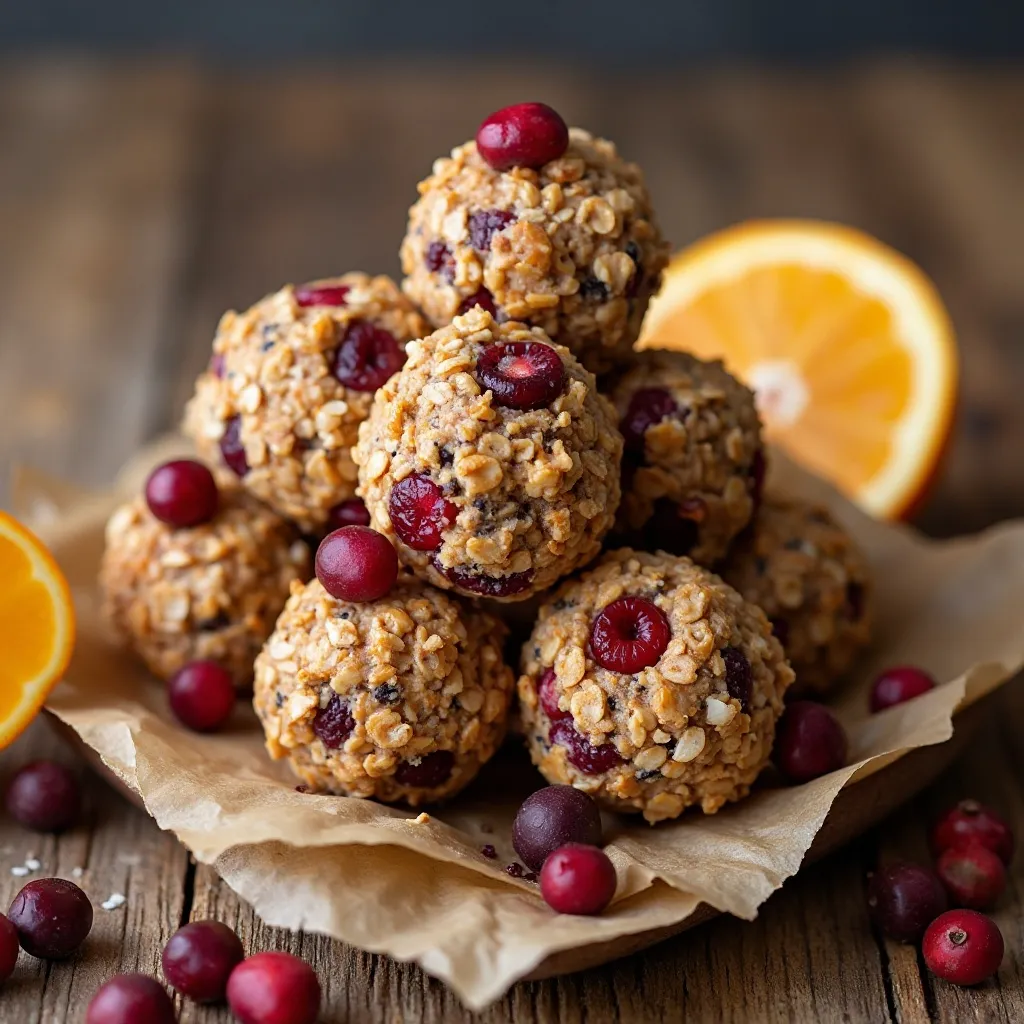
Key Ingredients for Cranberry Orange Energy Bites
- 1 cup old-fashioned oats
- ½ cup dried cranberries
- ½ cup almond butter or peanut butter
- ⅓ cup honey
- ¼ cup ground flaxseed
- 2 tablespoons orange zest
- 1 teaspoon vanilla extract
- Pinch of salt
- ¼ cup mini chocolate chips (optional)
Step-by-Step Instructions
Combine All Ingredients
In a large bowl, mix together oats, cranberries, nut butter, honey, flaxseed, orange zest, vanilla, and salt. Stir until everything is well combined and the mixture holds together when pressed.
Chill the Mixture
Cover bowl and refrigerate for 30 minutes. This makes the mixture easier to roll and helps the balls hold their shape.
Roll Into Balls
Using a small cookie scoop or your hands, roll mixture into 1-inch balls. You should get about 20-24 bites.
Store Properly
Place energy bites in an airtight container with parchment paper between layers. Refrigerate until ready to gift.
6. Pumpkin Spice Puppy Chow (Muddy Buddies)
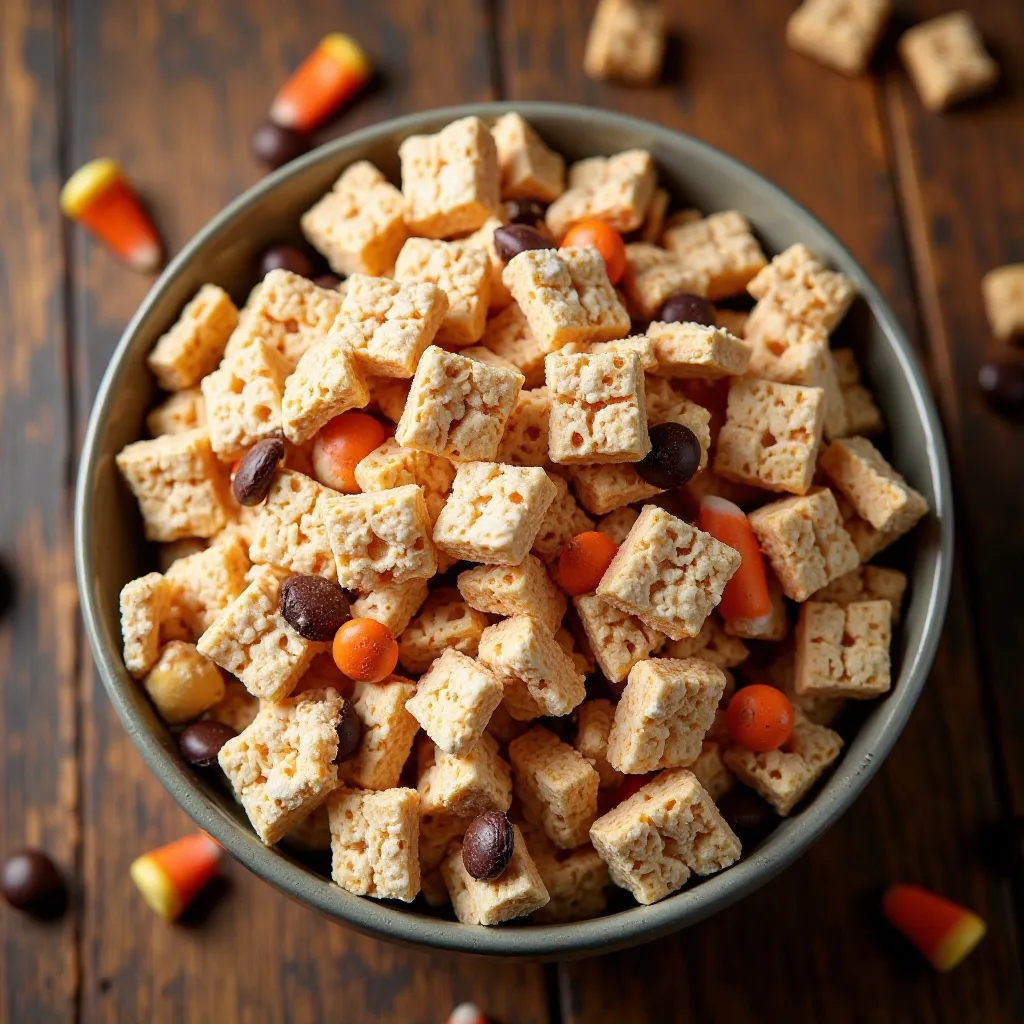
Key Ingredients for Pumpkin Spice Puppy Chow
- 9 cups Rice Chex cereal
- 1 ½ cups white chocolate chips
- ½ cup pumpkin puree
- 3 tablespoons butter
- 1 teaspoon pumpkin pie spice
- 2 cups powdered sugar
- Orange and brown M&Ms or candy corn
Step-by-Step Instructions
Prepare Cereal
Pour Chex cereal into a large bowl and set aside.
Melt Chocolate Mixture
In a microwave-safe bowl, combine white chocolate chips, pumpkin puree, butter, and pumpkin pie spice. Microwave in 30-second intervals, stirring between each, until smooth and melted.
Coat Cereal
Pour melted mixture over cereal and gently stir until all pieces are evenly coated.
Add Powdered Sugar
Place powdered sugar in a large ziplock bag. Add coated cereal, seal bag, and shake vigorously until all pieces are coated in powdered sugar.
Add Candy and Cool
Spread on parchment paper to cool. Mix in M&Ms or candy corn once completely cool.
7. Thanksgiving Trail Mix
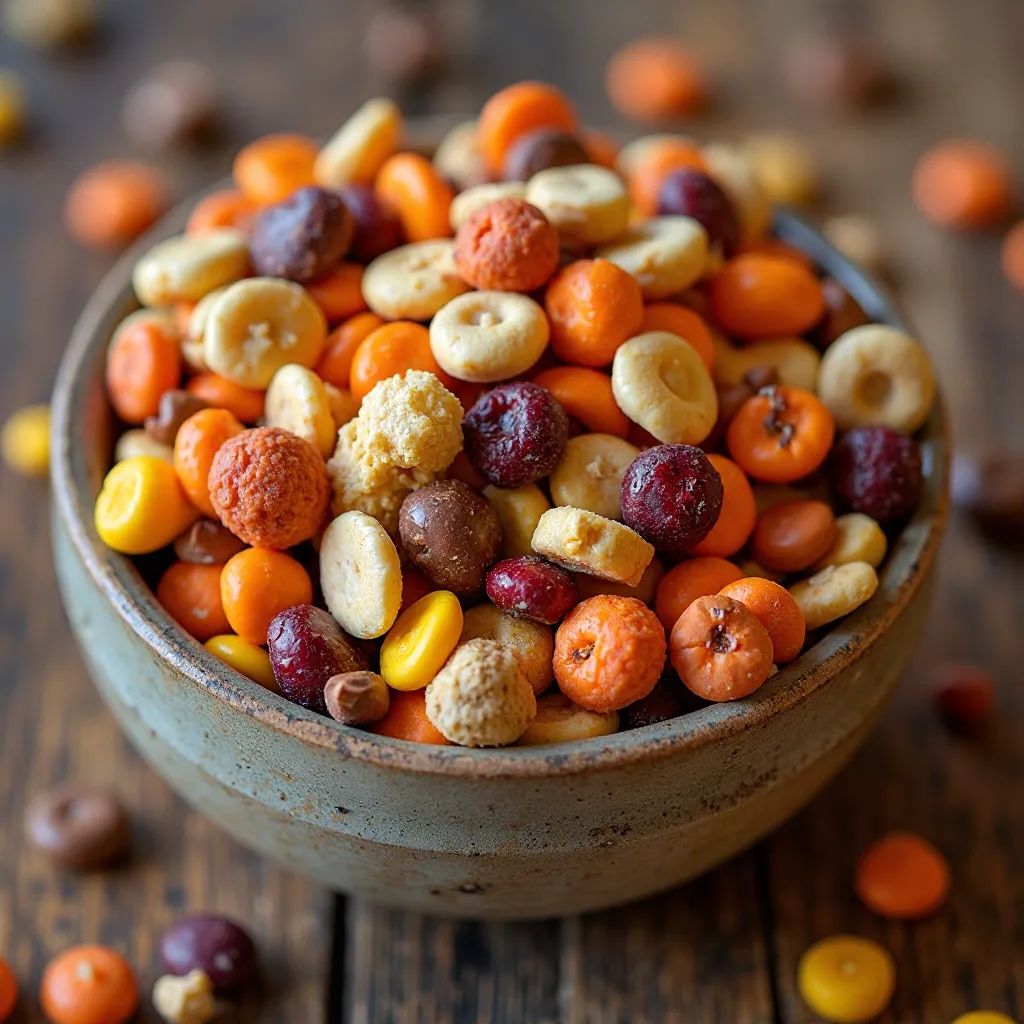
Key Ingredients for Thanksgiving Trail Mix
- 2 cups honey roasted peanuts
- 1 cup dried cranberries
- 1 cup candy corn
- 1 cup chocolate chips
- 1 cup pretzel pieces
- 1 cup candy-coated chocolates (fall colors)
- ½ cup pumpkin seeds (pepitas)
- ½ cup yogurt-covered raisins
Step-by-Step Instructions
Simple Assembly
In a large bowl, combine all ingredients and mix thoroughly until evenly distributed.
Portion Into Bags
Divide trail mix into individual servings using small cellophane bags or mason jars. This makes about 8-10 teacher-sized portions.
Customize Colors
For Thanksgiving, use orange, yellow, and brown candies to keep with the fall theme.
Add a Personal Touch
Attach a tag with a cute saying like “We’re so thankful for you!” or “Thanks for helping us grow!”
8. Apple Cider Caramels
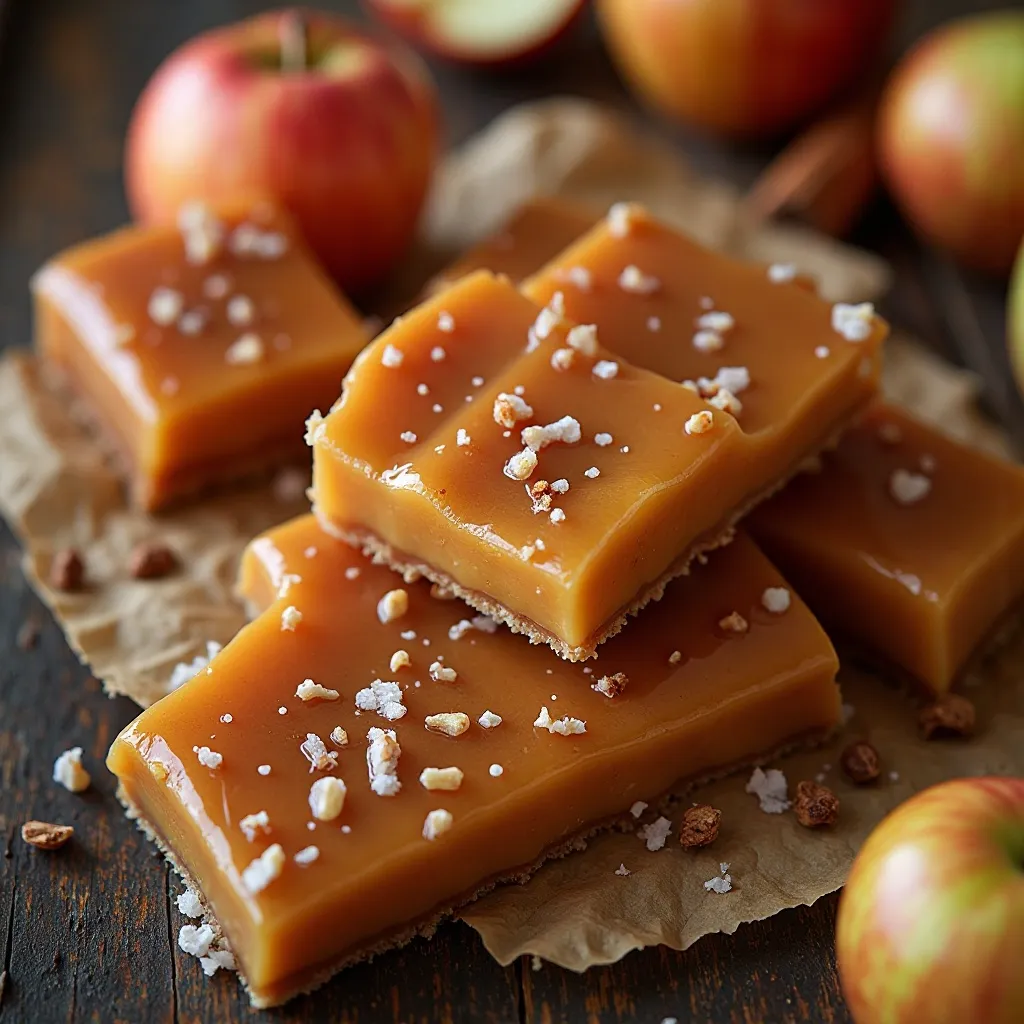
Key Ingredients for Apple Cider Caramels
- 2 cups apple cider
- 1 cup heavy cream
- ½ cup light corn syrup
- 1 ½ cups granulated sugar
- 4 tablespoons butter
- 1 teaspoon vanilla extract
- ½ teaspoon cinnamon
- ½ teaspoon sea salt
Step-by-Step Instructions
Reduce Apple Cider
In a small saucepan, boil apple cider over medium-high heat until reduced to ¼ cup, about 20-25 minutes. Watch carefully to prevent burning.
Prepare Pan
Line an 8×8-inch pan with parchment paper and spray with cooking spray.
Make Caramel
In a large heavy-bottomed saucepan, combine reduced cider, cream, corn syrup, sugar, and butter. Cook over medium heat, stirring until sugar dissolves.
Monitor Temperature
Attach a candy thermometer and cook without stirring until mixture reaches 250°F (hard ball stage), about 15-20 minutes.
Finish and Pour
Remove from heat and stir in vanilla, cinnamon, and salt. Pour into prepared pan and let cool completely at room temperature.
Cut Caramels
Once set (about 4 hours), cut into small squares using a greased knife. Wrap each caramel in wax paper squares.
9. Chocolate Covered Pretzel Turkeys
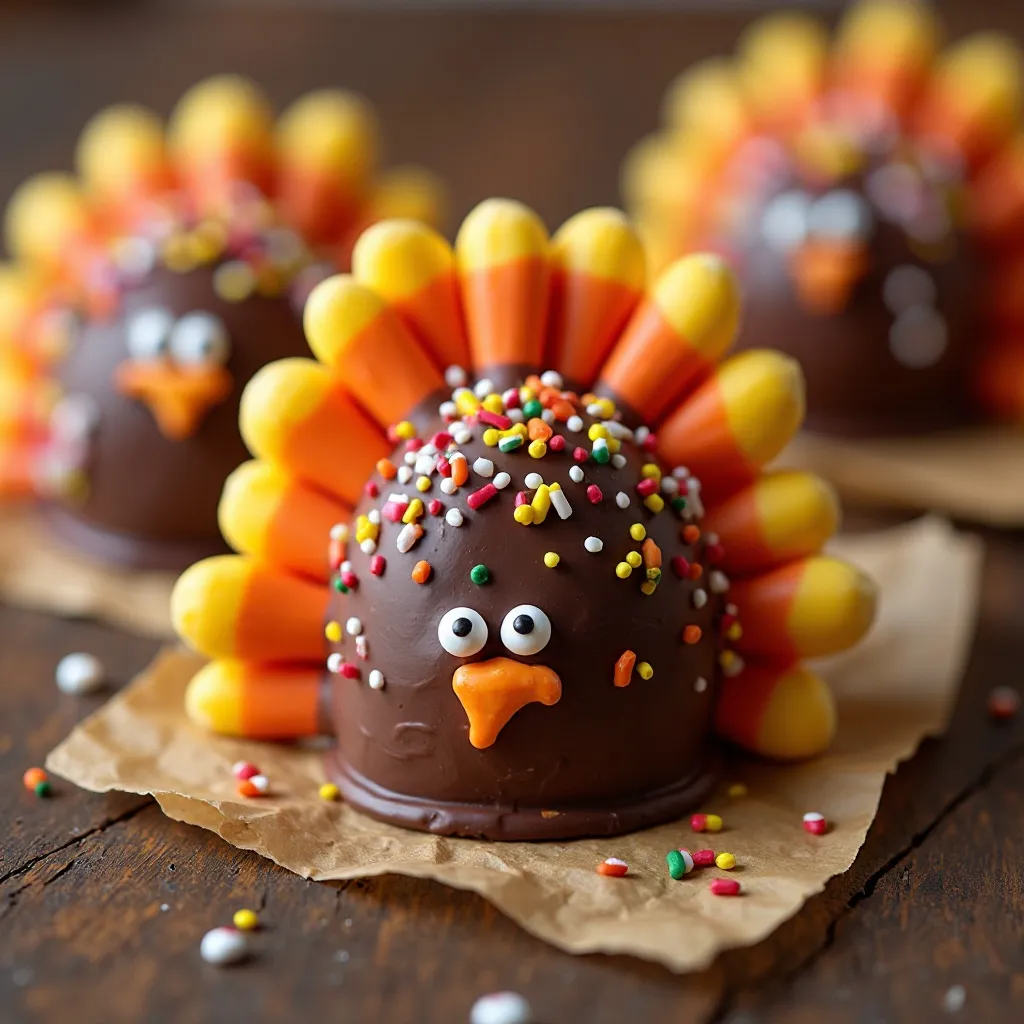
Key Ingredients for Chocolate Covered Pretzel Turkeys
- 24 pretzel twists
- 12 oz chocolate chips (milk, dark, or white)
- Candy corn
- Candy eyes
- Mini chocolate chips for mouth
- Fall-colored sprinkles
Step-by-Step Instructions
Melt Chocolate
Melt chocolate chips in microwave in 30-second intervals, stirring between each until smooth.
Dip Pretzels
Dip each pretzel twist in melted chocolate, coating about ¾ of the pretzel. Let excess drip off.
Create Turkey Design
Place dipped pretzel on parchment paper. While chocolate is still wet, add 3-4 pieces of candy corn along the top edge to create “feathers.”
Add Face Details
Place two candy eyes in the center and a mini chocolate chip as the mouth. You can use a small piece of orange candy for the beak.
Let Set
Allow chocolate to harden completely at room temperature or speed up the process by refrigerating for 15 minutes.
10. Pumpkin Spice Granola Bars
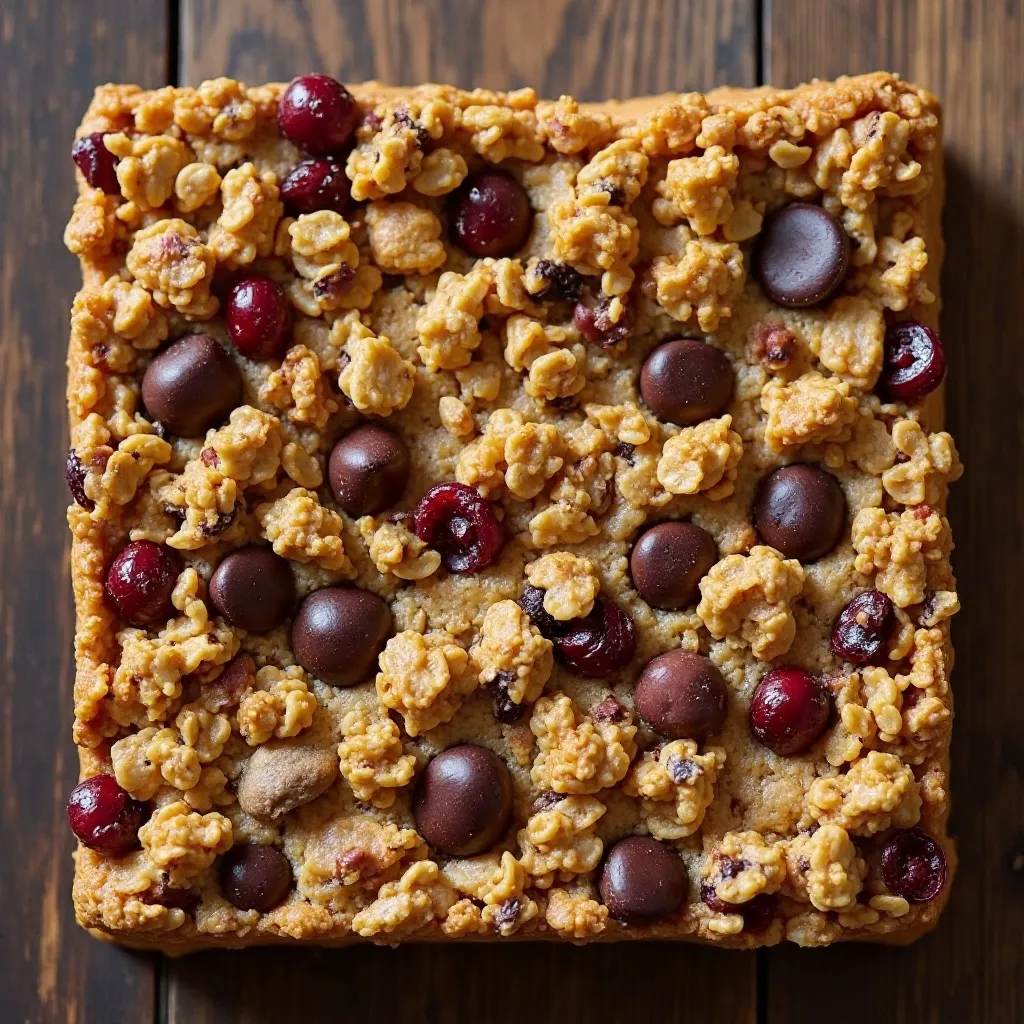
Key Ingredients for Pumpkin Spice Granola Bars
- 3 cups old-fashioned oats
- 1 cup chopped pecans or walnuts
- ½ cup pumpkin puree
- ½ cup honey
- ¼ cup coconut oil
- 1 teaspoon vanilla extract
- 2 teaspoons pumpkin pie spice
- ½ teaspoon salt
- ½ cup dried cranberries
- ½ cup chocolate chips
Step-by-Step Instructions
Toast Oats and Nuts
Preheat oven to 350°F (175°C). Spread oats and nuts on a baking sheet and toast for 8-10 minutes, stirring halfway through.
Make Binding Mixture
In a saucepan, warm pumpkin puree, honey, and coconut oil over medium heat until combined. Stir in vanilla, pumpkin pie spice, and salt.
Combine Everything
In a large bowl, mix toasted oats and nuts with cranberries. Pour pumpkin mixture over and stir until everything is evenly coated. Fold in chocolate chips.
Press and Bake
Press mixture firmly into a parchment-lined 9×13-inch pan. Bake at 325°F (160°C) for 25-30 minutes until edges are golden.
Cool and Cut
Let cool completely in pan before cutting into bars. This is crucial—cutting too early will cause them to crumble.
What to Serve Thanksgiving Treats for Teachers With
These treats are designed to stand alone as complete gifts, but here are some thoughtful pairing ideas:
Coffee or Tea Selections: Include a small bag of gourmet coffee or an assortment of fall-flavored tea bags. Pumpkin spice treats pair beautifully with chai or cinnamon tea.
Apple Cider: Attach a packet of instant apple cider mix to your treat package for a complete autumn experience.
Recipe Cards: Include the recipe card so teachers can recreate their favorite treats at home. This adds a personal, thoughtful touch.
Gratitude Notes: Pair treats with handwritten notes from students expressing specific things they’re thankful for about their teacher.
Fall-Themed Packaging: Present treats in mason jars, decorative tins, or boxes lined with autumn-colored tissue paper. Add ribbon in fall colors and a tag with “Happy Thanksgiving.”
Classroom Supplies: For an extra thoughtful gesture, include a gift card to a teacher supply store or some practical classroom items alongside the treats.
Top Tips for Perfecting Thanksgiving Treats for Teachers
Plan Your Baking Schedule
Don’t try to make everything in one day. Spread baking over several days—many treats actually taste better after sitting for 24 hours. Fudge, cookies, and granola bars can be made up to a week in advance.
Test for Allergies First
Discreetly check with the school office or other parents about food allergies. Many schools maintain lists of student and teacher allergies for exactly this reason.
Use Quality Ingredients
Since these are gifts, spring for real vanilla extract, good chocolate, and pure maple syrup. Teachers will notice the difference in taste.
Proper Cooling is Critical
Rushing the cooling process leads to melted chocolate, crumbly bars, and sticky caramels. Be patient—set aside enough time for treats to cool and set properly.
Double-Wrap for Freshness
Wrap treats twice—once in plastic wrap or wax paper, then again in decorative packaging. This keeps them fresh longer and looks more polished.
Label Everything Clearly
Include ingredient lists on gift tags, especially for common allergens like nuts, dairy, and gluten. This shows consideration and helps teachers make informed choices.
Keep It Simple
If you’re making treats for multiple teachers, choose 2-3 recipes and make larger batches rather than attempting all 10. Quality over quantity always wins.
Temperature Matters
Room temperature ingredients (especially butter and eggs) mix more smoothly and create better texture. Set them out 30 minutes before baking.
Invest in Good Packaging
Dollar stores carry affordable cellophane bags, mason jars, and decorative boxes. Good packaging elevates even simple treats into impressive gifts.
Make It Personal
Have your child decorate gift tags or include a photo of them helping make the treats. Teachers cherish these personal touches more than perfection.
Storing and Reheating Tips
Cookie Storage: Store cookies in airtight containers at room temperature for up to 5 days. Layer with parchment paper to prevent sticking. For longer storage, freeze for up to 3 months.
Fudge and Caramels: Keep in airtight containers in the refrigerator for up to 2 weeks. Bring to room temperature before serving for best texture. Fudge freezes well for up to 3 months.
Cheesecake Bites: Must be refrigerated. Store in airtight containers for up to 4 days. These don’t freeze well due to the whipped cream topping, so make them closer to delivery day.
Popcorn Mix and Puppy Chow: Store at room temperature in airtight containers for up to 2 weeks. Avoid refrigeration as it can make them soggy.
Energy Bites and Granola Bars: Refrigerate in airtight containers for up to 2 weeks or freeze for up to 3 months. These actually taste great cold!
Trail Mix: Room temperature storage in airtight containers for up to 3 weeks. The low moisture content keeps it fresh longer than most treats.
Chocolate-Covered Items: Store in cool, dry places. Refrigerate in hot weather but bring to room temperature before serving to prevent condensation.
General Freezing Tip: Almost all these treats freeze beautifully. Wrap individual portions in plastic wrap, then place in freezer bags with dates labeled. Thaw overnight in the refrigerator before gifting.
Nutrition Information
Here’s approximate nutritional information per serving for each treat:
| Treat Name | Calories | Total Fat | Carbs | Protein | Fiber | Sugar |
|---|---|---|---|---|---|---|
| Pumpkin Spice Cookies (1 cookie) | 140 | 7g | 19g | 2g | 1g | 12g |
| Caramel Apple Popcorn (1 cup) | 180 | 8g | 27g | 2g | 2g | 18g |
| Mini Cheesecake Bite (1 piece) | 165 | 11g | 14g | 3g | 0g | 11g |
| Maple Pecan Fudge (1 piece) | 110 | 6g | 13g | 2g | 1g | 11g |
| Energy Bites (2 pieces) | 130 | 6g | 17g | 3g | 2g | 9g |
| Pumpkin Puppy Chow (½ cup) | 200 | 6g | 35g | 2g | 1g | 22g |
| Trail Mix (¼ cup) | 150 | 8g | 18g | 4g | 2g | 13g |
| Apple Cider Caramel (2 pieces) | 90 | 3g | 15g | 0g | 0g | 13g |
| Pretzel Turkey (1 piece) | 85 | 4g | 12g | 1g | 0g | 8g |
| Granola Bar (1 bar) | 170 | 8g | 23g | 4g | 3g | 11g |
Note: Nutrition information is approximate and varies based on specific brands and ingredient choices.
Frequently Asked Questions
How far in advance can I make these thanksgiving treats for teachers?
Most of these treats can be made 3-5 days in advance. Cookies, fudge, granola bars, and trail mix actually improve with time. Make cheesecake bites no more than 2 days ahead to ensure freshness. Chocolate-covered pretzels can be made a week early if stored properly.
What are the best nut-free options for teachers with allergies?
The pumpkin puppy chow, pumpkin cookies, cheesecake bites, pretzel turkeys, and trail mix (made without nuts) are all excellent nut-free options. You can substitute sunflower seed butter in the energy bites for a completely nut-free version.
How should I package these treats for teachers?
Cellophane bags tied with ribbon work beautifully for cookies and popcorn. Mason jars are perfect for trail mix and energy bites. Use small bakery boxes lined with tissue paper for delicate items like cheesecake bites. Always include an ingredient list on the package.
Can these recipes be made gluten-free?
Yes! The energy bites, trail mix (without pretzels), fudge, and caramels are naturally gluten-free. For cookies and granola bars, substitute 1:1 gluten-free flour. Use gluten-free pretzels and Rice Chex for those recipes.
What’s the estimated cost per teacher for these treats?
On average, you can create a beautiful gift package for $5-8 per teacher when making treats in bulk. This includes ingredients and basic packaging materials. Compare this to $15-25 for store-bought gift baskets.
Should I worry about making treats for teachers who are dieting?
Include a variety in your gift—pair indulgent treats with healthier options like energy bites or granola bars. Teachers appreciate the thoughtfulness regardless and can always share with family or save for later.
How do I transport these treats to school safely?
Use sturdy containers or boxes to prevent crushing. Keep cold items like cheesecakes in an insulated bag with ice packs. Transport chocolate-covered items in cooler weather or with cooling packs to prevent melting.
Can kids help make these treats?
Absolutely! Most of these recipes are kid-friendly. Let them measure ingredients, stir batters, roll energy bites, or decorate pretzel turkeys. It’s a wonderful way to teach gratitude and kitchen skills.
What if the teacher doesn’t eat sweets?
Consider making the trail mix with less candy, the granola bars with less sweetener, or the energy bites (which are relatively healthy). You could also pair a small treat with a gift card or classroom supplies.
Are these treats appropriate for all grades?
Yes! From preschool to high school, teachers of all grade levels appreciate homemade treats. Adjust packaging sophistication to match—cute and colorful for elementary, more elegant for older grades.
Creative Presentation Ideas
The Gratitude Jar: Layer different treats in a large mason jar—puppy chow on bottom, trail mix in middle, cookies on top. Attach a “Jar of Thanks” label.
Thanksgiving Treat Tower: Stack small bakery boxes filled with different treats, tied together with fall ribbon. Each box contains a different recipe.
Apple Basket Theme: Present treats in a small decorative basket with fake autumn leaves and a mini pumpkin as decoration.
Teacher Survival Kit: Package treats with coffee, tea, and a funny tag about “surviving” parent-teacher conferences or report card season.
Recipe Box Gift: Include treats along with printed recipe cards in a decorative box, so teachers can recreate favorites.
Making Treats More Special
Handwritten Notes: Have your child write what they’re thankful for about their teacher. These notes often mean more than the treats themselves.
Class Collaboration: Coordinate with other parents to create a larger gift basket featuring everyone’s homemade treats.
Photo Tags: Attach photos of your child making the treats. Teachers love seeing students engaged in thoughtful activities.
Themed Packaging: Use fall colors, attach cinnamon sticks with ribbon, or include small decorative elements like miniature pinecones.
Delivery Timing: Drop off treats the week of Thanksgiving, not too early (treats get stale) or too late (teachers may have left for break).
Final Thoughts
These 10 thanksgiving treats for teachers combine simplicity, affordability, and heartfelt appreciation into delicious packages that truly stand out. Whether you’re an experienced baker or just starting out, these recipes accommodate all skill levels while delivering impressive results.
The real magic happens when your child participates in making these treats. They learn that gratitude isn’t just words—it’s action. They discover that homemade gifts carry more meaning than anything bought off a store shelf.
This Thanksgiving, skip the generic gift cards and mass-produced gift baskets. Instead, invest a little time creating something from your kitchen and your heart. Your child’s teacher has invested countless hours in their education and growth—these treats are a small but meaningful way to say thank you.
Remember, it’s not about perfection. It’s about appreciation. Even if your cookies aren’t perfectly round or your fudge has a few cracks, the thought and effort shine through. Teachers see past imperfections to the gratitude behind them.
Now gather your ingredients, enlist your little helpers, and start creating treats that’ll make this Thanksgiving one your child’s teacher will remember. Happy baking, and happy Thanksgiving!
Pin this post for later! Save these 10 thanksgiving treats for teachers to your Pinterest boards and share with other parents looking for meaningful, affordable teacher appreciation ideas!